How to Boot Windows 11 System in Safe Mode?
Introduction
Windows 11 has many strong features and tools that focus on ensuring strong OS performance. However, like others, it is not always safe from certain system issues, like bad drivers, malware problems, or bug-based errors. At this point, you can use third-party software like IObit Driver Booster to fix specific problems like defective drivers.
Yet, you should still know how to boot in Safe Mode, where the system operates with just the main fundamental apps and drivers. If the system goes through issues like sudden freeze, slow performance, or startup lag, restarting in Safe Mode allows users to find the error source while the system runs safely.
This guide highlights the different steps one can take to do this action. If that is what you want to know, read ahead.
Methods to Boot in Safe Mode for Windows 11
There are many security protocols available for Windows 11 systems. The Windows 11 boot into Recovery mode process includes Safe Mode as one of the best safety measures for beginner-level users and more technical experts. We created this guide with appropriate steps, detailing different approaches possible.
Method 1: Boot to Safe Mode via Start Menu
Going through the Start Menu is one of the quickest and simplest methods to activate Safe Mode on Windows 11 devices.
How to do this?
Step 1: Click on the Start menu or Windows icon available on the taskbar.
Step 2: Then, click your cursor on the Power button.
Step 3: Press down the Shift key and hold. Then, while holding the Shift key in the same position, you should press the Restart button.
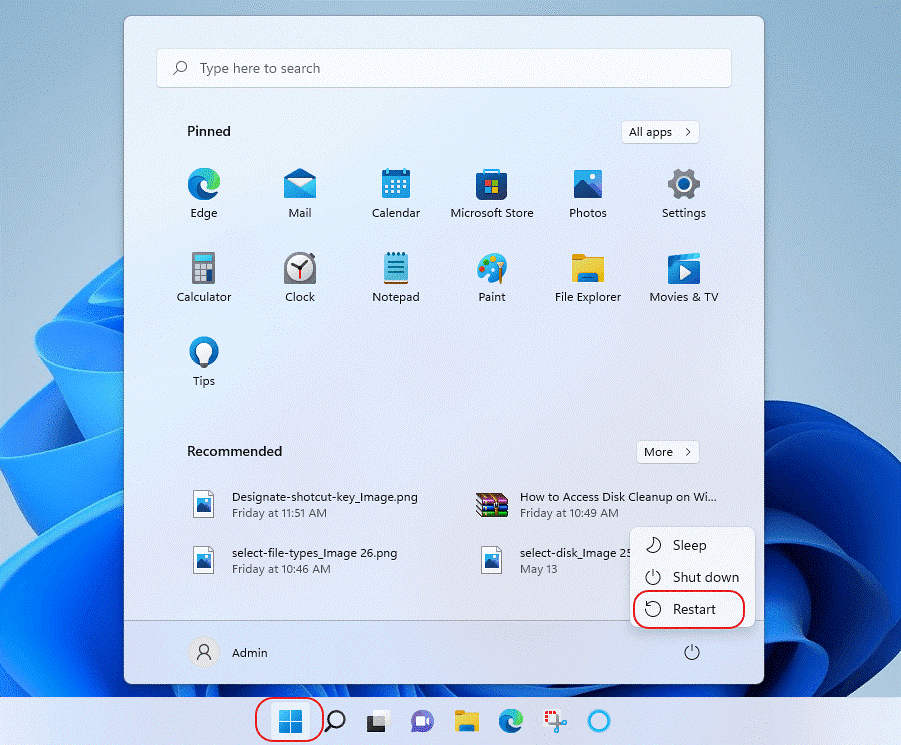
Step 4: After the PC restarts, open the “Choose an option” tab and press “Troubleshoot” from the list.
Step 5: Press Advanced Settings and click on the “Startup Settings” option.
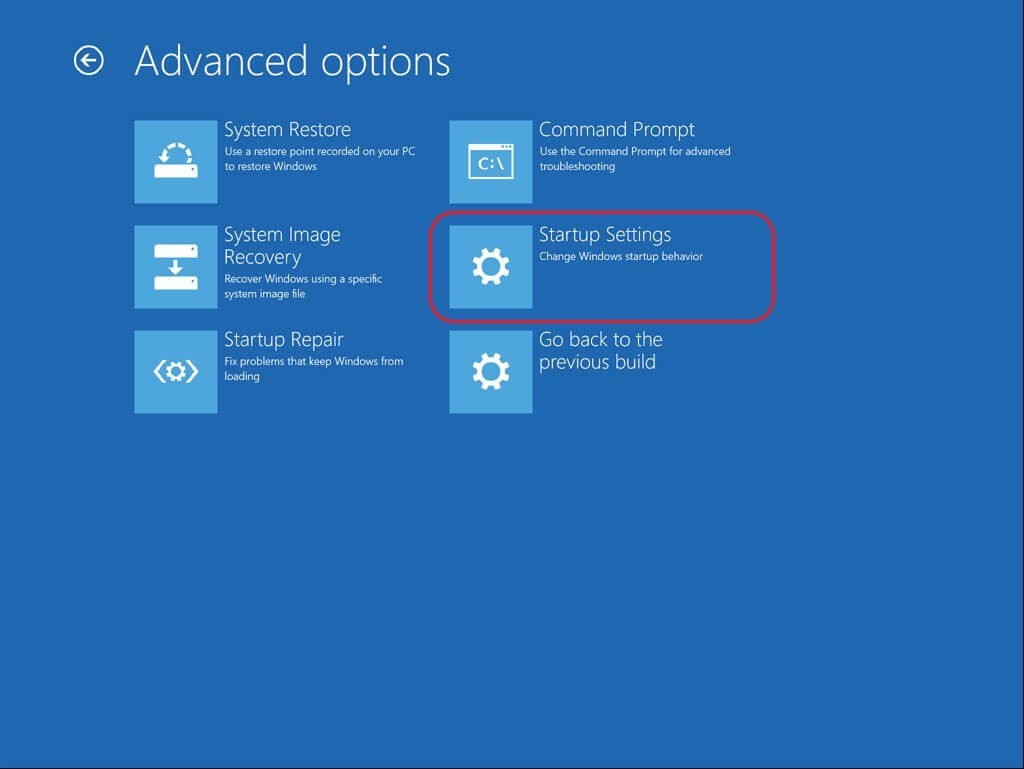
In case that is unavailable on your device settings, find the “See more recovery options” choice on the Advanced Options screen and press it.
Step 6: Press the Restart button.
Step 7: In the next window, three options will appear:
- Enable Safe Mode with Networking
- Enable Safe Mode
- Enable Safe Mode with Command Prompt

Select the Safe Mode type you want to activate on your device after the restart.
Method 2: Pressing the Shift + Restart icons
One of the easiest ways of converting a PC system into its Safe Mode form is to use Restart and Shift keys together. This is simple to carry out, even for complete beginners.
How to do this?
Step 1: Press the Windows icon on the taskbar. Then, click your cursor on the Power icon.
Step 2: Press down and hold your cursor on the Shift key. Choose the “Restart” option at the same time.
Step 3: As you hold the button down, you will see Windows 11 boot into Recovery mode.
Step 4: Open the Start menu and click on the System tab under Settings. Then, click on Recovery > Advanced Startup > Restart Now.
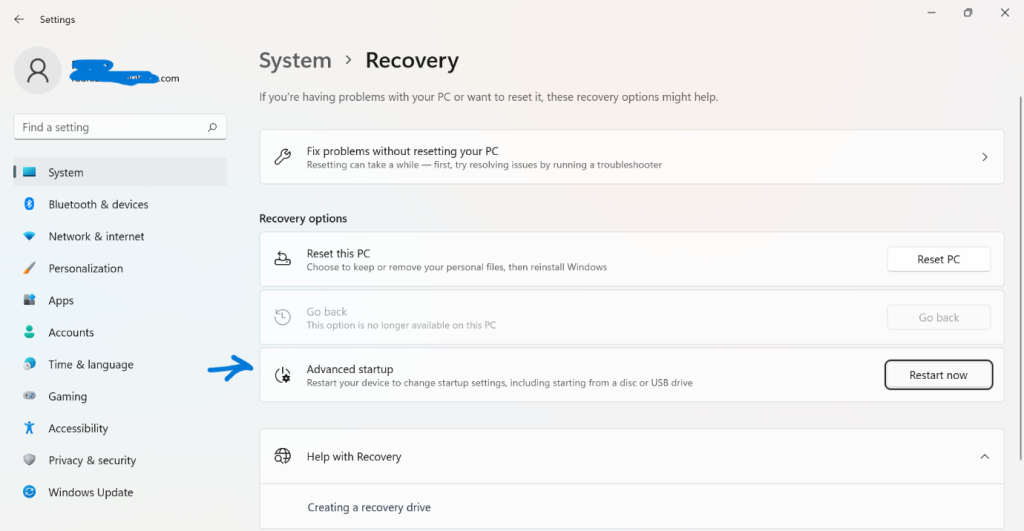
Step 5: The three options Safe Mode booting would appear. Choose between them and click on F6, F5, or F4 keys, depending on your specific booting needs.
Method 3: Through the Sign-in Screen
While starting the system through the Power button, users have to go to the sign-in screen. However, at this point, avoid logging in and go into the Safe Mode through specific steps.
How to do this?
Step 1: Press the Power button.
Step 2: Press + hold down the Shift key on your keyboard.
Step 3: After that, choose the “Restart” option. This would activate the Windows 11 booting process and let the OS enter WinRE mode.
Step 4: Following the Windows 11 boot into Recovery mode, access the Safe Mode.
Method 4: Use the Advanced Startup function through Windows 11
In the context of how to boot in Safe Mode, another usable method is using the Advanced Startup tool. This feature is available on Windows 11, which users can operate to configure settings or troubleshoot certain processes while the OS is still running. It is also useful for booting the operating system into the Safe recovery mode.
How to do this?
Step 1: Press the Windows and I keys together on the keyboard. Or, access the Start menu and select Settings.

Step 2: Click on System > Recovery.
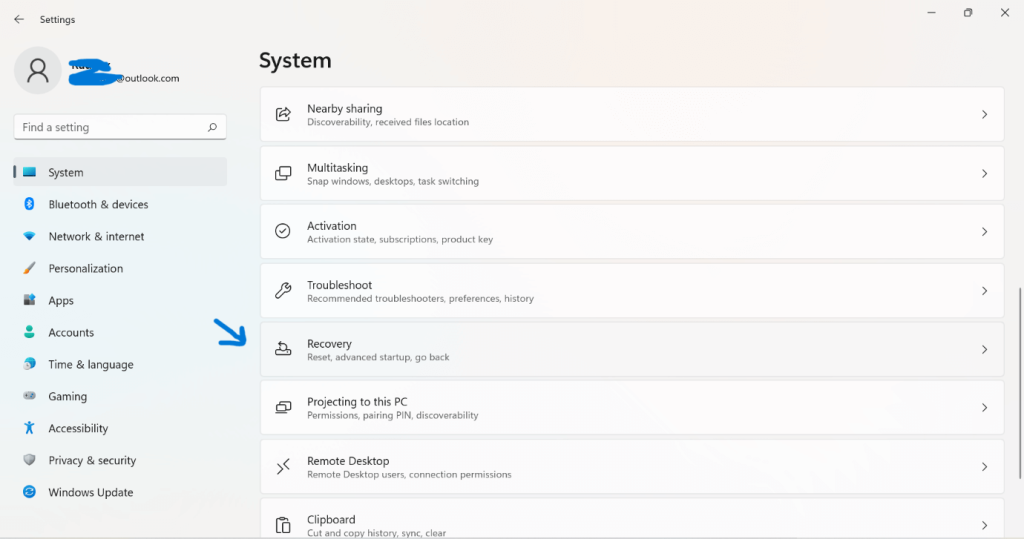
Step 3: Under the next menu, choose Advanced Startup.
Step 4: This would provide you with a warning prompt stating how the system would begin restarting instantly, and you should save all your work before rebooting.
Click on the “Restart Now” button.
Step 5: The PC would restart. After it does, choose the Troubleshoot tab. Then, click on Advanced Options > Startup Setting.
Step 6: Press Restart and let the device boot up.
Step 7: After the full booting process ends, you should choose the Safe Mode you want to use.
Method 5: Use the Recovery Drive
One of the most popular ways how to boot in Safe Mode you can use is with a USB recovery drive you prepared to restart the PC in Safe Mode. If there is none previously available, you can create a USB-based bootable recovery drive first in another system. Then, you boot Windows 11 to Safe Mode through a USB connection with the system.
How to do this?
Step 1: The PC would boot up via the USB drive.
Step 2: Make your preferred choice from the list that comes up under the “Choose your keyboard layout” screen.

Step 3: Then, the “Choose an option” section would open another window. Click on Troubleshoot.
Step 4: Follow the steps to open Startup Settings and choose your preferred type of Safe Mode option.
Method 6: Stop Normal Booting to Go into Safe Mode
There are multiple protective measures in place for Windows 11 to perform well. One of the protocols is that the system activates its failsafe repair mode when there are many critical OS-based problems available. The system modes into this mode when users notice three booting attempts end in failure for some reason.
Thus, one must interrupt regular PC booting the same way to get into the Safe Mode.
Step 1: While you turn on the PC, press your finger down on the Power button while it starts booting up for 4-5 seconds. This will turn the device off.
Step 2: Do Step 1 twice more, and the system will go into the Automatic Repair Mode.
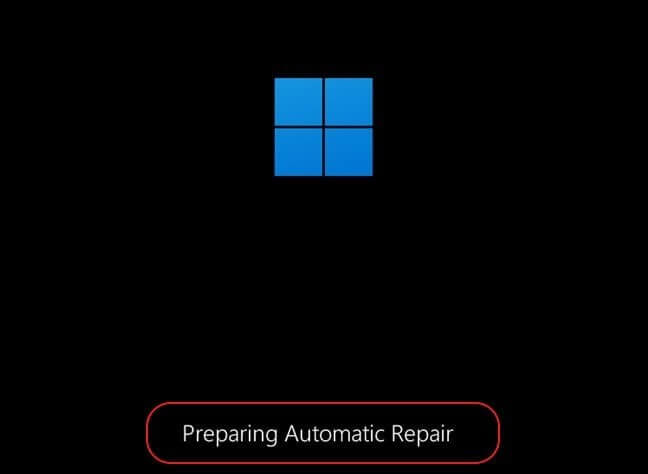
Step 3: The operating system would run internal diagnostics. Please wait for it to complete.
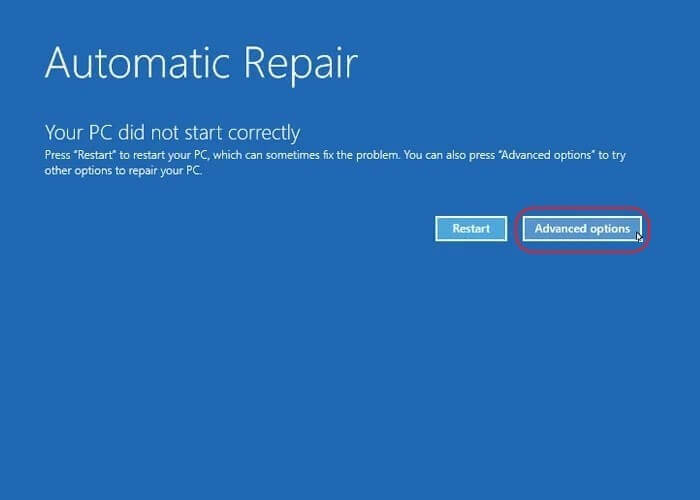
Step 4: Next, the “Automatic Repair” window would appear. Choose the Advanced Options button and click on it.
Step 5: Then, press the Troubleshoot option and click on Advanced Options under it. Choose Startup Settings next and click on it.
Step 6: Under the Startup Settings windows, press the Restart button. Select the Safe Mode-based action you want and run it.
Method 7: Use Command Prompt
You can go through the Command Prompt section and act as a PC administration to rectify specific system issues. Likewise, it is also possible to boot into Safe Mode through this route.
How to do this?
Step 1: Press the Search icon on the taskbar.
Step 2: Type the term ‘cmd’ in the text field and press Enter.
Step 3: Select the “Run as Administrator” option.
Step 4: On the windows that appear for CMD, type the next command:
shutdown.exe /r /o

Click on Enter button on your keyboard.
Step 5: The Window 11 would boot into Recovery Mode within some time. Then, select your preferred Safe Mode action in the WinRE environment.
Method 8: Making changes in System Configuration
You can make certain changes to the system configuration through the window mentioned above. This is a suitable method if you are wondering how to boot in Safe Mode every time the system restarts. Plus, the process allows direct activation of Safe Mode without going into the Recovery environment all the time.
How to do this?
Step 1: Press the Windows and R keys on the keyboard to access the Run dialog box.
Step 2: Type the term “msconfig” and then click on the OK button.
Step 3: Press the Boot tab when the System Configuration window options. Then, press the tick box beside the “Safe Boot” option.
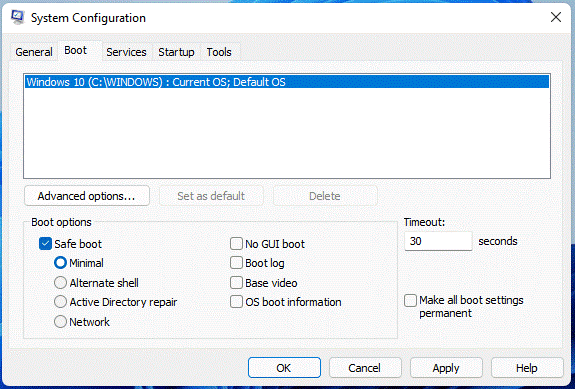
Step 4: Click on OK and then the Restart button. After that, your system would go into Safe Mode whenever you reboot.
Conclusion
For a safe way regarding the Windows 11 boot into Recovery mode process, the Safe Mode is highly valuable and efficient if you carry out the steps carefully. The methods listed here are tested sequences- follow the steps cautiously to avoid any errors.
Popular Post
Recent Post
Supercharge Your Productivity: A Solopreneur’s and SMB’s Guide to Mastering Google Workspace with Gemini’
Picture this. It’s Monday morning. You open your laptop. Email notifications flood your screen. Your to-do list has 47 items. Three clients need proposals by Friday. Your spreadsheet crashed yesterday. The presentation for tomorrow’s meeting is half-finished. Sound familiar? Most small business owners live this reality. They jump between apps. They lose files. They spend […]
9 Quick Tips: How To Optimize Computer Performance
Learn how to optimize computer performance with simple steps. Clean hard drives, remove unused programs, and boost speed. No technical skills needed. Start today!
How To Speed Up My Computer/Laptop Windows 11/10 [2025]
Want to make your computer faster? A slow computer can be really annoying. It takes up your time and makes work more difficult. But with a few easy steps, you can improve your laptop’s speed and make things run more smoothly. Your computer slows down over time. Old files pile up. Programs start with Windows. […]
How To Fix Low Disk Space Error Due To A Full Temp Folder
A low disk space error due to a full temp folder is a common problem. Many users face this issue daily. Your computer stores temporary files in special folders. These files ensure optimal program performance, but they can accumulate as time goes on. When temp folders get full, your system slows down. You might see […]
How to Use Disk Cleanup on This Computer: Step-by-Step Guide
Computers getting slow is just the worst, right? Well, yes! Files pile up on your hard drive. Luckily, the Disk Cleanup tool on your PC is here to save the day. It clears out unnecessary files, giving your system the boost it needs to run smoothly again. A lot of users aren’t aware of the […]
Top 25 Computer Maintenance Tips: Complete Guide [2025]
Computer maintenance tips are vital for every PC user. Without proper PC maintenance, your system will slow down. Files can get lost. Programs may crash often. These computer maintenance tips will help you avoid these problems. Good PC maintenance keeps your computer running fast. It makes your hardware last longer. Regular computer maintenance tips can […]
Reclaiming Disk Space On Windows Without Losing Files: A Complete Guide
Running low on storage can slow down programs and trigger that annoying “low disk space” warning. Files accumulate over time, cluttering the drive. The good news? It’s possible to reclaim space without deleting anything important. Reclaiming disk space on Windows without losing files is easier than you think. Your computer stores many temporary files, old […]
Fix Issues Downloading From the Microsoft Store on Windows 11, 10 PC
Do you get excited when you’re about to download a new app or game? You open the Microsoft Store, click the download button… but nothing happens. Or maybe it starts and then suddenly stops. Sometimes, strange messages pop up like “Something happened on our end” or “Try again later.” That can be really annoying. But […]
Fix Low Disk Space Errors Quickly On Windows 11, 10 PC [2025]
Low disk space errors can slow down your Windows PC. These errors appear when your hard drive runs out of room. Your computer needs space to work properly. When space runs low, programs crash and files won’t save. Windows shows warning messages about low disk space. Your PC may freeze or run slowly. You might […]
How To Uninstall Software From My Computer: Complete Guide [2025]
Learning how to uninstall software from my computer is a key skill. Every PC user needs to know this. Old programs take up space. They slow down your system. Unused software creates clutter. When you remove a program from computer, you free up storage. Your PC runs faster. You also fix issues caused by bad […]


