How To Change Screen Orientations in Windows 11: 4 Easiest Ways
Windows 11 is undoubtedly one of the most powerful and versatile Operating Systems, particularly when it comes to the display or performing any screen-related tasks. Whether it’s the advanced display feature, intuitive user experience, or accessibility enhancement features, the OS caters to a wide range of user needs, from productivity to gaming. So, if you are curious about enhancing your overall user experience, this guide is for you.
Whether you own a desktop, laptop, or tablet, adjusting your screen orientation on Windows 11 can significantly improve the visibility, and the way you use your device for executing various tasks, including viewing e-books/PDFs, gaming, and graphic/video editing. So, without wasting any more time, keep scrolling to learn various methods to change the display orientation in Windows 11 devices.
Advantages of Altering The Screen Orientation on Windows 11 Computer
Well, changing the display orientation of your desktop/laptop can be beneficial for various reasons.
This includes: Enjoy enhanced productivity like never before with Portrait mode, ideal for reading lengthy documents and with Landscape mode, watch your favourite videos in a wider view. Enjoy ease of use while setting the display orientation as per your personal preferences and gain more accessibility while working.
Changing screen orientation on a Windows 11 computer can be specifically beneficial if you give a multi-monitor setup. Hence, you can rotate one screen when working with particular apps or workflows, which makes it seamless to view content side by side.
Best Ways To Adjust Screen Orientations or Rotate Screen on Windows 11 PC/Laptop
Wondering how to change the way your Windows 11 screen looks? Follow the step-by-step ways.
METHOD 1: Tweak The Display Settings
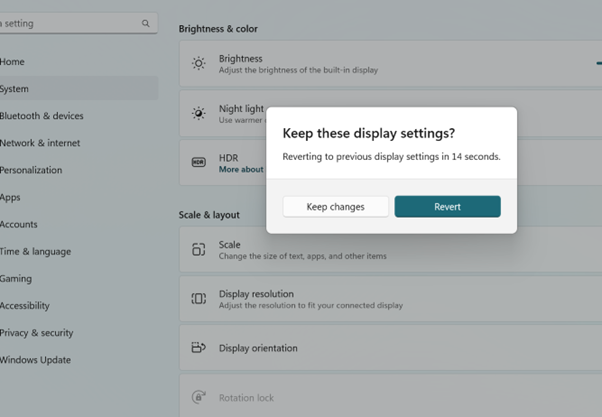
Well, one of the most straightforward and easy-to-use workaround to alter the screen orientation is making changes through the Display Settings. All you have to do is:
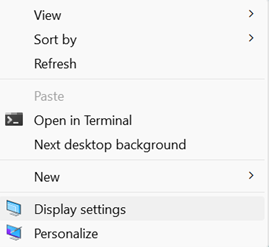
STEP 1: Simply, right-click on a space on your desktop screen.
STEP 2: From the context menu that appears on your screen, select Display Settings.
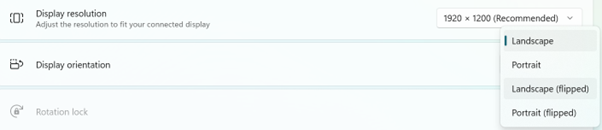
STEP 3: On the Display settings window, just scroll down to find the “Display orientation” section.
STEP 4: From here, you can choose any of the options: Landscape, Portrait, Landscape (flipped), or Portrait (flipped).
STEP 5: Once you decide your preference, simply select the option and click on the “Keep changes” button to implement the changes.
METHOD 2: Use Keyboard Shortcuts
Well, if you are in a hurry, using keyboard shortcuts provides one of the most convenient and quickest ways to adjust your screen orientation without following numerous instructions through settings and other menus. This method is specifically useful for gamers and professionals who prefer juggling with multiple applications. By using the following keyboard shortcuts you can effectively rotate your screen and get started:
- To rotate your screen to 90-degree right, simply press CTRL + ALT + RIGHT ARROW keys altogether.
- To rotate your screen to 90-degree left, simply press CTRL + ALT + LEFT ARROW keys altogether.
- To rotate your screen to 180 degrees, simply press CTRL + ALT + DOWN ARROW keys altogether.
- To restore the normal orientation, simply press CTRL + ALT + UP ARROW keys altogether.
Super easy, right? These keyboard shortcuts are specifically useful for those who frequently prefer to switch their screen orientations on Windows 11 PC/Laptop.
METHOD 3: Make Use of Registry Editor To Modify The Screen Orientation
To be honest, using Registry Editor might not be the most straightforward way to change the screen orientation, but there are plenty of reasons why advanced users might preferusing this method. For starters, it allows for deeper customization, this workaround is also useful for system admins who want to modify the screen orientation settings across multiple devices within a network.
| WARNING: Make sure you proceed with this method at your own risk. Any error could lead to unstable systems. Before making any changes, ensure sure you have a registry backup. |
STEP 1: To get started, launch Registry Editor on your Windows 11 PC. For this, you can press the shortcut keys – WIN + R to open the Run dialogue box and type regedit. Hit the Enter button!
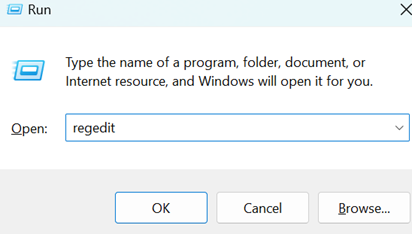
STEP 2: As soon as you hit the Enter button, the Registry Editor window will open in front of your screen. Simply head towards the path shared below:
HKEY_LOCAL_MACHINE\SOFTWARE\Microsoft\Windows\CurrentVersion\AutoRotation
STEP 3: Once you go to the key, consider double-clicking on the Enable button and set it to 1 to activate the rotation. Alternatively, you can add the value 0 to disable the rotation.
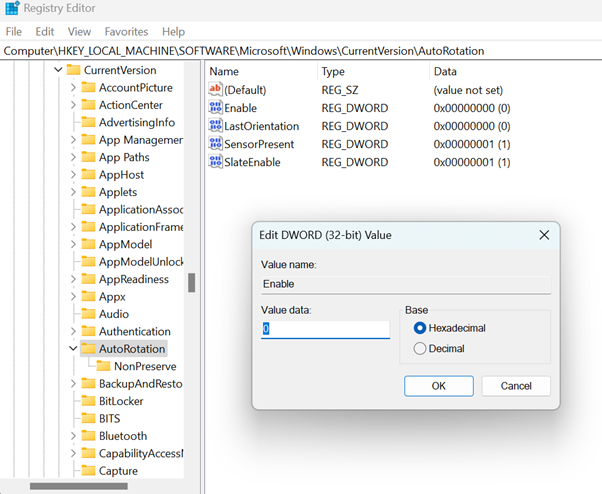
STEP 4: Make sure you restart your computer to implement these changes effectively.
This approach can be used by users who are comfortable making technical tweaks to enable or disable capabilities, such as screen orientation, that are not available through regular settings.
METHOD 4: Take Help from the Graphic Control Panel
Well, another approach to modify the screen orientation in Windows 11 is through the graphic’s card control panel. This method is super practical for users who prefer tinkering with graphic hardware frequently. Simply follow the steps shared below if you use NVIDIA Control Panel, Intel Graphics Command Center, or AMD Radeon Settings. Here’s what you need to do:
On NVIDIA Control Panel:
STEP 1: On your desktop, just right-click on a space and choose NVIDIA Control Panel.
STEP 2: Now, go to the Display settings, followed by clicking on the Rotate Display option.
STEP 3: At this point, just select the desired orientation as per your preference and implement the changes you have just made.
On AMD Radeon Settings:
STEP 1: On your desktop, just right-click on a space and choose AMD Radeon Settings.
STEP 2: On the next step, simply click on the Display button and choose the Rotation option.
STEP 3: At this point, just select the desired orientation from the available options and click on the Apply button to implement the changes you have just made.
On Intel Graphics Command Center:
STEP 1: On your desktop, just right-click on a space and choose Intel Graphic Settings or Intel Graphics Command Center from the context menu.
STEP 2: On the next step, simply click on the Display button and choose the Rotation option.
STEP 3: From the list of options, you can select 0 degrees (Normal), 90 degrees (Portrait), 180 degrees (Upside-down Landscape), and 270 degrees (Portrait flipped).
STEP 4: Once you select the desired orientation, hit the Apply button to modify the display orientation on Windows 11.
Additional Tips To Troubleshoot Common Screen Rotation Issues On Windows 11 PC
Stuck with the Rotation Lock? Well, the rotation lock feature prevents the screen from automatically rotating when the device gets tilted. To ensure the rotation lock is disabled, check the Action Center and click on the Rotation Lock icon to disable it.
Outdated graphic drivers prevent screen rotation. For a lot of users, running incompatible, damaged or old drivers can lead to a variety of display issues, including the inability to modify the screen orientation. To fix this, we recommend our users update their respective drivers using a dedicated third-party driver updater utility or via built-in Device Manager to replace outdated drivers.
Dealing with hardware limitations? There are numerous times when your monitor might not support changing screen orientation in Windows 11. To ensure your monitor does support screen rotation, we advise you to refer to the user manual to verify whether your monitor supports this feature or not.
Conclusion
Modifying the screen orientation in Windows 11 is quite a simple and effective way to customize your workspace. By following any of the methods shared above, you can easily change the display orientation and enjoy enhanced productivity, accessibility and customizability of working with different layouts. I hope this blog post has been helpful. If you have any questions, suggestions or feedback to share please feel free to leave a comment below.
People Also Ask:
Q1. How can I return the screen orientation to its default state?
A1. To restore the screen orientation to its initial configuration, just carry out the above procedures again and this will help you bring your desktop/laptop to the original normal state.
Q2. What happens if the alignment of my screen becomes locked?
A2. Restarting your computer could be necessary if your screen is stuck in the incorrect orientation. Should it fail, you might have to get in touch with Microsoft support.
Q3. Why Your Laptop Screen Keeps Flipping Between Landscape and Portrait Modes?
A3. Try the following three tips to fix this annoying issue on your Windows 11 PC:
1. Turn off all touchpad gestures associated with rotating the screen for the time being.
2. Try remapping or deactivating any keyboard shortcuts that conflict with one another.
3. Install the right and most compatible drivers and software updates to fix files that might interfere with the screen orientation.
Hopefully, the aforementioned fixes help you!
Author Bio:
Dinesh Lakhwani 
Dinesh Lakhwani, the entrepreneurial brain behind “TechCommuters,” achieved big things in the tech world. He started the company to make smart and user-friendly tech solutions. Thanks to his sharp thinking, focus on quality and the motto of never giving up, TechCommuters became a top player in the industry. His commitment to excellence has propelled the company to a leading position in the industry.
Popular Post


Recent Post

How To Adjust Display Appearance Settings Easily in Windows 11/10
Learn to adjust display appearance settings easily Windows offers. Simple guide covers brightness, scaling, resolution & multi-monitor setup for better screen experience.

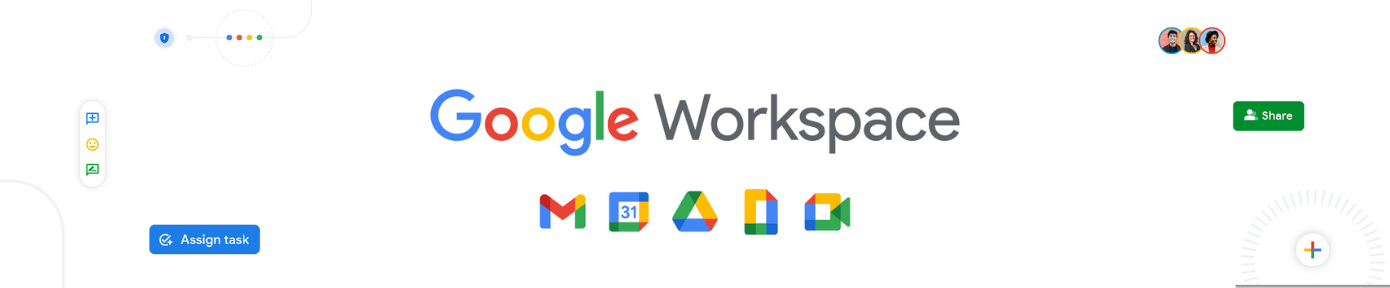
Supercharge Your Productivity: A Solopreneur’s and SMB’s Guide to Mastering Google Workspace with Gemini’
Picture this. It’s Monday morning. You open your laptop. Email notifications flood your screen. Your to-do list has 47 items. Three clients need proposals by Friday. Your spreadsheet crashed yesterday. The presentation for tomorrow’s meeting is half-finished. Sound familiar? Most small business owners live this reality. They jump between apps. They lose files. They spend […]

9 Quick Tips: How To Optimize Computer Performance
Learn how to optimize computer performance with simple steps. Clean hard drives, remove unused programs, and boost speed. No technical skills needed. Start today!

How To Speed Up My Computer/Laptop Windows 11/10 [2025]
Want to make your computer faster? A slow computer can be really annoying. It takes up your time and makes work more difficult. But with a few easy steps, you can improve your laptop’s speed and make things run more smoothly. Your computer slows down over time. Old files pile up. Programs start with Windows. […]

How To Fix Low Disk Space Error Due To A Full Temp Folder
A low disk space error due to a full temp folder is a common problem. Many users face this issue daily. Your computer stores temporary files in special folders. These files ensure optimal program performance, but they can accumulate as time goes on. When temp folders get full, your system slows down. You might see […]
How to Use Disk Cleanup on This Computer: Step-by-Step Guide
Computers getting slow is just the worst, right? Well, yes! Files pile up on your hard drive. Luckily, the Disk Cleanup tool on your PC is here to save the day. It clears out unnecessary files, giving your system the boost it needs to run smoothly again. A lot of users aren’t aware of the […]

Top 25 Computer Maintenance Tips: Complete Guide [2025]
Computer maintenance tips are vital for every PC user. Without proper PC maintenance, your system will slow down. Files can get lost. Programs may crash often. These computer maintenance tips will help you avoid these problems. Good PC maintenance keeps your computer running fast. It makes your hardware last longer. Regular computer maintenance tips can […]
Reclaiming Disk Space On Windows Without Losing Files: A Complete Guide
Running low on storage can slow down programs and trigger that annoying “low disk space” warning. Files accumulate over time, cluttering the drive. The good news? It’s possible to reclaim space without deleting anything important. Reclaiming disk space on Windows without losing files is easier than you think. Your computer stores many temporary files, old […]
Fix Issues Downloading From the Microsoft Store on Windows 11, 10 PC
Do you get excited when you’re about to download a new app or game? You open the Microsoft Store, click the download button… but nothing happens. Or maybe it starts and then suddenly stops. Sometimes, strange messages pop up like “Something happened on our end” or “Try again later.” That can be really annoying. But […]

Fix Low Disk Space Errors Quickly On Windows 11, 10 PC [2025]
Low disk space errors can slow down your Windows PC. These errors appear when your hard drive runs out of room. Your computer needs space to work properly. When space runs low, programs crash and files won’t save. Windows shows warning messages about low disk space. Your PC may freeze or run slowly. You might […]