How to Disable the Lock Screen on Windows 11
Introduction:
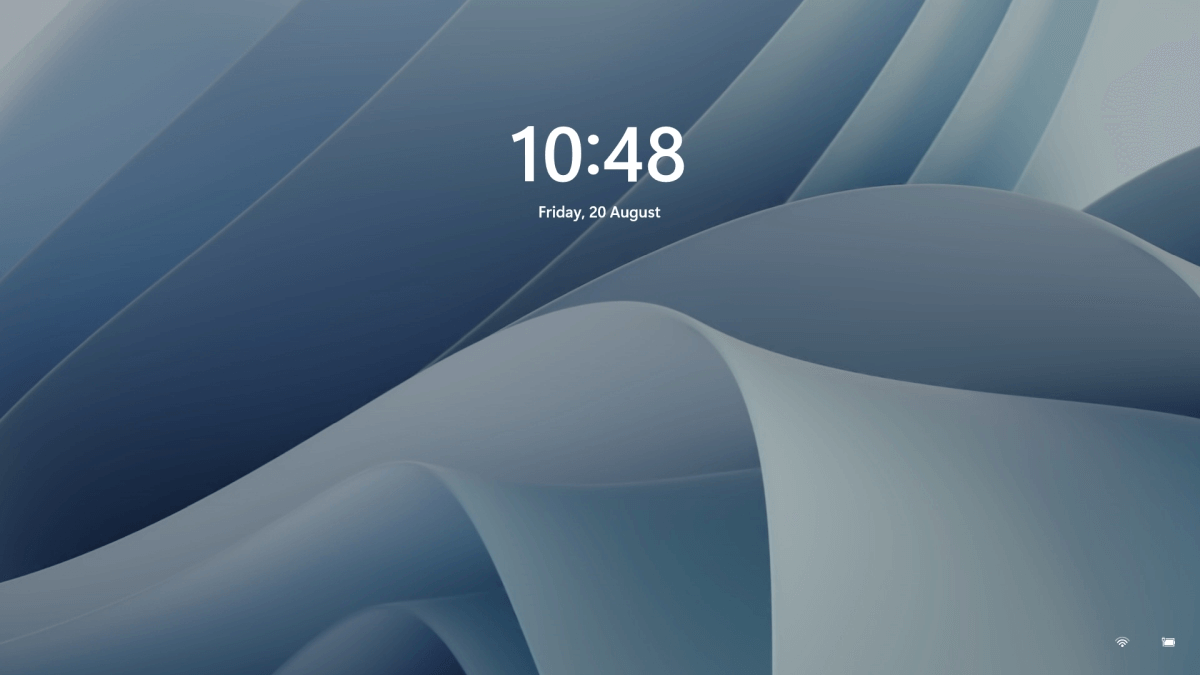
In the world of productivity, every single second counts. The last thing anyone wants is to be hindered by unnecessary obstacles while using their computer. One such obstacle is the lock screen that appears every time you wake up your Windows device. Though it may appear as a minor inconvenience, those valuable seconds spent bypassing the lock screen can accumulate over time and may impact your efficiency and disrupt your workflow.
Thankfully, Windows provides a solution by offering the ability to disable the lock screen, enabling you to dive straight into your desktop environment without any avoidable delays. In this blog post, we will walk you through a simple, step-by-step process to disable lock screen on Windows 11.
Why Disable Lock Screen on Windows 11?
Disabling the lock screen on Windows 11 can have its own set of pros and cons. So, when it comes to faster access, the lock screen serves as an additional step in the login process, requiring users to click or swipe to access the login screen. Disabling the lock screen eliminates this extra step and allows users to directly access the login prompt, saving a few seconds in the login process.
In fact, some users simply prefer a streamlined login experience and find the lock screen to be an unnecessary feature that adds little value to their workflow. So, whatever the reason may be, in this post we will be covering various methods of removing the lock screen on a Windows PC.
How to Disable Lock Screen on Windows 11?
Without further ado, let’s explore how you can unlock the full potential of your Windows device by eliminating the lock screen using different methods.
Method 1: Edit the Registry
To disable the lock screen on Windows by adjusting the registry settings, you need to follow these steps while keeping your registry data safe:
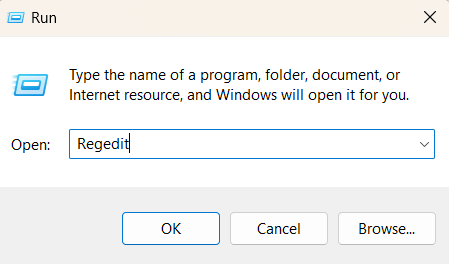
- Press the Win key + R, type “regedit” and hit Enter. This action will open the Registry Editor.
- In the Registry Editor window, navigate to the following folder location:
Computer\HKEY_LOCAL_MACHINE\SOFTWARE\Policies\Microsoft\Windows
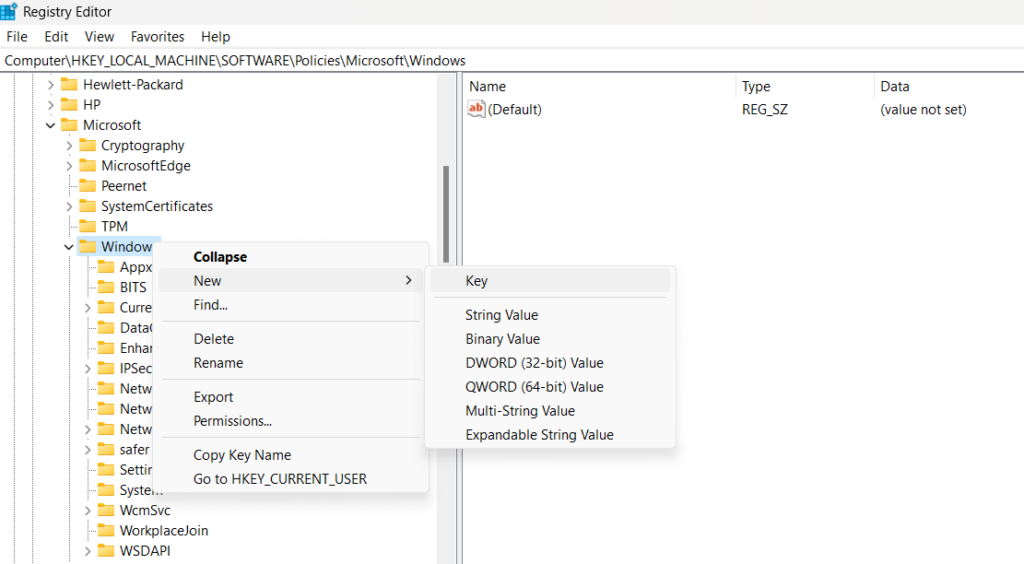
- Right-click on the Windows folder from the left menu pane and select New> Key. Rename the new key as “Personalization”.
- Now, right-click on “Personalization” and select New> D-WORD (32-Bit) Value. Name the new key as “NoLockScreen”.
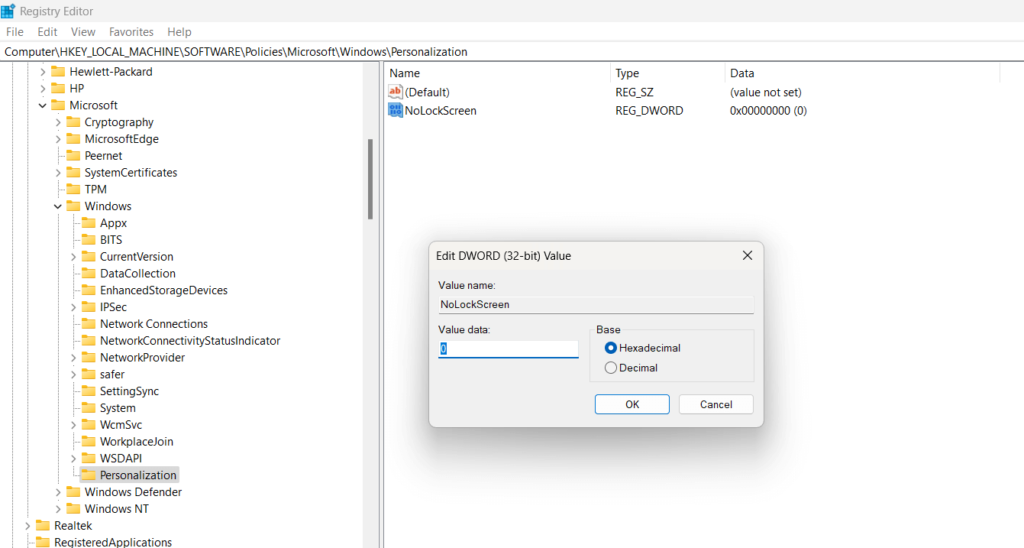
- Here comes the final step. Double-tap on NoLockScreen and set the Value Data to 1. Hit on the OK button to save the recent changes.
By following these steps, you will be able to disable lock screen on Windows. However, in the future in case you ever need to re-enable it then set the Value Data of NoLockScreen to 0 to revert changes.
Method 2: Use the Group Policy Editor
If you using the Professional, Ultimate, or Enterprise version of Windows on your device then you can also use the Local Group Policy Editor to eliminate the lock screen. Here are the step-by-step instructions to do so:
To disable the lock screen on Windows using the Local Group Policy Editor, follow these steps:
- Open the Local Group Policy Editor by pressing the Win key + R to launch the Run command box. Type “gpedit.msc” and hit Enter.
- In the Local Group Policy Editor window, navigate to the following path on the left-hand side:
Computer Configuration -> Administrative Templates -> Control Panel -> Personalization
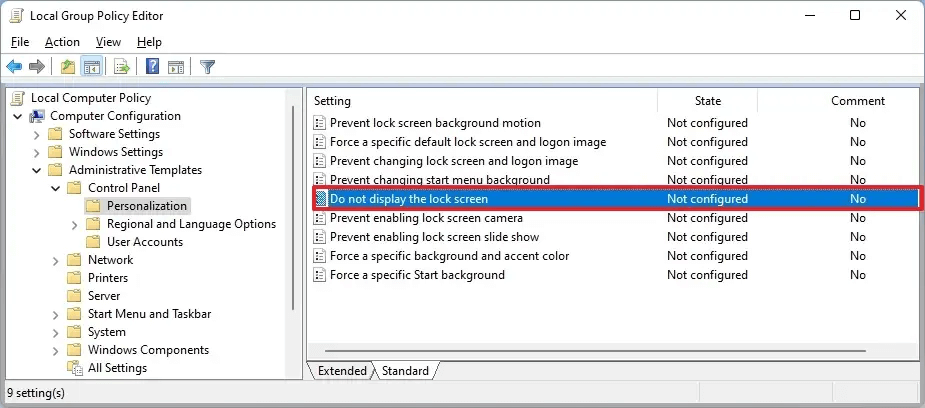
- On the right-hand side, locate the policy named “Do not display the lock screen”. Double-click on it to open the policy settings.
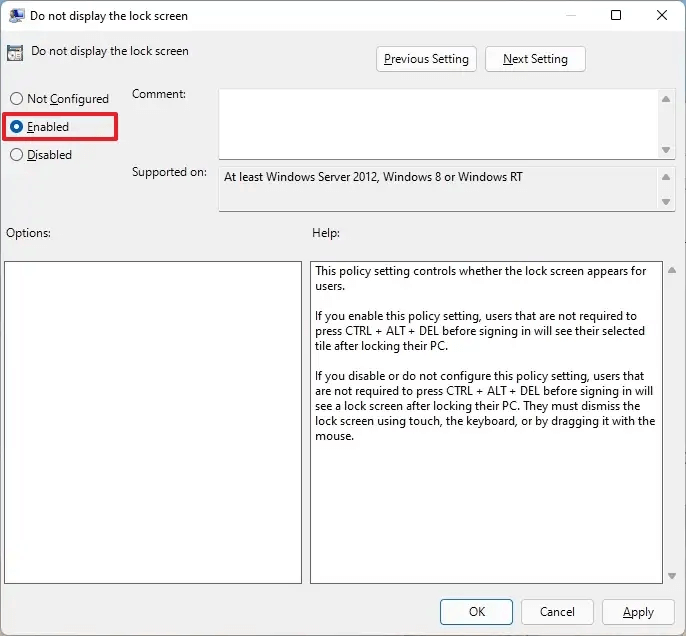
- In the policy settings window, select the “Enabled” option and click on “Apply” or “OK” to save the changes.
- Close the Local Group Policy Editor and reboot your computer to apply the changes.
Method 3: Use a Third-Party Tool
Yes, you can use Winaero Tweaker to disable the lock screen on your Windows system. Winaero Tweaker is a third-party software tool that provides a user-friendly interface to customize various aspects of the Windows operating system.
To disable the lock screen using Winaero Tweaker, follow these steps:
- Open any preferred web browser and then download and install Winaero Tweaker from the official website.
- Launch Winaero Tweaker on your Windows system.
- In the left-hand navigation pane, switch to the “Appearance” category.
- Under the “Appearance” category, click on the “Boot and Logon” option.
- In the right-hand pane, locate the option to disable the lock screen. It is labeled as “Disable Lock Screen”.
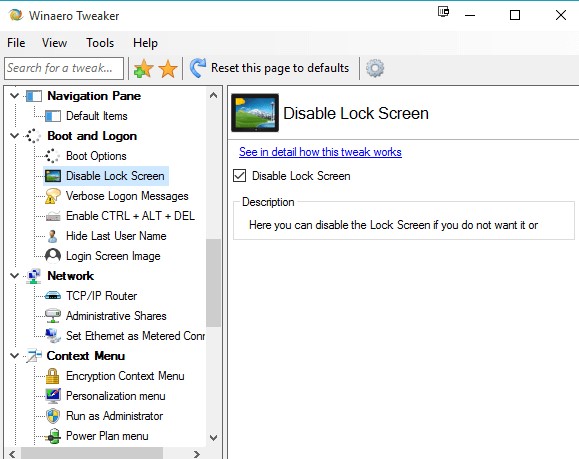
- Check on the option to disable the lock screen. Once the lock screen is disabled, close Winaero Tweaker.
- Restart your computer to apply the changes.
By using Winaero Tweaker to disable the lock screen, you can conveniently customize your Windows system without directly modifying system settings or configurations.
Conclusion
In this blog post, we have explored various methods to disable lock screen on Windows 11, providing you with the flexibility to streamline your computing experience and optimize productivity. Whether you prefer using the Local Group Policy Editor, tweaking registry settings, or utilizing third-party tools like Winaero Tweaker, you can pick any of these methods to get the job done.
By disabling the lock screen, you can eliminate the additional step of bypassing it every time you wake up your Windows 11 device. This can save you valuable seconds that add up over time, ensuring a smoother workflow and enhanced efficiency.
Popular Post
Recent Post
How To Adjust Display Appearance Settings Easily in Windows 11/10
Learn to adjust display appearance settings easily Windows offers. Simple guide covers brightness, scaling, resolution & multi-monitor setup for better screen experience.
Supercharge Your Productivity: A Solopreneur’s and SMB’s Guide to Mastering Google Workspace with Gemini’
Picture this. It’s Monday morning. You open your laptop. Email notifications flood your screen. Your to-do list has 47 items. Three clients need proposals by Friday. Your spreadsheet crashed yesterday. The presentation for tomorrow’s meeting is half-finished. Sound familiar? Most small business owners live this reality. They jump between apps. They lose files. They spend […]
9 Quick Tips: How To Optimize Computer Performance
Learn how to optimize computer performance with simple steps. Clean hard drives, remove unused programs, and boost speed. No technical skills needed. Start today!
How To Speed Up My Computer/Laptop Windows 11/10 [2025]
Want to make your computer faster? A slow computer can be really annoying. It takes up your time and makes work more difficult. But with a few easy steps, you can improve your laptop’s speed and make things run more smoothly. Your computer slows down over time. Old files pile up. Programs start with Windows. […]
How To Fix Low Disk Space Error Due To A Full Temp Folder
A low disk space error due to a full temp folder is a common problem. Many users face this issue daily. Your computer stores temporary files in special folders. These files ensure optimal program performance, but they can accumulate as time goes on. When temp folders get full, your system slows down. You might see […]
How to Use Disk Cleanup on This Computer: Step-by-Step Guide
Computers getting slow is just the worst, right? Well, yes! Files pile up on your hard drive. Luckily, the Disk Cleanup tool on your PC is here to save the day. It clears out unnecessary files, giving your system the boost it needs to run smoothly again. A lot of users aren’t aware of the […]
Top 25 Computer Maintenance Tips: Complete Guide [2025]
Computer maintenance tips are vital for every PC user. Without proper PC maintenance, your system will slow down. Files can get lost. Programs may crash often. These computer maintenance tips will help you avoid these problems. Good PC maintenance keeps your computer running fast. It makes your hardware last longer. Regular computer maintenance tips can […]
Reclaiming Disk Space On Windows Without Losing Files: A Complete Guide
Running low on storage can slow down programs and trigger that annoying “low disk space” warning. Files accumulate over time, cluttering the drive. The good news? It’s possible to reclaim space without deleting anything important. Reclaiming disk space on Windows without losing files is easier than you think. Your computer stores many temporary files, old […]
Fix Issues Downloading From the Microsoft Store on Windows 11, 10 PC
Do you get excited when you’re about to download a new app or game? You open the Microsoft Store, click the download button… but nothing happens. Or maybe it starts and then suddenly stops. Sometimes, strange messages pop up like “Something happened on our end” or “Try again later.” That can be really annoying. But […]
Fix Low Disk Space Errors Quickly On Windows 11, 10 PC [2025]
Low disk space errors can slow down your Windows PC. These errors appear when your hard drive runs out of room. Your computer needs space to work properly. When space runs low, programs crash and files won’t save. Windows shows warning messages about low disk space. Your PC may freeze or run slowly. You might […]

