
How to Manage Your Fonts in Windows

Last updated on February 27th, 2025 at 9:34 am
In most devices and OS types, applications and programs are available with personalized font variations. Some font types are pre-installed into the system from the beginning, while others download font-based apps. However, often, this variety of accumulated fonts can lag the computer or cause functional issues in the system.
Here, we discuss the best methods you can use to manage fonts on Windows properly.
Best Methods to Manage Fonts on Windows
You can follow particular steps to install and then manage all fonts on your Windows device. We went through several approaches on different Windows versions to check the quality of the method on all devices. The following are the right steps to manage fonts on Windows.
Method 1: View All Installed Fonts
Before removing or updating the font library, you should know which fonts are installed on the system. Some apps that are specifically for fonts are generally visible on the desktop. However, some programs install additional fonts, which are harder to locate through the File Manager without knowing the right location. You can find that information through the Control Panel.
How to Do This?
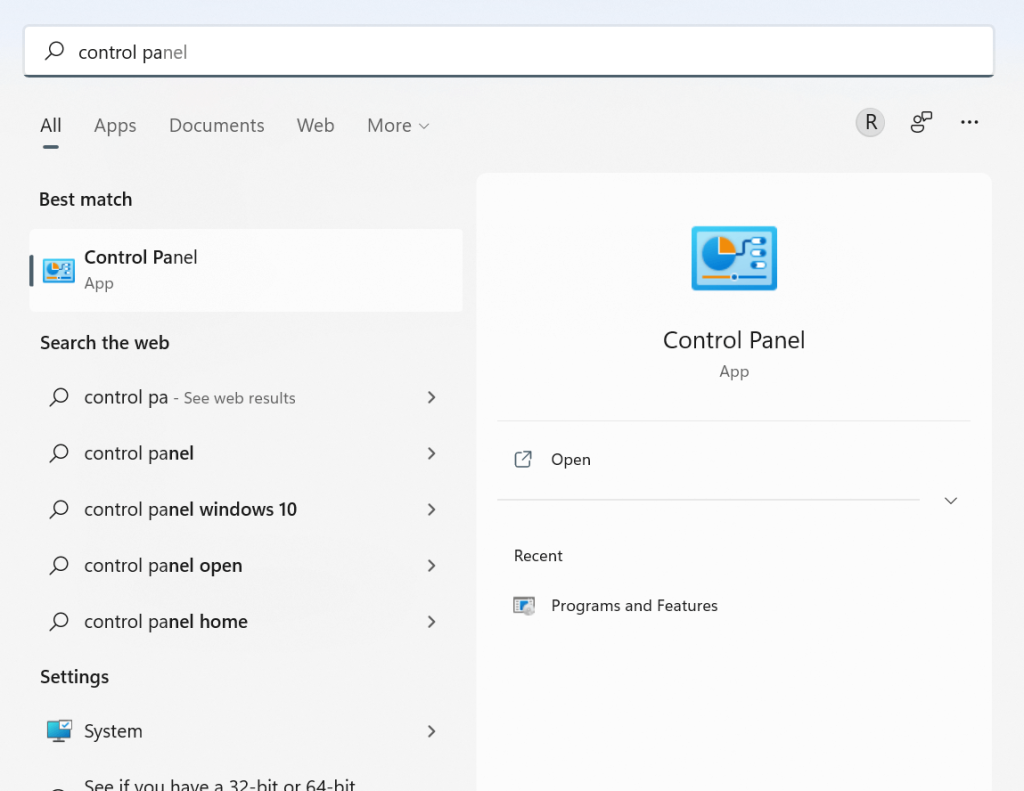
Step 1: On your Windows 10/11 device, open the search bar from the homepage taskbar.
Step 2: Type in the term “Control Panel” in the text field. Out of the results that come up, choose the first one.
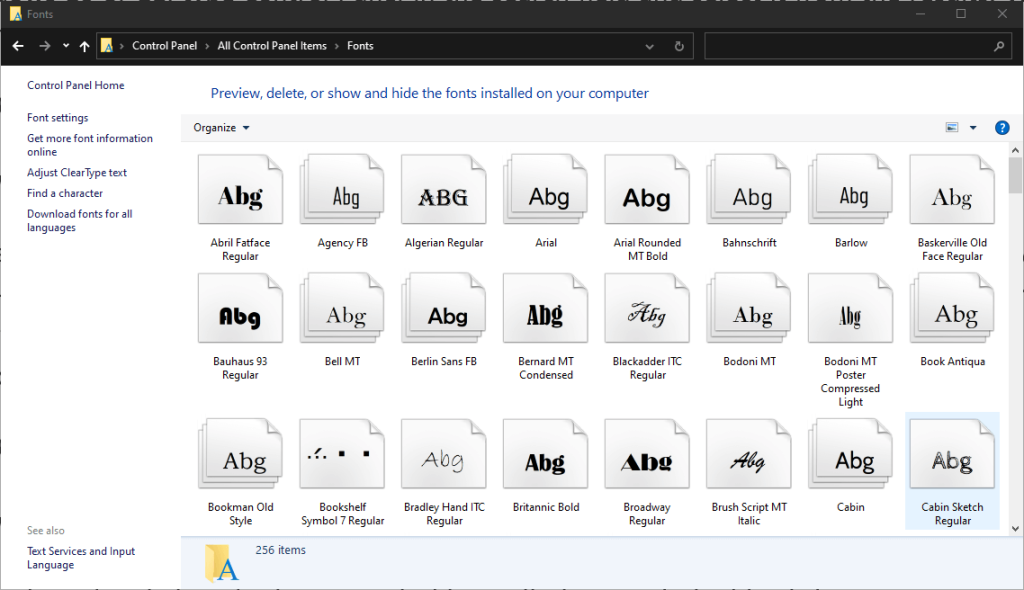
Step 3: Opening the Icon View option, find and choose the Fonts icon from the menu.
Step 4: All the installed fonts will appear in the list.
Method 2: Preview the Available Fonts
With the right step, you can view a preview of the installed fonts in the system through font settings in Windows 10 or other devices. Here are the main steps for the process.
How to Do This?
Step 1: Choose the specific font type of the text you want to preview on a single page that you are using.
Step 2: Double-click on the font or click on the Preview option. Another alternative is to right-click your cursor on top of the font and then choose “Preview” from the options.
Step 3: Next, the Font Viewer will display each look of the font of your choice in different sizes.
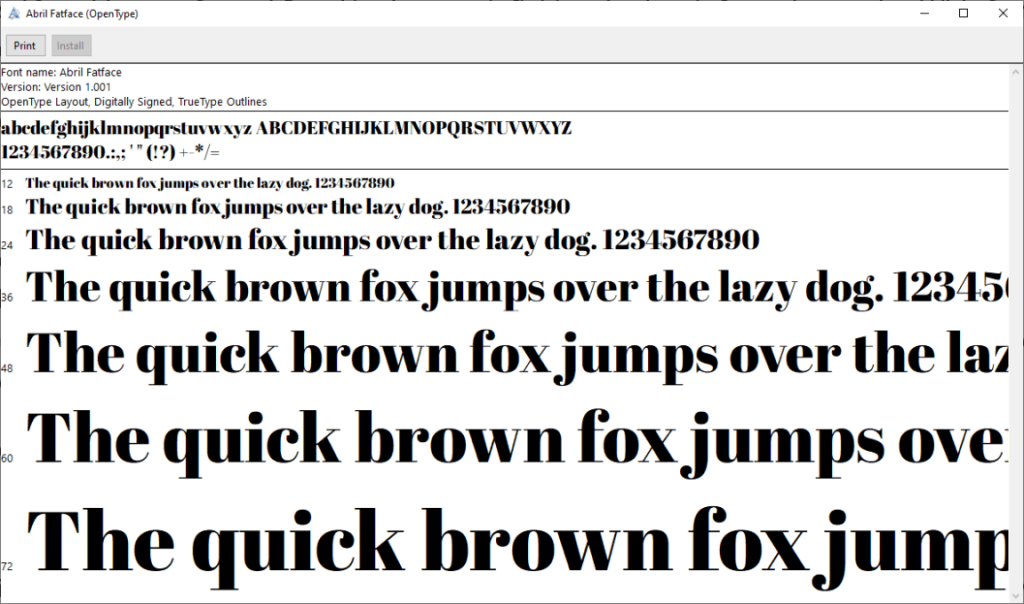
Step 4: For a hard copy version, you can print out the content that appears on the window of the font viewer.
Method 3: Preview the Font Groups/Families
Fonts that are showcased on multiple pages are regardless in total as font families. You can see a preview of that when you try to manage fonts on Windows effectively.
How to Do This?
Step 1: Double-clicking on the font would showcase all members in a specific font family. Follow the steps for viewing each font as mentioned in Method 2.
Step 2: Choose the “Preview” option for the whole font family from the next menu. Many viewers would open for each font as you select and displace their different styles, like bold italics, italics, bold, and regular.
Step 3: If the font families hold many options, the font settings on Windows 10 or 11 will showcase the prompt for opening all.

Step 4: You must click close on them all individually.
Method 4: Hide All Fonts
While using the different programs on your device, you can choose to hide particular font types that you are not using or do not want to see. However, the steps for this are not universal for all programs. In software types like Notepad or WordPad, you can find any font that can become invisible to users.
On the other hand, other applications like the installed Microsoft Office contain pre-set software-specific font menus. You cannot hide these fonts through the system’s Control Panel.
How to Do This?
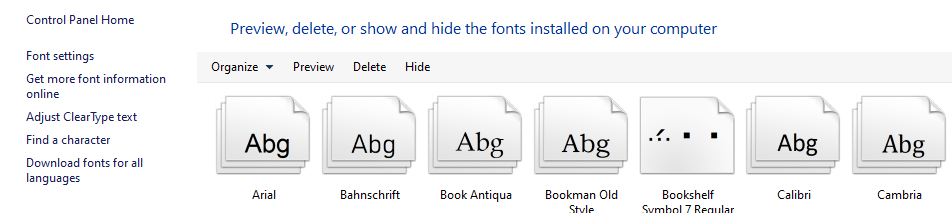
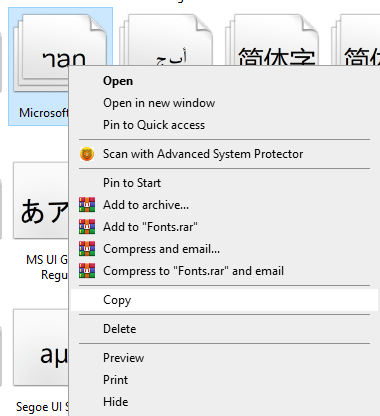
Step 1: Right-click your cursor on top of one of the fonts.
Step 2: Choose the ” Hide ” option from the pop-up menu that comes up, choose the “Hide” option.

Step 3: You can choose to hide all fonts from the font settings on Windows 10 or 11 that are not suitable for your selected language. This can occur automatically if you configure the right settings.
Access the left sidebar and then choose the Font Settings tab after following the steps for viewing them through the Control Panel.
Step 4: You will find the option for hiding fonts as per the settings of the current language.
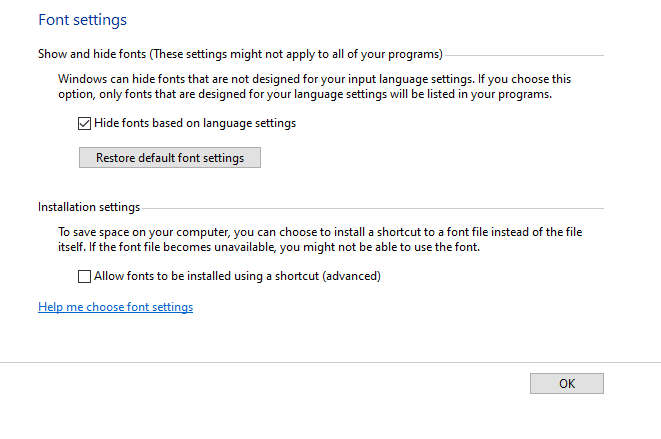
Step 5: Click on the “OK” button to confirm.
Method 5: Keep Fonts As Backup
To note, when you manage fonts on Windows and delete a font type, that would permanently remove it. So, before doing that step, you should save them as a backup in case you need them in the future. You should prepare a backup folder for it.
How to Do This?
Step 1: Through the font settings on Windows 10 or 11 that you access through Control Panel, right-click on the font or the font family of your choice. Then, choose the “Copy” option.
Step 2: After copying the font, save the option into the backup folder you set on your device.
Step 3: After the font is removed, you can check the font library again to verify if it is permanently deleted. Follow the same steps for viewing a font, if necessary.
Then, move the copied folder or font file to another system and delete the font you want to remove.
Method 6: Permanently Delete the Fonts
Some fonts can cause the system to lag unnecessarily, especially if users do not work with them regularly. If there are particular font types that you do not use regularly, you can uninstall the font type. When you manage fonts on Windows, know that erasing all Windows font types is not easy as they are protected. You can delete those that are unprotected, like Adobe Creative Suite-based fonts.
How to Do This?
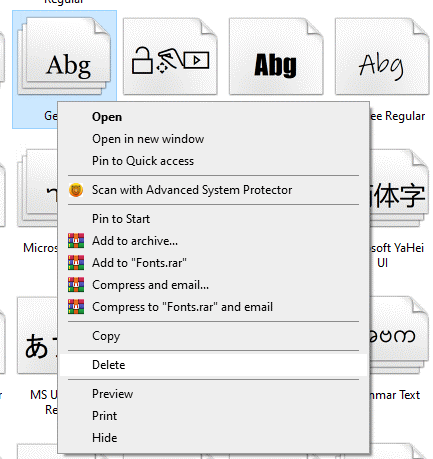
Step 1: Right-click your cursor on top of an unprotected font type.
Step 2: From the next Context menu, choose the “Delete” option to erase it.
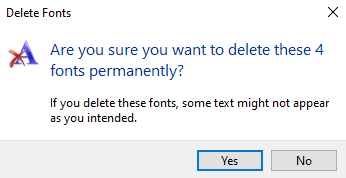
Step 3: The system would provide a prompt for you to confirm the removal. Press the “Yes” button on the prompt box.
If you remove a font family, all of the fonts under that family are also deleted automatically.
Conclusion
Multiple steps are available for carrying out different functions like viewing, previewing, deleting, or copying fonts when you manage fonts on Windows. Follow the steps for each function as mentioned under each method, and then optimize your system with software like CCleaner.
Found this helpful? Check out other such guides that we offer among our library of posts.
Author Bio:
Dinesh Lakhwani 
Dinesh Lakhwani, the entrepreneurial brain behind “TechCommuters,” achieved big things in the tech world. He started the company to make smart and user-friendly tech solutions. Thanks to his sharp thinking, focus on quality and the motto of never giving up, TechCommuters became a top player in the industry. His commitment to excellence has propelled the company to a leading position in the industry.
Popular Post


Recent Post

How To Adjust Display Appearance Settings Easily in Windows 11/10
Learn to adjust display appearance settings easily Windows offers. Simple guide covers brightness, scaling, resolution & multi-monitor setup for better screen experience.

Supercharge Your Productivity: A Solopreneur’s and SMB’s Guide to Mastering Google Workspace with Gemini’
Picture this. It’s Monday morning. You open your laptop. Email notifications flood your screen. Your to-do list has 47 items. Three clients need proposals by Friday. Your spreadsheet crashed yesterday. The presentation for tomorrow’s meeting is half-finished. Sound familiar? Most small business owners live this reality. They jump between apps. They lose files. They spend […]

9 Quick Tips: How To Optimize Computer Performance
Learn how to optimize computer performance with simple steps. Clean hard drives, remove unused programs, and boost speed. No technical skills needed. Start today!

How To Speed Up My Computer/Laptop Windows 11/10 [2025]
Want to make your computer faster? A slow computer can be really annoying. It takes up your time and makes work more difficult. But with a few easy steps, you can improve your laptop’s speed and make things run more smoothly. Your computer slows down over time. Old files pile up. Programs start with Windows. […]

How To Fix Low Disk Space Error Due To A Full Temp Folder
A low disk space error due to a full temp folder is a common problem. Many users face this issue daily. Your computer stores temporary files in special folders. These files ensure optimal program performance, but they can accumulate as time goes on. When temp folders get full, your system slows down. You might see […]

How to Use Disk Cleanup on This Computer: Step-by-Step Guide
Computers getting slow is just the worst, right? Well, yes! Files pile up on your hard drive. Luckily, the Disk Cleanup tool on your PC is here to save the day. It clears out unnecessary files, giving your system the boost it needs to run smoothly again. A lot of users aren’t aware of the […]

Top 25 Computer Maintenance Tips: Complete Guide [2025]
Computer maintenance tips are vital for every PC user. Without proper PC maintenance, your system will slow down. Files can get lost. Programs may crash often. These computer maintenance tips will help you avoid these problems. Good PC maintenance keeps your computer running fast. It makes your hardware last longer. Regular computer maintenance tips can […]

Reclaiming Disk Space On Windows Without Losing Files: A Complete Guide
Running low on storage can slow down programs and trigger that annoying “low disk space” warning. Files accumulate over time, cluttering the drive. The good news? It’s possible to reclaim space without deleting anything important. Reclaiming disk space on Windows without losing files is easier than you think. Your computer stores many temporary files, old […]

Fix Issues Downloading From the Microsoft Store on Windows 11, 10 PC
Do you get excited when you’re about to download a new app or game? You open the Microsoft Store, click the download button… but nothing happens. Or maybe it starts and then suddenly stops. Sometimes, strange messages pop up like “Something happened on our end” or “Try again later.” That can be really annoying. But […]

Fix Low Disk Space Errors Quickly On Windows 11, 10 PC [2025]
Low disk space errors can slow down your Windows PC. These errors appear when your hard drive runs out of room. Your computer needs space to work properly. When space runs low, programs crash and files won’t save. Windows shows warning messages about low disk space. Your PC may freeze or run slowly. You might […]