Complete Guide to Use Safety Check on iPhone with iOS 16
Last updated on August 1st, 2024 at 4:49 pm
Apple has always taken its users’ privacy and security seriously. With iOS 16, Apple has introduced the Safety Check on iPhones. This feature is a way to help people suffering in abusive relationships.
Apple partnered with several social organizations to create a system for people wanting to come out of an abusive relationship. Since most people use passwords to access their devices and even share passwords with their partners, it is easy to hide away from an abusive partner.
But this can make it harder to escape an abusive relationship. So, the iOS 16 Safety Check feature is a way to support domestic violence victims.
Sounds interesting?
Let’s understand how Safety Check on an iPhone works.
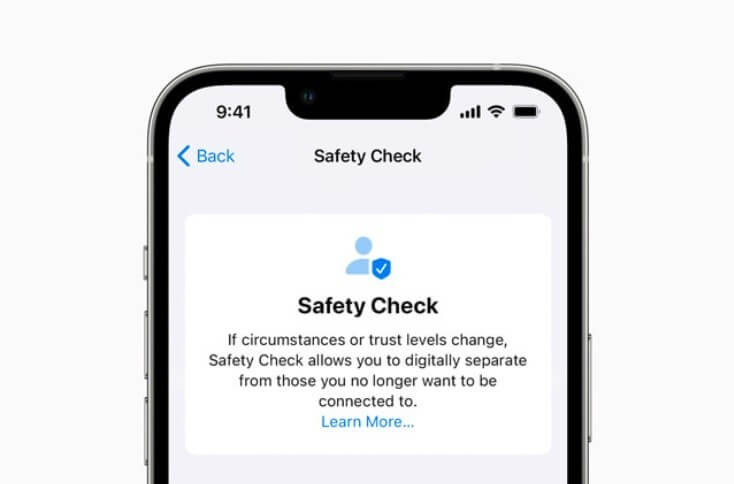
What is the Safety Check on iPhones?
The center of your iPhone’s security is Safety Check. You can run Safety Check on your iPhone regularly to ensure that no unauthorized device or person can ever access your data and activities.
It allows you to check which applications have permission to access your iPhone’s sensors and personal information. It also ensures no useless apps are secretly using these features.
According to Apple, Safety Check is designed for victims of intimate relationships or domestic abuse. The Safety Check feature makes it simple for users to reset all data and location exposure granted to others immediately.
Why Is iOS 16 Safety Check Feature Important?
To begin, Safety Check on iPhones is significant because Apple has always given users the option to share their location with apps and people. In addition, though, Apple has given security like access to the iPhone via Face ID and passcodes.
Safety Check, however, makes it easier for people at risk of domestic abuse to adjust quickly or entirely revoke these permissions from a single location, rather than having to hunt down the various settings scattered throughout the iPhone.
Safety Check functions in two ways:
- Emergency Reset
- Manage Sharing & Access
We’ll go over these iOS 16 Safety Check features in depth below.
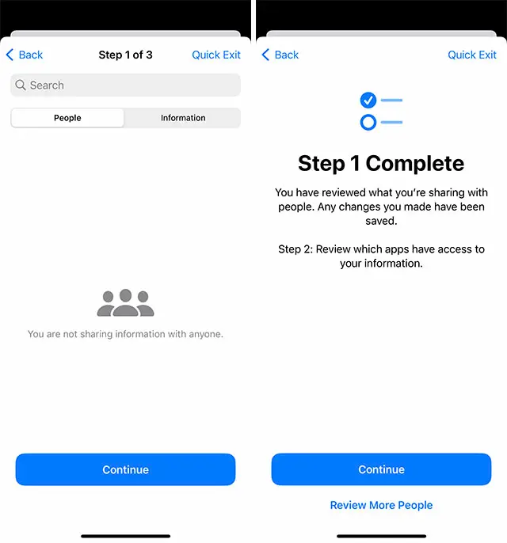
How to Use Safety Check on Your iPhone? (Emergency Reset)
Let’s first talk about the Emergency Reset. Emergency Reset is essentially a kill switch that stops sharing any access you may have granted to apps and people all at once.
It is intended to be used when you urgently need to stop sharing data with anyone. For example, your location includes any apps that might track your whereabouts.
Here’s how you can use this feature:
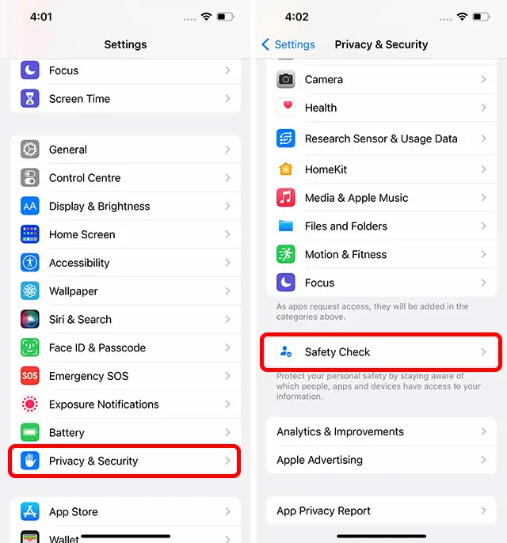
Step 1. Go to Settings > Privacy and Security > Safety Check on your iPhone.
Step 2. Tap on the Emergency Reset button. You will be first asked to identify yourself with a Passcode or Face ID. After that, tap on the Start Emergency Reset button.
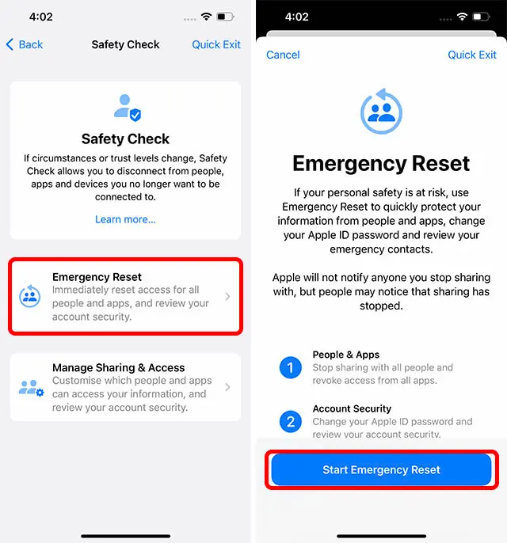
Step 3. This step ensures your iPhone no longer shares information with anyone or any app like location data, photo libraries, etc. To do this, tap on ‘Reset People & Apps.’ Tap on ‘Reset’ to confirm.
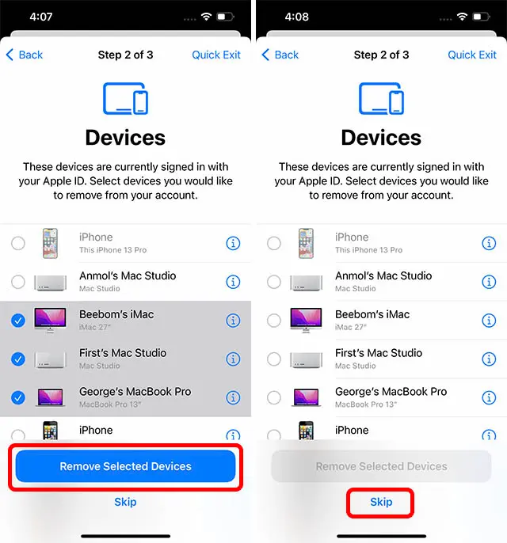
Step 4. After that, Safety Check will ensure that only your devices are linked to your Apple ID. Next, select any devices you want to sign out of and remove your Apple ID remotely. After you’ve chosen the devices, click ‘Remove Selected Devices.’ If there are no such devices, press the ‘Skip’ button.
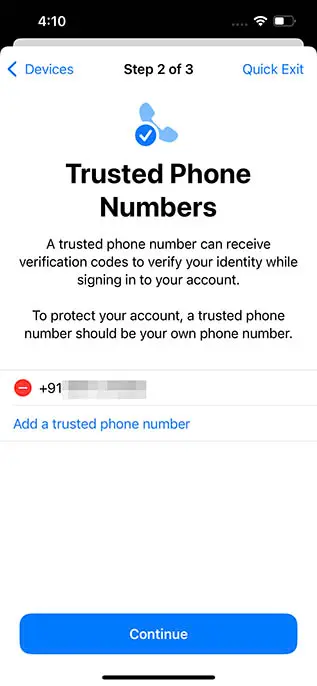
Step 5. Next, add (or remove) trusted phone numbers from your account. These are your phone numbers. If there are more phone numbers in this list, remove them before clicking ‘Continue.’
Step 6. If you share your Apple ID password with an abusive person, it’s critical to ensure they can’t access your Apple account.
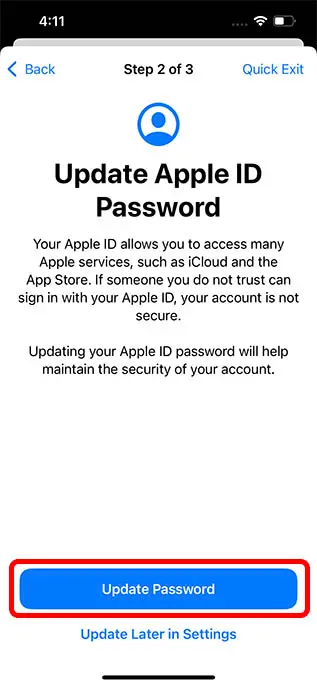
If necessary, Safety Check will allow you to reset your Apple ID password during this step. You can use the ‘Update Password’ button to change your password or the ‘Update Later in Settings’ option to keep the same password.
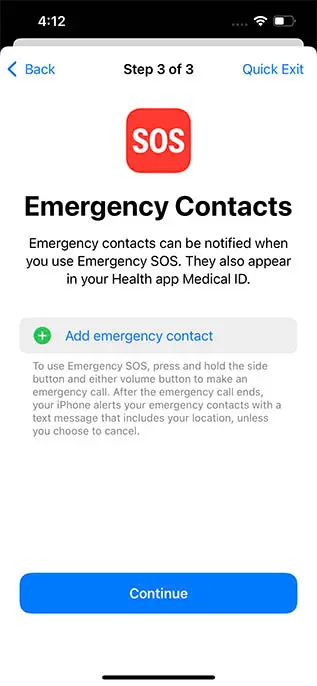
Step 7. Make a list of your emergency contacts, such as your family members or friends. These contacts will be notified if you ever need to use your iPhone’s Emergency SOS feature. You can add touches here before clicking ‘Continue.’
Once you’ve completed these steps, the iOS 16 Safety Check feature will recommend additional actions you can take to improve your safety and peace of mind. Once you’ve completed this list, tap ‘Done.’
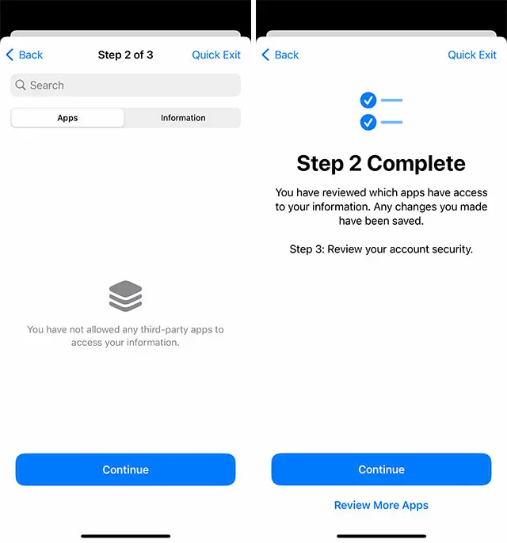
How to Use Safety Check on Your iPhone? (Manage Sharing & Access)
You can remove permissions and sharing settings for specific people by selecting the second option, ‘Manage Sharing & Access.’ Here’s how to make use of this feature:
Step 1. Navigate to Settings > Privacy and Security > Safety Check.
Step 2. Tap on ‘Manage Sharing & Access’ and click on Continue.
Step 3. You can see who you’ve shared information with and what information you’re sharing here. From there, you can remove people with whom you no longer want to share information, such as your location, iPhone access, etc.
Step 4. You can decide on apps that can access your data in the following step. Next, you can uninstall any apps that you did not install yourself or that you no longer want to use. When finished, press the ‘Continue’ button.
Step 5. Finally, a list of devices you have logged using your Apple ID. If you notice any unidentified devices, remove them. You can also remove devices belonging to the abuser so they no longer have access to your iPhone information. If there are no devices attached, select ‘Skip.’
Step 6. You can now define your trusted contacts. In addition, delete those contacts you no longer trust and add new ones if necessary. When finished, tap ‘Continue.’
Step 7. Your iPhone will then ask you to update your Apple ID password. In case your abusive partner has written down or saved your password. You can easily change your password, so no one else has access to your Apple ID.
Step 8. You can add emergency contacts here before clicking ‘Continue.
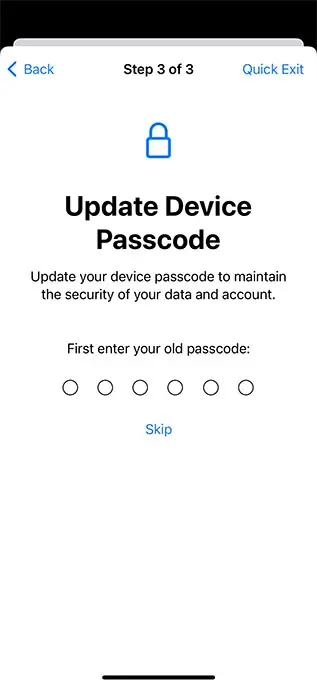
Step 9. Finally, to ensure the security of your data, you will be prompted to change your device passcode. You can change your passcode or skip it.
Once you’ve completed these steps, Safety Check on your iPhone will recommend additional actions you can take to improve your safety. Once you’ve completed this list, tap ‘Done.’
Is It Safe to Use Safety Check on an iPhone?
To protect its users’ safety and privacy, Apple will not notify anyone if you stop sharing information, account access, location data, etc. This is done to ensure that victims (or those at risk) of domestic abuse can safely prevent perpetrators from accessing their devices and information without fear of them being notified of the change.
So, that’s pretty much how you use Safety Check on your iPhone. Unfortunately, it is a new feature so we can’t stay much.
But overall, this is an excellent initiative by Apple to secure their users. It is a great social movement to protect people suffering from domestic violence and abusive relationships.
So, if you are also a domestic violence victim, you should try this iOS 16 feature to escape your toxic relationship. That’s it for now! Keep on following for more iOS updates.
Author Bio:
Dinesh Lakhwani 
Dinesh Lakhwani, the entrepreneurial brain behind “TechCommuters,” achieved big things in the tech world. He started the company to make smart and user-friendly tech solutions. Thanks to his sharp thinking, focus on quality and the motto of never giving up, TechCommuters became a top player in the industry. His commitment to excellence has propelled the company to a leading position in the industry.
Popular Post


Recent Post

How To Adjust Display Appearance Settings Easily in Windows 11/10
Learn to adjust display appearance settings easily Windows offers. Simple guide covers brightness, scaling, resolution & multi-monitor setup for better screen experience.

Supercharge Your Productivity: A Solopreneur’s and SMB’s Guide to Mastering Google Workspace with Gemini’
Picture this. It’s Monday morning. You open your laptop. Email notifications flood your screen. Your to-do list has 47 items. Three clients need proposals by Friday. Your spreadsheet crashed yesterday. The presentation for tomorrow’s meeting is half-finished. Sound familiar? Most small business owners live this reality. They jump between apps. They lose files. They spend […]

9 Quick Tips: How To Optimize Computer Performance
Learn how to optimize computer performance with simple steps. Clean hard drives, remove unused programs, and boost speed. No technical skills needed. Start today!
How To Speed Up My Computer/Laptop Windows 11/10 [2025]
Want to make your computer faster? A slow computer can be really annoying. It takes up your time and makes work more difficult. But with a few easy steps, you can improve your laptop’s speed and make things run more smoothly. Your computer slows down over time. Old files pile up. Programs start with Windows. […]

How To Fix Low Disk Space Error Due To A Full Temp Folder
A low disk space error due to a full temp folder is a common problem. Many users face this issue daily. Your computer stores temporary files in special folders. These files ensure optimal program performance, but they can accumulate as time goes on. When temp folders get full, your system slows down. You might see […]
How to Use Disk Cleanup on This Computer: Step-by-Step Guide
Computers getting slow is just the worst, right? Well, yes! Files pile up on your hard drive. Luckily, the Disk Cleanup tool on your PC is here to save the day. It clears out unnecessary files, giving your system the boost it needs to run smoothly again. A lot of users aren’t aware of the […]

Top 25 Computer Maintenance Tips: Complete Guide [2025]
Computer maintenance tips are vital for every PC user. Without proper PC maintenance, your system will slow down. Files can get lost. Programs may crash often. These computer maintenance tips will help you avoid these problems. Good PC maintenance keeps your computer running fast. It makes your hardware last longer. Regular computer maintenance tips can […]
Reclaiming Disk Space On Windows Without Losing Files: A Complete Guide
Running low on storage can slow down programs and trigger that annoying “low disk space” warning. Files accumulate over time, cluttering the drive. The good news? It’s possible to reclaim space without deleting anything important. Reclaiming disk space on Windows without losing files is easier than you think. Your computer stores many temporary files, old […]

Fix Issues Downloading From the Microsoft Store on Windows 11, 10 PC
Do you get excited when you’re about to download a new app or game? You open the Microsoft Store, click the download button… but nothing happens. Or maybe it starts and then suddenly stops. Sometimes, strange messages pop up like “Something happened on our end” or “Try again later.” That can be really annoying. But […]

Fix Low Disk Space Errors Quickly On Windows 11, 10 PC [2025]
Low disk space errors can slow down your Windows PC. These errors appear when your hard drive runs out of room. Your computer needs space to work properly. When space runs low, programs crash and files won’t save. Windows shows warning messages about low disk space. Your PC may freeze or run slowly. You might […]