How to Use Split Screen on a Mac
Introduction:
In today’s fast-paced digital world, maximizing productivity is the key. Period. And being able to juggle multiple tasks seamlessly is a skill worth mastering. If you’re a Mac user looking to boost your multitasking abilities, you’re in luck. Apple’s macOS offers a powerful feature known as Split Screen, which allows you to effortlessly divide your screen real estate and work on multiple applications simultaneously.
Whether you’re a student trying to take notes while researching, a professional multitasking on a project, or simply someone who loves to optimize their workflow, understanding how to use Split Screen on Mac can be a game-changer. In this blog post, we’ll take you through the steps and techniques to make the most out of this powerful feature, ensuring you can tackle multiple tasks with ease.
What is Split View on Mac?
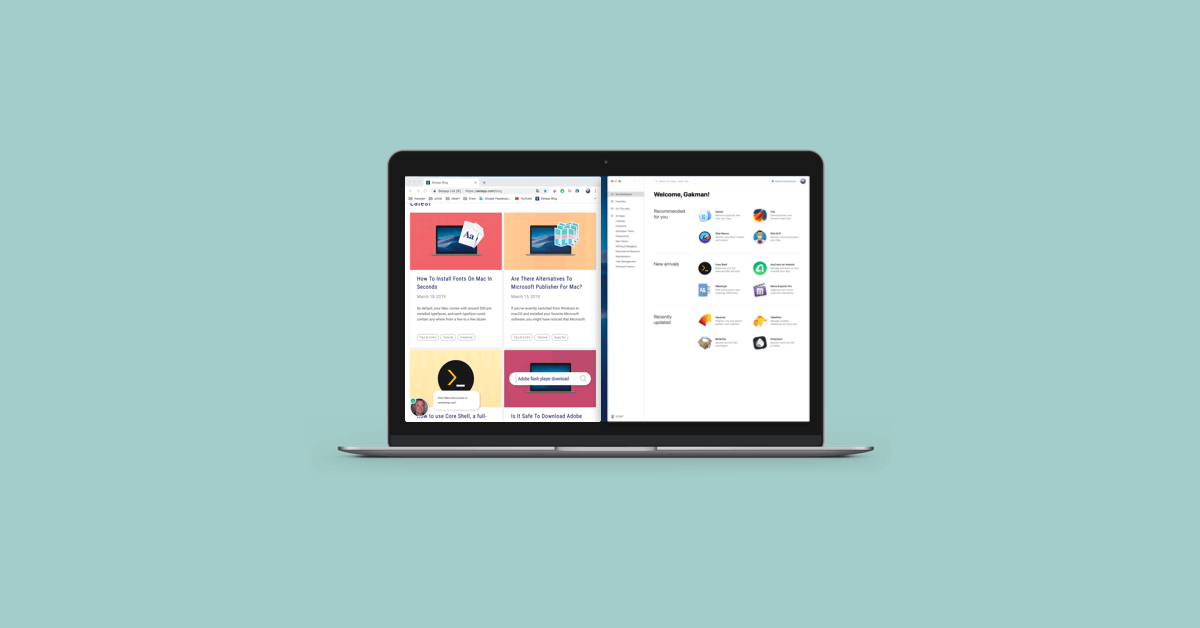
Split View is a feature available on macOS that allows you to divide your screen into two separate windows, displaying different applications side by side. It enables you to work on multiple tasks simultaneously, enhancing your productivity and streamlining your workflow.
With Split View, you can easily divide your screen space into different applications, enabling you to view and interact with them simultaneously without the need to constantly switch between windows. This split screen on MacBook feature is particularly useful when you need to reference information from one app while actively working on another, or when you want to compare and analyze data from different sources.
How to Use Split Screen on MacBook?
Using Split View on a Mac is straightforward and can be accomplished in a few simple steps. Here’s a step-by-step guide to use split screen on Mac:
- Open the applications you want to use in Split View: Ensure that the applications you want to work with are already open on your Mac.
- Enter Full-Screen mode: Click on the green button located at the upper left corner of the application window you want to use in Split View.
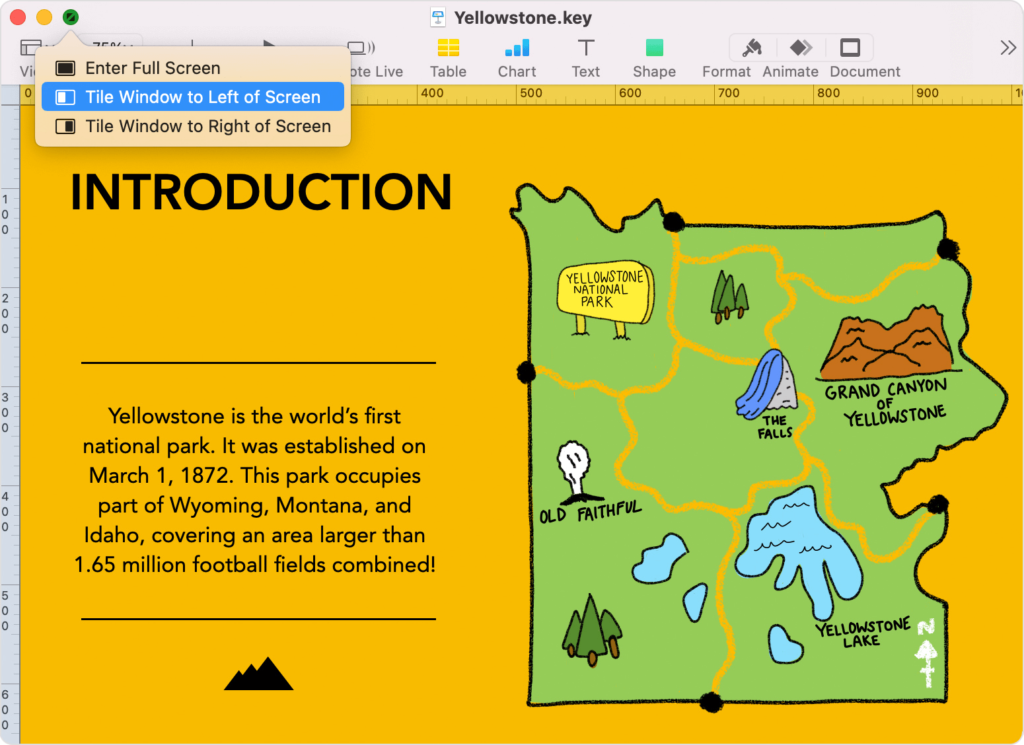
- Activate Split View: Once you’ve entered Full-Screen mode on the first application, move your cursor to the top of the screen to reveal the menu bar. You can either select “Tile window to left of the screen” or “Tile window to the right of the screen”, as per your preference.
- Drag the second application to the other side: Click and hold on to the second application’s thumbnail and drag it to either the left or right side of the screen. Release the mouse button to drop the application into place.
- Adjust the Split View window size: You can adjust the size of each application window by positioning your cursor on the vertical divider between the two windows. Click and drag the divider to resize the windows according to your preference.
How to Switch Screens in Split View?
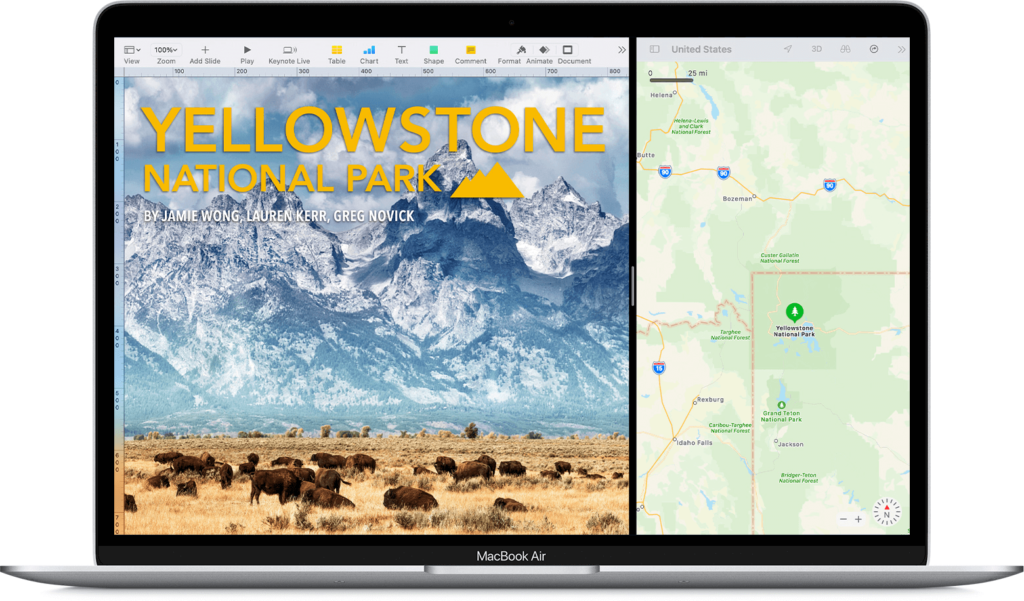
In Split View mode, managing and switching between screens becomes a breeze, allowing you to enhance your productivity. To switch screens, you have multiple options at your disposal. Firstly, you can simply click on the window you want to activate, instantly shifting your focus to that particular application. This straightforward method enables smooth transitions between different tasks.
If you prefer to rearrange the position of your windows within Split View, you can effortlessly switch their positions. By clicking and dragging a window from one side to the other, you can easily swap their locations.
How to Exit Split Screen View on Mac?
Exiting Split Screen on a Mac is a straightforward process. Here are a couple of methods to gracefully exit Split View:
- Tap on the green button: To exit Split View, move your cursor to the top of the screen and locate the green button on one of the windows. Clicking on this button will restore that particular window to its original size and exit Split View. The other window will automatically switch to full-screen mode.
- Keyboard shortcut: Another way to exit Split View is by pressing the “Esc” (Escape) key on your keyboard. This will immediately exit Split View and transition the windows accordingly. The window you’re currently focused on will return to its normal size, while the other window will expand to full-screen mode.
To access the full-screen window after exiting Split View, simply press the Mission Control button (F3) on your keyboard.
How to Use Split Screen on Mac Using Keyboard Shortcuts?
Do you want to know how to use the keyboard shortcut for Split View on a Mac? It’s simple! First, enter full-screen mode by pressing Control + Command + F. Once in full-screen mode, you can activate Split View using the F3 key to open Mission Control. Then, you can drag another application onto the full-screen app to create a split-screen view.
Finally, click on one of the windows to activate the Split View mode and start multitasking effortlessly. With these steps, you can quickly and easily enter Split View and make the most of your Mac’s capabilities.
Conclusion
Mastering the art of Split Screen on your Mac opens up a world of possibilities for efficient multitasking and increased productivity. In this blog post, we have explored the ins and outs of using Split Screen on Mac, from activating it to managing Windows and switching between applications seamlessly.
By following the step-by-step instructions provided, you can make the most of the split screen view on macOS to enhance productivity and multitask efficiently.
Popular Post
Recent Post
Supercharge Your Productivity: A Solopreneur’s and SMB’s Guide to Mastering Google Workspace with Gemini’
Picture this. It’s Monday morning. You open your laptop. Email notifications flood your screen. Your to-do list has 47 items. Three clients need proposals by Friday. Your spreadsheet crashed yesterday. The presentation for tomorrow’s meeting is half-finished. Sound familiar? Most small business owners live this reality. They jump between apps. They lose files. They spend […]
9 Quick Tips: How To Optimize Computer Performance
Learn how to optimize computer performance with simple steps. Clean hard drives, remove unused programs, and boost speed. No technical skills needed. Start today!
How To Speed Up My Computer/Laptop Windows 11/10 [2025]
Want to make your computer faster? A slow computer can be really annoying. It takes up your time and makes work more difficult. But with a few easy steps, you can improve your laptop’s speed and make things run more smoothly. Your computer slows down over time. Old files pile up. Programs start with Windows. […]
How To Fix Low Disk Space Error Due To A Full Temp Folder
A low disk space error due to a full temp folder is a common problem. Many users face this issue daily. Your computer stores temporary files in special folders. These files ensure optimal program performance, but they can accumulate as time goes on. When temp folders get full, your system slows down. You might see […]
How to Use Disk Cleanup on This Computer: Step-by-Step Guide
Computers getting slow is just the worst, right? Well, yes! Files pile up on your hard drive. Luckily, the Disk Cleanup tool on your PC is here to save the day. It clears out unnecessary files, giving your system the boost it needs to run smoothly again. A lot of users aren’t aware of the […]
Top 25 Computer Maintenance Tips: Complete Guide [2025]
Computer maintenance tips are vital for every PC user. Without proper PC maintenance, your system will slow down. Files can get lost. Programs may crash often. These computer maintenance tips will help you avoid these problems. Good PC maintenance keeps your computer running fast. It makes your hardware last longer. Regular computer maintenance tips can […]
Reclaiming Disk Space On Windows Without Losing Files: A Complete Guide
Running low on storage can slow down programs and trigger that annoying “low disk space” warning. Files accumulate over time, cluttering the drive. The good news? It’s possible to reclaim space without deleting anything important. Reclaiming disk space on Windows without losing files is easier than you think. Your computer stores many temporary files, old […]
Fix Issues Downloading From the Microsoft Store on Windows 11, 10 PC
Do you get excited when you’re about to download a new app or game? You open the Microsoft Store, click the download button… but nothing happens. Or maybe it starts and then suddenly stops. Sometimes, strange messages pop up like “Something happened on our end” or “Try again later.” That can be really annoying. But […]
Fix Low Disk Space Errors Quickly On Windows 11, 10 PC [2025]
Low disk space errors can slow down your Windows PC. These errors appear when your hard drive runs out of room. Your computer needs space to work properly. When space runs low, programs crash and files won’t save. Windows shows warning messages about low disk space. Your PC may freeze or run slowly. You might […]
How To Uninstall Software From My Computer: Complete Guide [2025]
Learning how to uninstall software from my computer is a key skill. Every PC user needs to know this. Old programs take up space. They slow down your system. Unused software creates clutter. When you remove a program from computer, you free up storage. Your PC runs faster. You also fix issues caused by bad […]

