How to Watch Netflix 4K Videos on Mac?
Netflix is one of the biggest streaming services currently, with almost 214 million subscribers. Users can easily Watch Netflix 4K content on their laptops or PC, but this is only available for Windows.
Mac aims to offer the MacOS Big Sur with Safari 14 updates for users to stream the content on Netflix in HDR 4K definition. However, the software would work on specific laptop and desktop versions of Mac that can support compatible hardware.
How to Watch Netflix Videos in 4K on Mac
There are particular methods available for Mac users to stream their Netflix content on Mac devices. We tried out different options to see the most suitable and easy processes for current versions. Prerequisites include a Netflix Premium account, Mac device with Kaby Lake or newer Intel processor type, HDCP 2.2-supported 4K TV, and a Windows 10 copy.
Here are the top methods available.
Method 1: Install Windows 10 and Parallels Desktop on Mac
One manner of watching Mac Netflix 4K content is using a virtual machine, such as Parallels Desktop on your device. With this, you can operate Windows 10 through your Mac computer or laptop. Users who do not want to boot their system in specific manners prefer this method since they can easily switch between Windows and macOS.
This method is suitable for systems with a dual-monitor setup alternatively but can run on single-monitor systems.
How to do this?
Step 1: It is important to open the Parallels Desktop 15 site and download the software with a free trial or full plan.
Step 2: Open the Finder app from your system search bar after the download completes. Look for the file ParallelsDesktop.dmg here and double-click your cursor on it.
On the other hand, you can directly search for the file through Spotlight.
Step 3: The Parallels Dekstop window would come up. Double-click your cursor on top of the “Install” button.
Step 4: The software would show a confirmation prompt. Click on “Open” to begin the installation.
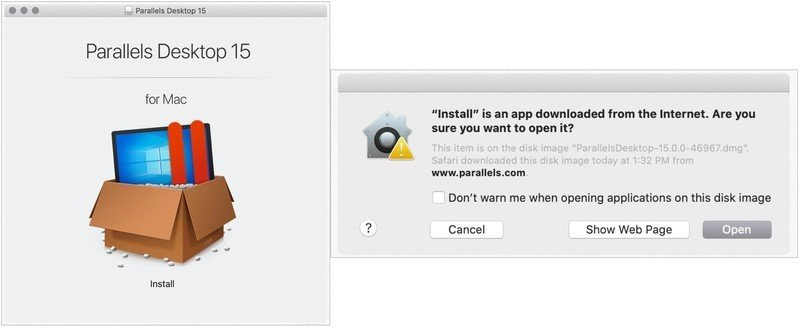
Step 5: Click Yes on the License Agreement prompt.
Step 6: On the next window, add the Administrator Name and then the Password in the correct fields.
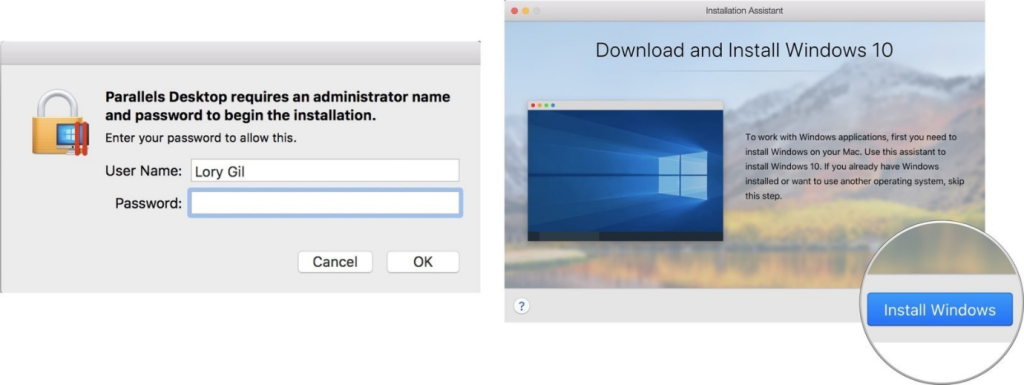
Step 7: After it installs, the software will automatically open the page for Windows 10 download on your Mac device.
Click on the “Install Windows” button to start the installation or “Skip” if you have a Windows 10 copy.
Step 8: Next, users are re-directed to the page for the Parallels Desktop account. Create a new one if you do not have an account or Sign-in to your available one.
Step 9: A new window would appear with a simulated Windows interface. Stream Mac Netflix 4K content through there.
Method 2: Use Bootcamp to Install Windows 10 on Mac
Another method to Watch Netflix 4K content on Mac is to use the Bootcamp software. Users can expect a native Windows-centric experience here. The Bootcamp partitions the SSD or HDD of the Mac into a section where one can install the Windows 10 version. Here, you can select the Windows partition to steam Mac Netflix 4K videos and then use the Mac partition later.
How to do this?
The following is a three-part breakdown of the setup of Windows 10 OS on Mac via Bootcamp for easy Mac Netflix 4K streaming.
Sequence 1: Install Windows 10 using BootCamp
First, you must download the Windows 10 version on the Mac device. Then, use the next steps for further installation.
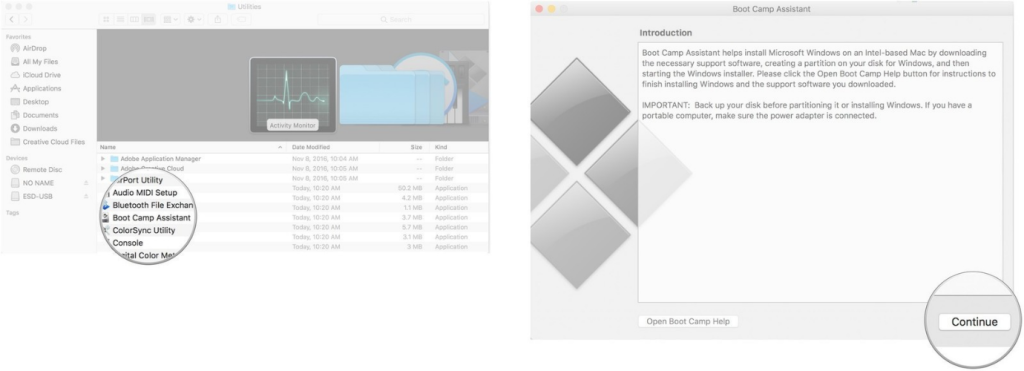
Step 1: Open Applications > Utilities. Find the “Boot Camp Assistant” option and launch the application.
Step 2: Click on the Continue button. The BootCamp software would automatically search for the Windows 10 ISO file you downloaded.
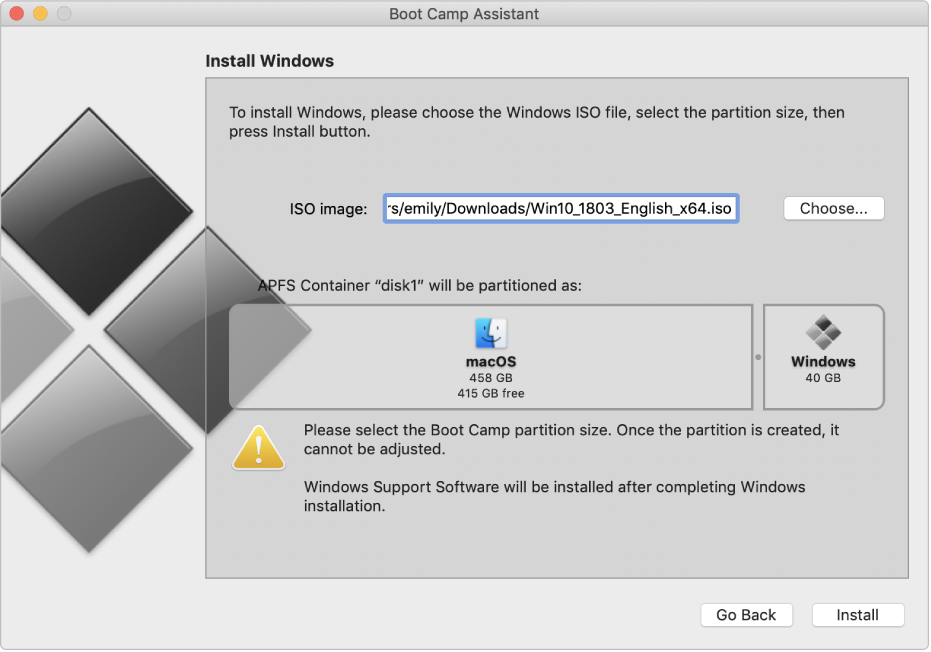
Step 3: Under the Partition section, click on the slider and drag it to the side. This would set the default 458 GB storage. Users have the choice to adjust their storage requirements depending on the space limits inside the drive.
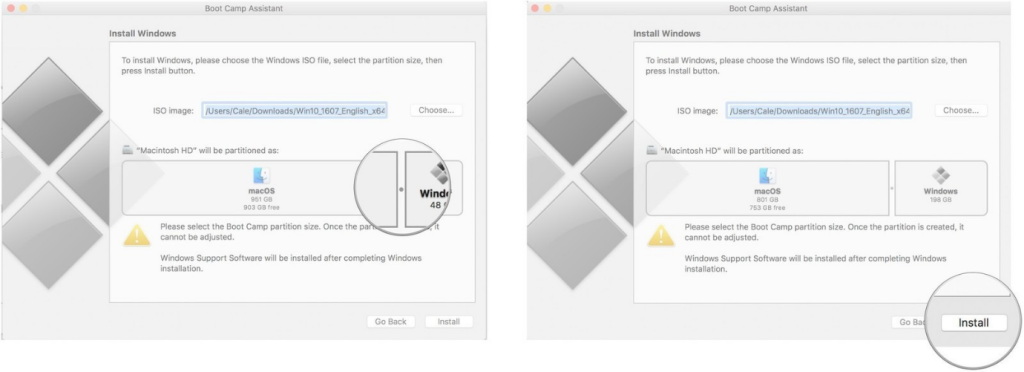
Step 4: Click on the “Install” button. This would download the Windows support.
Step 5: Add your set password in the available field.
Step 6: Click on the OK button. This would restart the Mac device, and the Windows 10 setup window would appear next.
Step 7: Select the preferred language out of the list.
Step 8: Click on the “Install Now” button.
Step 9: Either add your product key code or click the cursor on the “I don’t have a key” option. This step is possible after the installation as well.
Step 10: Choose the Windows 10 Pro option > Next.
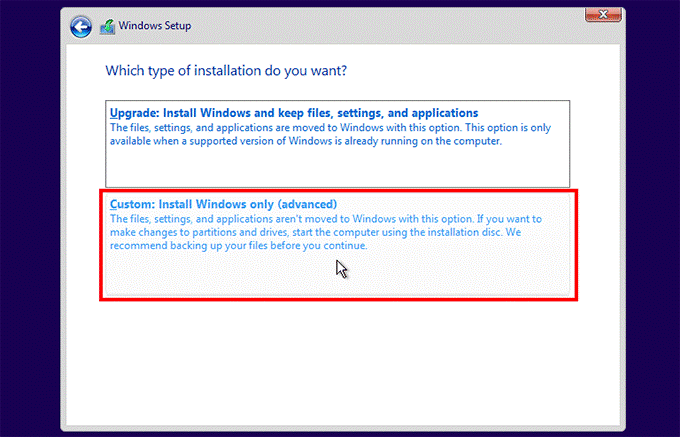
Step 11: Click the cursor on the “Custom: Install Windows Only” option on the next window.
Step 12: Click on top of the “Drive 0 Partition X: BOOTCAMP” option only and then choose Next. This will begin Windows 10 installation.
The Mac device you are using would restart multiple times.
Step 13: On the next setup window, click on the “Customize your installation” or “Use Express Settings” option
Step 14: If you choose the latter, type the username and password of your choice. Then, click the “Next” button.
Step 15: You can select Cortana use or avoid it. The Windows 10 software would boot up completely after this.
Sequence 2: Install the BootCamp on Windows 10 Partition
After the Windows 10 OS loads up on the Mac device, this would activate the BootCamp software installer. The step is important since particular software and drivers enter into the device during the BootCamp installation process. The window for it would crop up on the screen.
Step 1: Click on the “Install” option.
Step 2: Then, choose to agree on the license agreement prompt.
Step 3: Then, click your cursor on the Install option.
Step 4: After the installation is fully done, click on the “Finish” button.
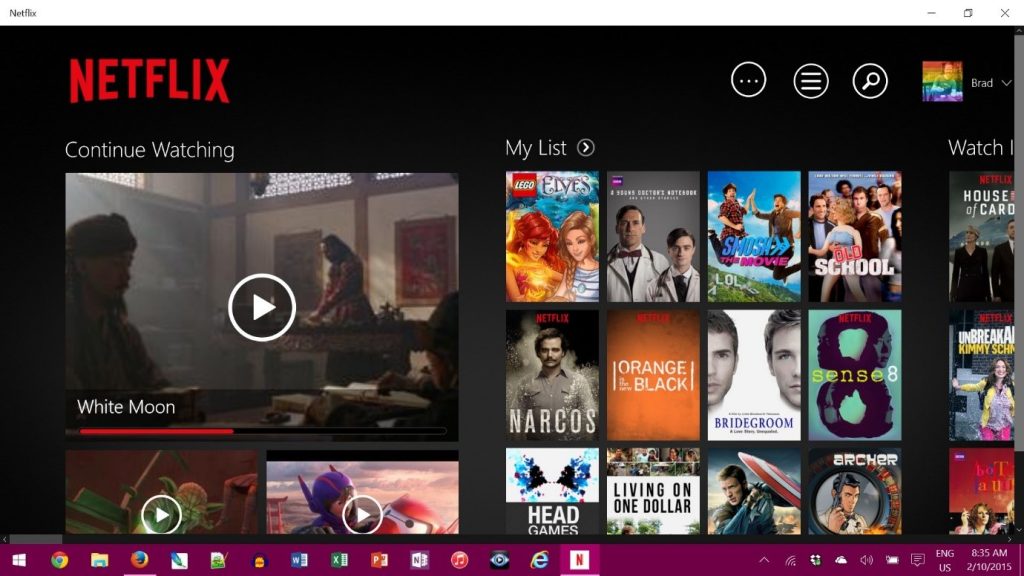
Step 5: Access the Netflix account and Watch Netflix 4K on Mac.
Sequence 3: Return Your Device to macOS Partition
After using the Windows partition screen, it is possible to easily switch the device OS back to macOS.
Step 1: Open the Windows 10 taskbar. Then, click your cursor on the “Show Hidden Icons” option.
Step 2: Click on the Boot Camp option.
Step 3: Then, choose the “Restart in OS X” option.

This would bring the macOS interface again. Alternatively, you can restart the Mac device and press on top of the “Options” key. This would open the boot menu, and you can select your preferred OS for the usage period.
Conclusion
Upon following the different steps correctly, users can Watch Netflix 4K content on their macOS devices. First, check for compatibility to understand which method would work best for your Mac laptop or PC.
If this proved helpful for you, read through our posts for similar guides.
Popular Post
Recent Post
How To Adjust Display Appearance Settings Easily in Windows 11/10
Learn to adjust display appearance settings easily Windows offers. Simple guide covers brightness, scaling, resolution & multi-monitor setup for better screen experience.
Supercharge Your Productivity: A Solopreneur’s and SMB’s Guide to Mastering Google Workspace with Gemini’
Picture this. It’s Monday morning. You open your laptop. Email notifications flood your screen. Your to-do list has 47 items. Three clients need proposals by Friday. Your spreadsheet crashed yesterday. The presentation for tomorrow’s meeting is half-finished. Sound familiar? Most small business owners live this reality. They jump between apps. They lose files. They spend […]
9 Quick Tips: How To Optimize Computer Performance
Learn how to optimize computer performance with simple steps. Clean hard drives, remove unused programs, and boost speed. No technical skills needed. Start today!
How To Speed Up My Computer/Laptop Windows 11/10 [2025]
Want to make your computer faster? A slow computer can be really annoying. It takes up your time and makes work more difficult. But with a few easy steps, you can improve your laptop’s speed and make things run more smoothly. Your computer slows down over time. Old files pile up. Programs start with Windows. […]
How To Fix Low Disk Space Error Due To A Full Temp Folder
A low disk space error due to a full temp folder is a common problem. Many users face this issue daily. Your computer stores temporary files in special folders. These files ensure optimal program performance, but they can accumulate as time goes on. When temp folders get full, your system slows down. You might see […]
How to Use Disk Cleanup on This Computer: Step-by-Step Guide
Computers getting slow is just the worst, right? Well, yes! Files pile up on your hard drive. Luckily, the Disk Cleanup tool on your PC is here to save the day. It clears out unnecessary files, giving your system the boost it needs to run smoothly again. A lot of users aren’t aware of the […]
Top 25 Computer Maintenance Tips: Complete Guide [2025]
Computer maintenance tips are vital for every PC user. Without proper PC maintenance, your system will slow down. Files can get lost. Programs may crash often. These computer maintenance tips will help you avoid these problems. Good PC maintenance keeps your computer running fast. It makes your hardware last longer. Regular computer maintenance tips can […]
Reclaiming Disk Space On Windows Without Losing Files: A Complete Guide
Running low on storage can slow down programs and trigger that annoying “low disk space” warning. Files accumulate over time, cluttering the drive. The good news? It’s possible to reclaim space without deleting anything important. Reclaiming disk space on Windows without losing files is easier than you think. Your computer stores many temporary files, old […]
Fix Issues Downloading From the Microsoft Store on Windows 11, 10 PC
Do you get excited when you’re about to download a new app or game? You open the Microsoft Store, click the download button… but nothing happens. Or maybe it starts and then suddenly stops. Sometimes, strange messages pop up like “Something happened on our end” or “Try again later.” That can be really annoying. But […]
Fix Low Disk Space Errors Quickly On Windows 11, 10 PC [2025]
Low disk space errors can slow down your Windows PC. These errors appear when your hard drive runs out of room. Your computer needs space to work properly. When space runs low, programs crash and files won’t save. Windows shows warning messages about low disk space. Your PC may freeze or run slowly. You might […]


