Virus Threat Protection Settings For Windows Computer [2025]

Last updated on June 3rd, 2025 at 3:03 am
Your Windows computer faces many threats every day. Hackers try to steal your data. Viruses want to damage your files. Malware aims to slow down your system. This is why you need strong protection.
Cybercriminals work around the clock. They create new viruses every hour. They target home users and businesses alike. Your personal photos could be stolen. Your bank details might be copied. Your work files could be destroyed. Without proper protection, you become an easy target.
Windows has built-in security features. These are called virus threat protection settings. They work like a shield for your computer. They block bad software before it can harm you. Most people don’t know how to use these settings properly. They leave their computers vulnerable to attack.
In this guide, you will learn how to set them up correctly. You will also discover why they matter so much. We will show you step-by-step instructions. You will become confident in protecting your computer.
Part 1: What Are The Virus Threat Protection Settings For Windows?
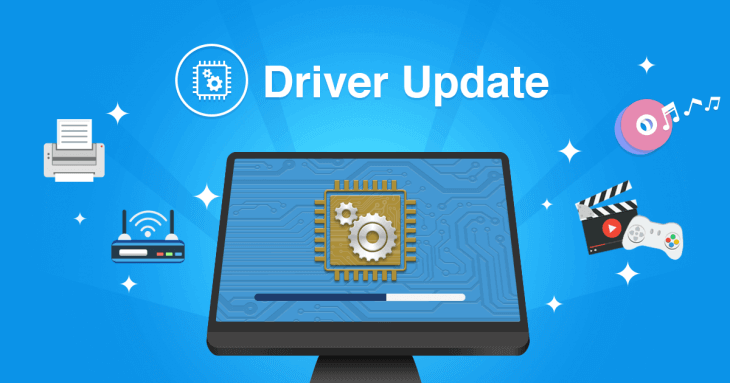
Virus threat protection settings are built-in Windows security tools. They come free with every Windows computer. Microsoft created them to keep your system safe. These settings work in the background all the time. You don’t need to buy extra software. Everything you need is already there.
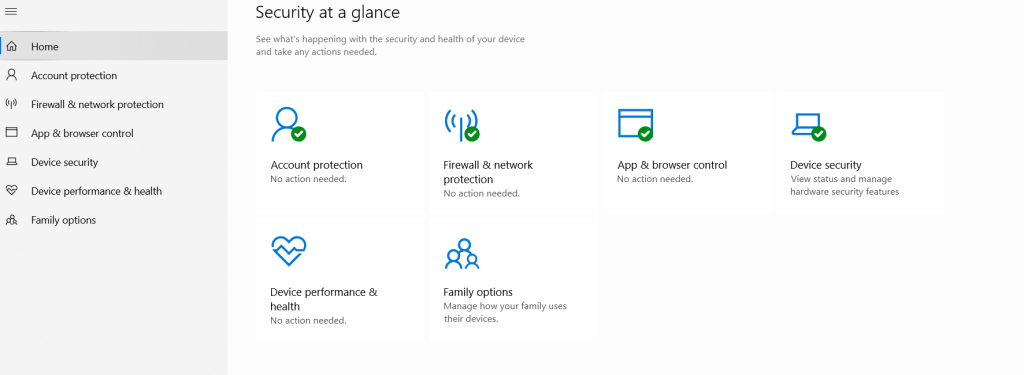
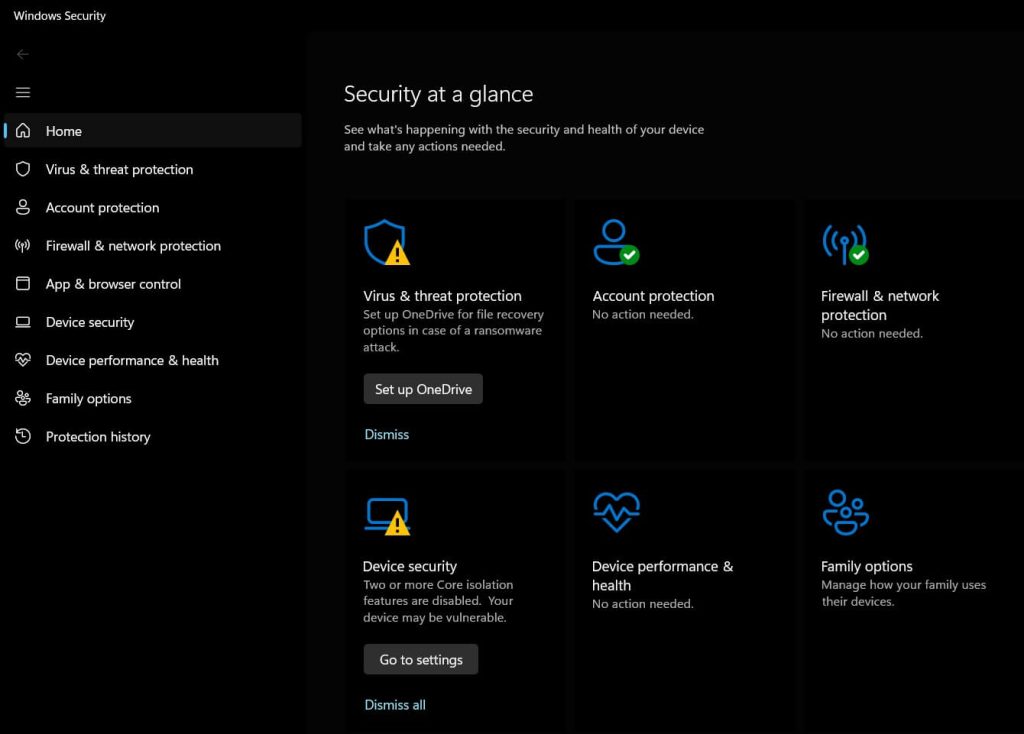
The main tool is called Windows Defender. It scans your files for viruses. It also watches what programs do on your computer. When it finds something bad, it stops it right away. You can control how it works through various settings. The program updates itself automatically. New virus definitions are downloaded every day.
Each part has its own job in keeping you safe. They work together like a team. When one part finds a threat, it alerts the others. This creates multiple layers of protection. Even if one layer fails, others still protect you. This approach is much stronger than single-layer protection.
Part 2: What Is The Need Of Virus Threat Protection Settings For Computer?
Here are the main reasons why you need these settings:
- Stop viruses from infecting your files – Viruses can corrupt important documents and photos
- Block malware downloads – Prevents harmful software from installing automatically
- Protect personal information – Keeps hackers from stealing passwords and bank details
- Prevent system crashes – Stops malicious code from making your computer unstable
- Save money on repairs – Avoiding infections means fewer expensive computer fixes
- Keep work data safe – Protects business files from being stolen or damaged
- Maintain computer speed – Prevents malware from slowing down your system
- Enable safe browsing – Warns you about dangerous websites before you visit them
Part 3: Precautions To Take: Using Virus Threat Protect Settings
Setting up virus threat protection settings correctly requires careful attention. You need to balance security with usability. Too much security blocks legitimate programs. Too little security leaves you vulnerable. Finding the right balance takes practice. Start with default settings and adjust slowly.
Many users make critical mistakes when configuring protection. They disable important features accidentally. They add too many exclusions carelessly. They ignore important warnings regularly. These mistakes create security gaps. Criminals exploit these gaps quickly. Following proper precautions prevents these problems.
Here are important precautions to follow:
- Never disable real-time scanning – This leaves your computer completely exposed to threats
- Keep Windows updates current – New security patches fix vulnerabilities that hackers exploit
- Don’t exclude system folders – Only exclude files you absolutely trust and need
- Use strong passwords – Weak passwords make other security measures less effective
- Be careful with email attachments – Scan all downloads before opening them
- Backup important files regularly – Protection isn’t perfect, so have copies of key data
- Monitor system performance – If your computer slows down suddenly, check for infections
- Review settings monthly – Security needs change, so update your configuration regularly
Part 4: Pros/Cons: Virus Threat Protection Settings
Understanding the advantages and disadvantages helps you make informed decisions. No security solution is perfect. Each approach has trade-offs. Windows built-in protection offers good value. It provides solid protection for most users. However, it has some limitations too.
Pros:
- Free protection built into Windows – No additional cost for basic security. Microsoft includes protection with every Windows license. You don’t need to research third-party options. Installation happens automatically during Windows setup. Updates arrive through Windows Update automatically.
- Automatic updates keep security current – New virus definitions download daily. Protection improves without user intervention. Microsoft’s research team works constantly. They analyze new threats quickly. Updates deploy to all users simultaneously.
- Low impact on system performance – Modern computers handle protection easily. Resource usage stays minimal during normal operation. Scans run efficiently in the background. Gaming and work performance remain unaffected. Older computers might notice slight slowdowns occasionally.
- Easy to configure for most users – Default settings work well immediately. Advanced users can customize extensively. Interface design follows Windows standards.
- Integrates well with Windows features – Protection works seamlessly with other Windows components. File Explorer shows scan results directly.
- Provides real-time threat detection – Threats are caught before causing damage. Protection monitors file system activity constantly. Suspicious behavior triggers immediate alerts.
Cons:
- May not catch the newest threats immediately – Zero-day threats evade detection temporarily. Criminals develop new techniques constantly. Protection databases need time to update.
- Can sometimes block legitimate software – False positives inconvenience users occasionally. Legitimate programs might trigger warnings. New software faces extra scrutiny initially. Users must approve blocked programs manually. This creates extra steps for some installations.
- Limited customization compared to paid solutions – Advanced users want more control options. Professional features cost extra money. Enterprise management tools aren’t included.
- Requires internet connection for best protection – Cloud protection needs online access. Offline computers miss important updates. Mobile users face connectivity challenges. Rural areas have limited internet access.
Part 5: Top Virus Threat Protection Settings
These are the most important virus threat protection settings for Windows users. Each setting provides specific protection benefits. Configure these settings first for maximum security. Start with basic settings and add advanced options later. Test each setting to ensure compatibility with your programs.
1. Real-Time Protection
This is the most important virus threat protection setting. It scans files as you open them. It also watches programs as they run. Real-time protection catches threats immediately. It prevents infections from spreading quickly. Without this setting, your computer remains vulnerable constantly.
The feature monitors file system activity continuously. Every file access triggers a security check. Suspicious files are blocked automatically. Users receive immediate warnings about threats. The system quarantines dangerous files safely. This happens before any damage occurs.
Why use it: Catches threats before they can damage your system. Works automatically without your input. Provides immediate protection against new infections. Prevents viruses from copying themselves. Stops malware from modifying system files. Creates the first line of defense against all threats.
Steps to enable:
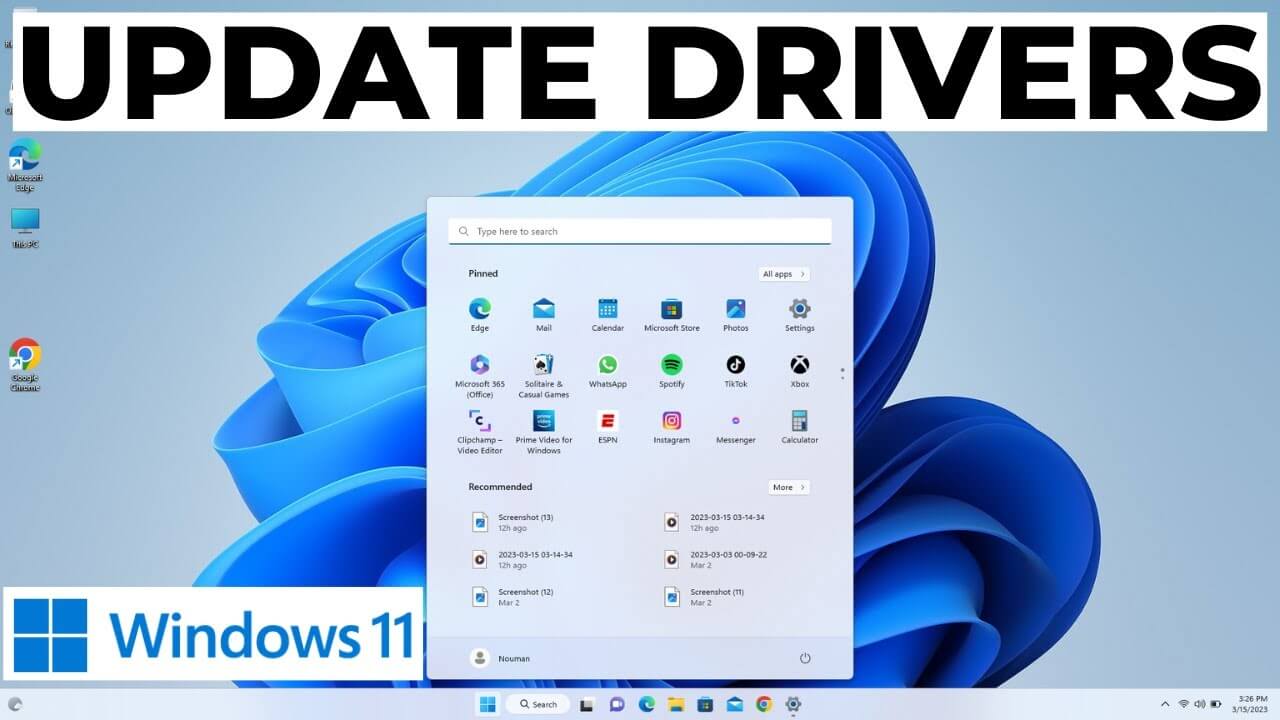
- Click the Start button on your taskbar. Type “Windows Security” in the search box. Click on Windows Security from the results. Select “Virus & threat protection” from the menu.
- Look for “Virus & threat protection settings”. Click on “Manage settings” under this section.
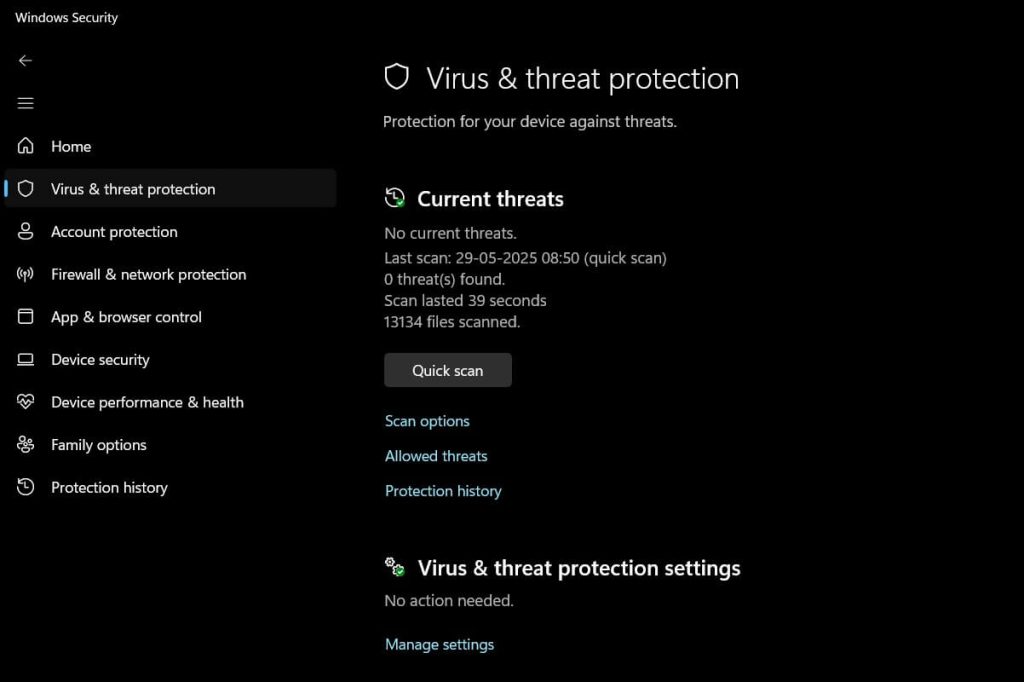
- Find the “Real-time protection” toggle switch. Turn the switch to the “On” position.
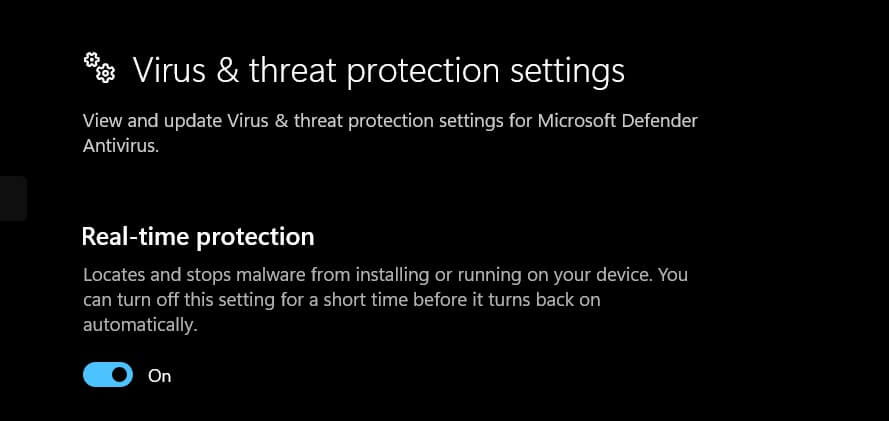
- Close the Windows Security window. Restart your computer to ensure proper activation
2. Cloud-Delivered Protection
This setting uses Microsoft’s online databases. It helps identify new threats faster. Your computer sends file information to Microsoft’s servers. The service provides real-time threat intelligence. New virus signatures download automatically. This creates a faster response to emerging threats.
Cloud protection connects to Microsoft’s security network. Millions of computers share threat information. New threats are identified within minutes. Protection updates happen multiple times daily. Your computer benefits from global threat intelligence. This service is free for all Windows users.
Why use it: Provides protection against the latest threats. Updates happen automatically throughout the day. Leverages global threat intelligence effectively. Identifies new viruses before local updates. Reduces time between threat discovery and protection. Improves detection rates significantly.
Steps to enable:
- Open Windows Security from the Start menu. Navigate to “Virus & threat protection”. Click on “Virus & threat protection settings”. Select “Manage settings” link.
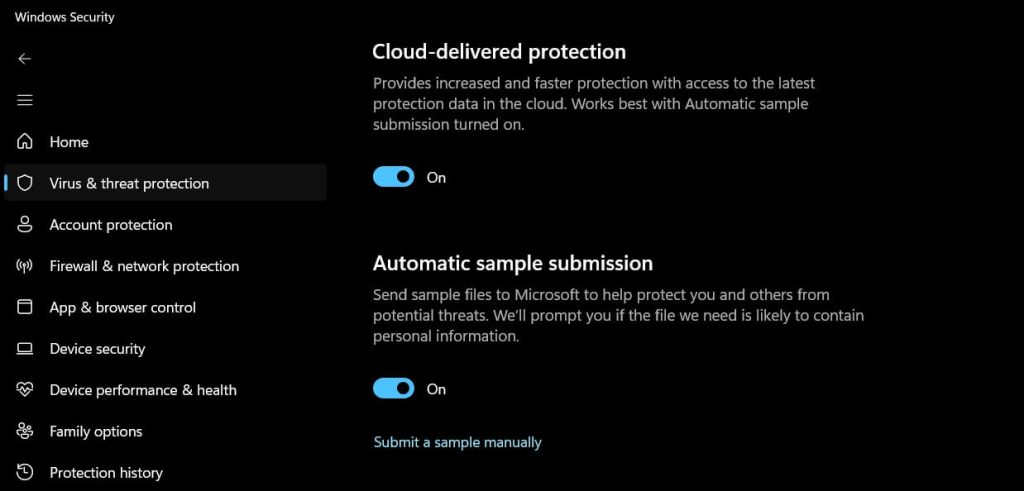
- Scroll down to find “Cloud-delivered protection”. Turn the toggle switch to “On”. Read the privacy information carefully. Click “Yes” to confirm your choice. Wait for the setting to activate. Restart your computer if prompted by the system
3. Automatic Sample Submission
This sends suspicious files to Microsoft for analysis. It helps improve protection for everyone. Your personal files stay private during this process. Only suspicious files are submitted automatically. Microsoft analyzes these samples quickly. New protection rules are created from analysis results.
The feature helps Microsoft understand new threats. Security researchers examine submitted samples carefully. They create new detection rules rapidly. These rules protect all Windows users globally. Your participation helps the entire Windows community. Personal information remains protected during submission.
Why use it: Helps Microsoft create better protection. Makes the system smarter over time. Contributes to global security improvements. Provides faster protection against new threats. Benefits from community-based security intelligence. Improves detection accuracy for everyone.
Steps to enable:
- Go to the Windows Security application. Select the “Virus & threat protection” option. Click on “Virus & threat protection settings”. Choose “Manage settings” from the options. Find the “Automatic sample submission” section.
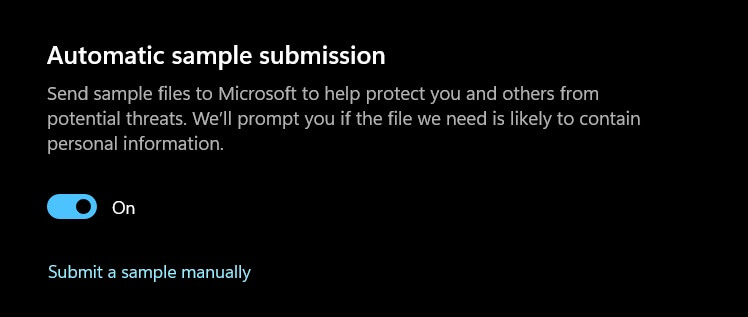
- Switch the toggle to the “On” position. Review the privacy statement provided. Confirm your choice by clicking “Yes”. Allow the system to save changes. The feature activates immediately without a restart
4. Controlled Folder Access
This protects important folders from ransomware. It stops unknown programs from changing your files. You can add trusted programs to an allowed list. The feature monitors folder access attempts continuously. Unauthorized changes are blocked immediately. Users receive alerts about blocked attempts.
Ransomware is a growing threat worldwide. It encrypts valuable files and demands payment. Controlled folder access prevents this attack method. Protected folders become read-only for unknown programs. Legitimate programs continue working normally. Users maintain full control over their files.
Why use it: Prevents ransomware from encrypting your documents. Keeps your most important files safe. Provides an additional layer of protection. Monitors folder access in real-time. Allows customization of protected folders. Maintains usability while improving security.
Steps to enable:
- Launch Windows Security from the Start menu. Go to the “Virus & threat protection” section. Look for the “Ransomware protection” option. Click on “Manage ransomware protection”.
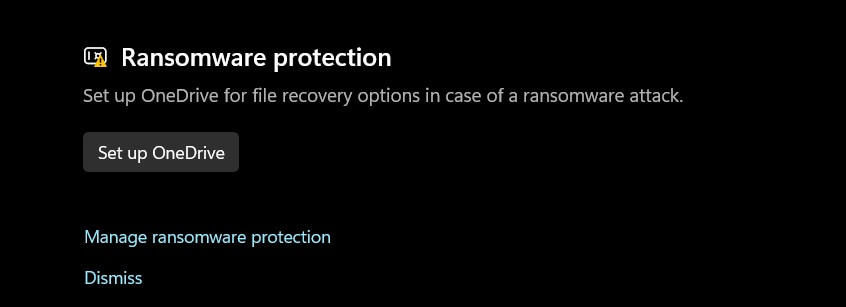
- Find the “Controlled folder access” setting. Turn the toggle switch to “On”. Click “Yes” when prompted for confirmation. Review the list of protected folders. Add additional folders if needed. Test the feature with trusted applications
5. Network Protection
This blocks connections to malicious websites. It works with your web browser. It also protects other programs that use the internet. Network protection analyzes web traffic continuously. Dangerous connections are terminated immediately. Users receive warnings about blocked sites.
The feature uses Microsoft’s reputation database. Known malicious websites are blocked automatically. Phishing sites cannot steal your information. Malware download sites become inaccessible. Social engineering attacks are prevented effectively. Your web browsing becomes much safer.
Why use it: Stops you from visiting dangerous sites. Prevents malware downloads from the web. Blocks phishing attempts automatically. Protects against social engineering attacks. Works with all internet-connected programs. Provides real-time web protection.
Steps to enable:
- Open the Windows Security application. Navigate to “App & browser control”. Look for “Reputation-based protection” section.
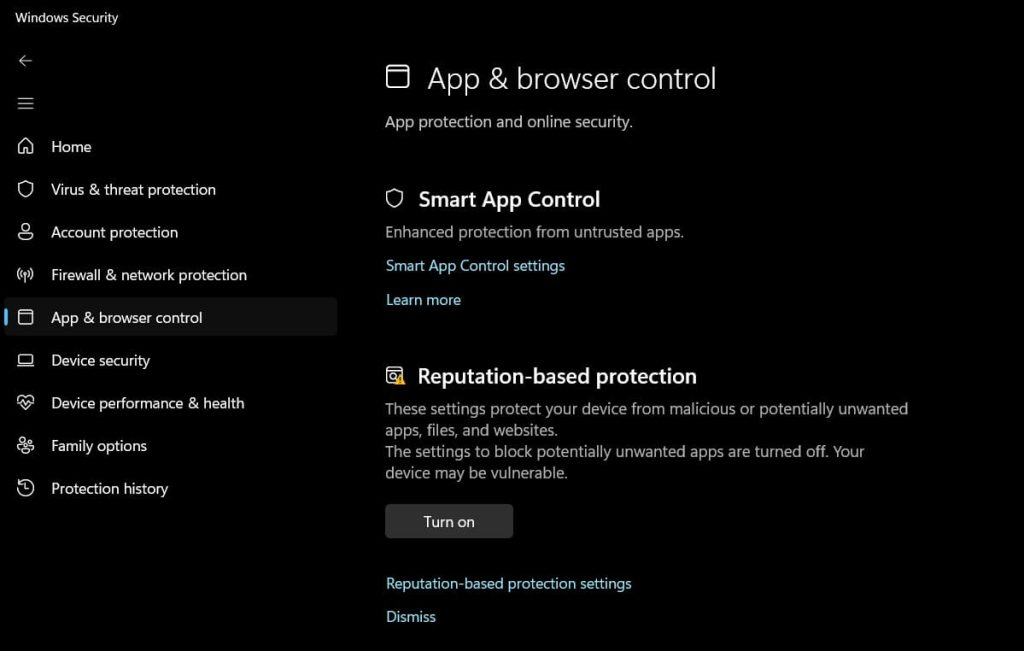
- The protection activates immediately
6. Firewall Settings
Windows Firewall controls network traffic. It blocks unauthorized connections. It also stops programs from sending data without permission. The firewall monitors all network activity. Suspicious connections are blocked automatically. Users can customize rules for specific programs.
Firewalls create barriers between your computer and the internet. They examine every network packet carefully. Authorized traffic passes through normally. Unauthorized attempts are rejected immediately. This prevents many types of cyber attacks. Remote access attempts are blocked effectively.
Why use it: Creates a barrier between your computer and the internet. Prevents hackers from accessing your system remotely. Blocks unauthorized data transmission. Controls program internet access. Protects against network-based attacks. Provides customizable security rules.
Steps to enable:
- Press Windows key + R to open the Run dialog. Type “firewall.cpl” and press Enter. Click “Turn Windows Defender Firewall on or off”.
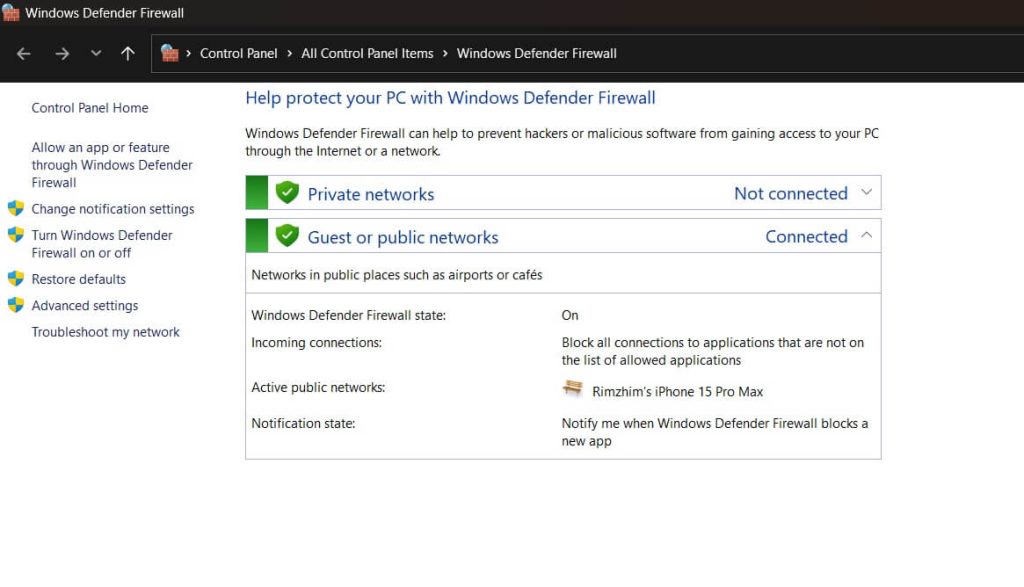
- Select “Turn on Windows Defender Firewall” for both networks. Choose “Block all incoming connections” for public networks.
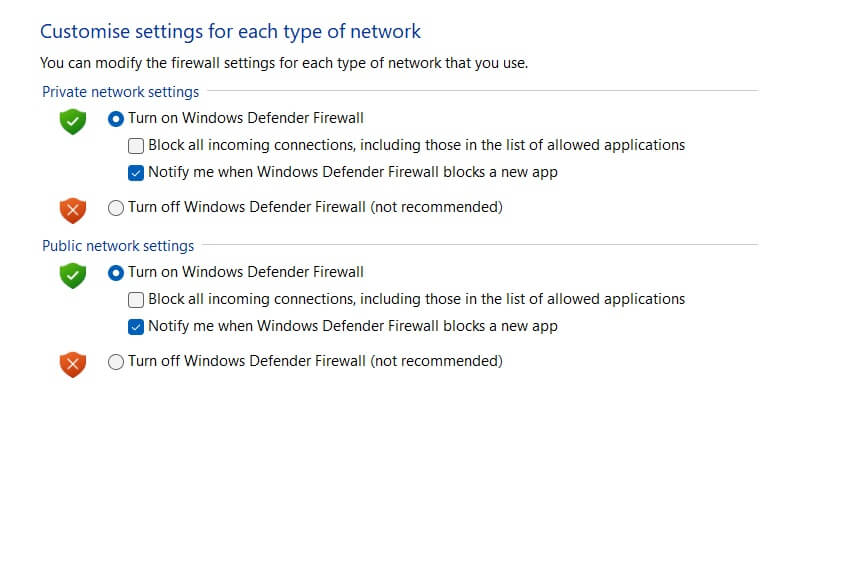
- Click “OK” to save the changes. Return to the main firewall window. Click “Allow an app or feature through Windows Defender Firewall”. Review the list of allowed programs. Make changes only if absolutely necessary
Conclusion
Virus threat protection settings are essential for every Windows user. They provide strong security without costing extra money. These settings work together to create multiple layers of protection. When configured properly, they can stop most threats before they cause damage. Your personal information stays safe from cybercriminals.
Make sure your programs still work correctly. Add advanced features gradually. Don’t change too many settings at once. This approach prevents configuration problems.
FAQs
Q: Do I need third-party antivirus if I use Windows virus threat protection settings?
For most users, Windows built-in protection is enough. It provides good security for everyday computing. The protection catches common viruses effectively. It blocks most malware automatically. Microsoft updates the protection regularly. New threats are detected quickly through cloud intelligence.
Q: Why do my virus threat protection settings sometimes turn off automatically?
This usually happens when you install third-party antivirus software. Windows disables its protection to avoid conflicts. Two antivirus programs running simultaneously cause problems. They compete for system resources constantly. This slows down your computer significantly. It also reduces protection effectiveness.
Q: Can virus threat protection settings slow down my computer?
Modern virus threat protection settings use very little system resources. They are designed to work efficiently in the background. Microsoft optimized them for performance. Current processors handle protection easily. Most users notice no speed difference. Gaming performance remains unaffected typically.
Author Bio:
Dinesh Lakhwani 
Dinesh Lakhwani, the entrepreneurial brain behind “TechCommuters,” achieved big things in the tech world. He started the company to make smart and user-friendly tech solutions. Thanks to his sharp thinking, focus on quality and the motto of never giving up, TechCommuters became a top player in the industry. His commitment to excellence has propelled the company to a leading position in the industry.
Popular Post


Recent Post

How To Adjust Display Appearance Settings Easily in Windows 11/10
Learn to adjust display appearance settings easily Windows offers. Simple guide covers brightness, scaling, resolution & multi-monitor setup for better screen experience.

Supercharge Your Productivity: A Solopreneur’s and SMB’s Guide to Mastering Google Workspace with Gemini’
Picture this. It’s Monday morning. You open your laptop. Email notifications flood your screen. Your to-do list has 47 items. Three clients need proposals by Friday. Your spreadsheet crashed yesterday. The presentation for tomorrow’s meeting is half-finished. Sound familiar? Most small business owners live this reality. They jump between apps. They lose files. They spend […]

9 Quick Tips: How To Optimize Computer Performance
Learn how to optimize computer performance with simple steps. Clean hard drives, remove unused programs, and boost speed. No technical skills needed. Start today!

How To Speed Up My Computer/Laptop Windows 11/10 [2025]
Want to make your computer faster? A slow computer can be really annoying. It takes up your time and makes work more difficult. But with a few easy steps, you can improve your laptop’s speed and make things run more smoothly. Your computer slows down over time. Old files pile up. Programs start with Windows. […]

How To Fix Low Disk Space Error Due To A Full Temp Folder
A low disk space error due to a full temp folder is a common problem. Many users face this issue daily. Your computer stores temporary files in special folders. These files ensure optimal program performance, but they can accumulate as time goes on. When temp folders get full, your system slows down. You might see […]

How to Use Disk Cleanup on This Computer: Step-by-Step Guide
Computers getting slow is just the worst, right? Well, yes! Files pile up on your hard drive. Luckily, the Disk Cleanup tool on your PC is here to save the day. It clears out unnecessary files, giving your system the boost it needs to run smoothly again. A lot of users aren’t aware of the […]

Top 25 Computer Maintenance Tips: Complete Guide [2025]
Computer maintenance tips are vital for every PC user. Without proper PC maintenance, your system will slow down. Files can get lost. Programs may crash often. These computer maintenance tips will help you avoid these problems. Good PC maintenance keeps your computer running fast. It makes your hardware last longer. Regular computer maintenance tips can […]

Reclaiming Disk Space On Windows Without Losing Files: A Complete Guide
Running low on storage can slow down programs and trigger that annoying “low disk space” warning. Files accumulate over time, cluttering the drive. The good news? It’s possible to reclaim space without deleting anything important. Reclaiming disk space on Windows without losing files is easier than you think. Your computer stores many temporary files, old […]

Fix Issues Downloading From the Microsoft Store on Windows 11, 10 PC
Do you get excited when you’re about to download a new app or game? You open the Microsoft Store, click the download button… but nothing happens. Or maybe it starts and then suddenly stops. Sometimes, strange messages pop up like “Something happened on our end” or “Try again later.” That can be really annoying. But […]

Fix Low Disk Space Errors Quickly On Windows 11, 10 PC [2025]
Low disk space errors can slow down your Windows PC. These errors appear when your hard drive runs out of room. Your computer needs space to work properly. When space runs low, programs crash and files won’t save. Windows shows warning messages about low disk space. Your PC may freeze or run slowly. You might […]