How to Make All Images The Same Size: 7 Ways
Images are a beautiful way to capture memories. In this digital age, capturing and sharing images have become super simple. You can click photos with your phone camera and quickly share them with your friends via instant messaging apps or social media.
But there is a small problem — to make all images the same size. Every device and social sharing portal today supports different image sizes. For instance, the Instagram grid supports 1080 x 1080 pixels, and the Pinterest layout wants 1000 x 1500 pixels size images.
Thus, when you want to share the same photo on all your social media platforms or upload different size photos on your website, it is essential to make all images of the same size.
It is easy to make different sizes of images into the same size. You can use third-party software and native methods in Windows and Mac to do so. Below, we will discuss all the possible ways to make all images the same size.
How to Make All Images the Same Size? Top 7 Ways
There you can use default Web and Mac features or third-party tools and online solutions to make all your images the same size. Here we have explained all the methods in detail so you can select the perfect one.
Way 1: Resize Multiple Images in Windows
Windows users can resize multiple photos at once to make them the same size. There is no need to use additional tools with methods. Follow these steps to reduce photo size and file size on Windows:
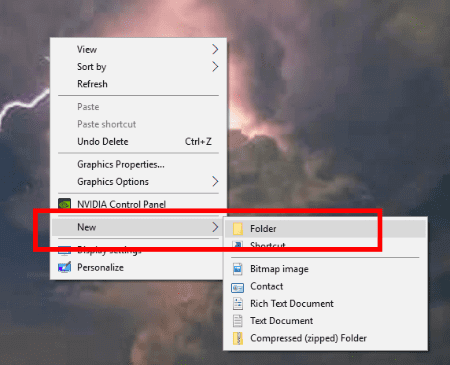
Step 1: Add all the photos you want to resize in a folder. To do so, right-click anywhere on your screen and go to New > Folder. After that, move the photos to the new folder.
Step 2: Now, open the folder containing all the images you wish to resize.
Step 3: Select all the photos by pressing the Ctrl and A keys together on your keyboard.
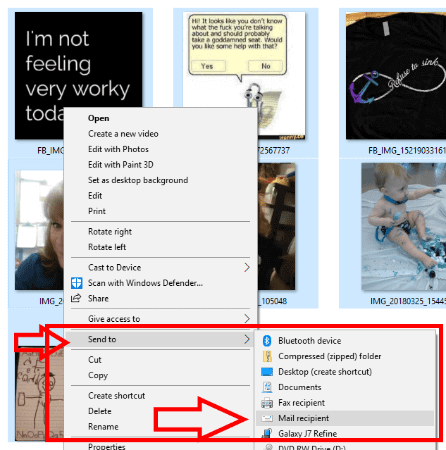
Step 4: Right-click on one photo and select Send To > Mail Recipient. Here you are not actually emailing these photos.
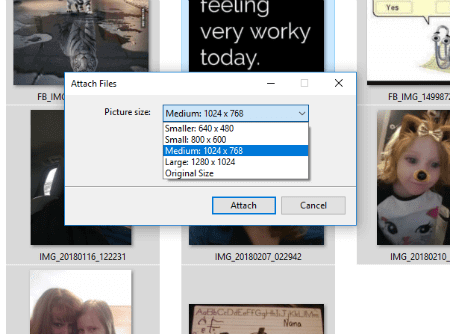
Step 5: Now, a small window will show up, letting you change the picture size. Finally, you can select the right picture size and click Attach.
Step 6: After that, your email program will initiate; ignore it. Simply go to your search box and type %temp%
Step 7: Once the Temporary folder launches, look for your attachment folder, and all your images will now be the same size.
Way 2: Resize Multiple Images on Mac
Mac users, there is no need to worry. You can also resize multiple images using default features. Here’s how to make all images the same size in the Mac operating system:
Step 1: Select all the images you want to make the same size.
Step 2: Right-click on one photo and select Open with Preview.
Step 3: On the Preview window, click on Edit > Select All.
Step 4: After that, go to Tools and select Adjust Size.
Step 5: Choose the Scale Proportionally box to ensure your image quality is not compromised.
Step 6: Enter the dimensions to which you want to resize images.
Step 7: Click on the Save button, and all your images are now resized.
Way 3: Make All Images the Same Size Using Image Resizer
Image Resizer is an amazing tool to crop, rotate, rename, flip, or format photos. It can change the dimensions of multiple images without losing their visual quality. If you want to edit and resize photos, you can use this software on your computer as follows:
Step 1: Download and install the Image Resizer application on your computer.
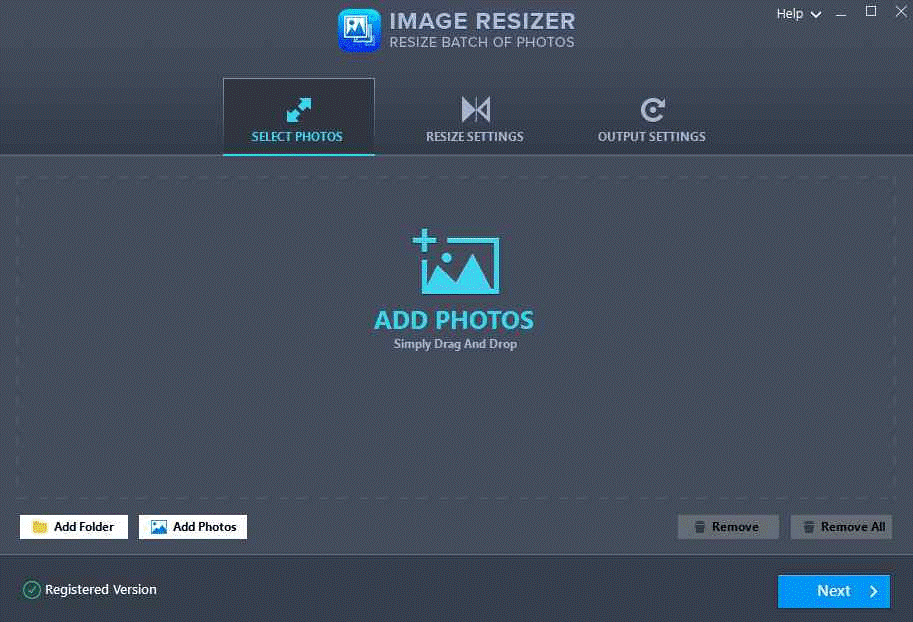
Step 2: Launch the program and click on Add Photos to upload all the photos you want to change.
Step 3: After selecting the images, click the Open button from the right corner.
Step 4: Click on the Next button.
Step 5: From the left pane, click on the Resize button. Select the Predefined Size Ratio option and enter the custom dimensions to resize your selected photos.
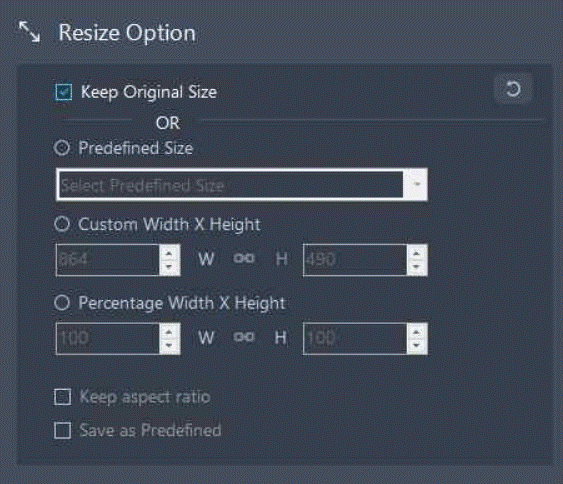
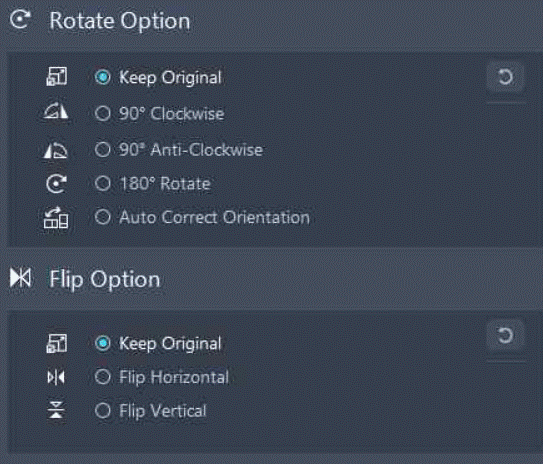
Step 6: Select the Rotate option to change the picture alignment. Next, select the degree of rotation and the Flip option. You can also mirror your photos on a Windows computer.
Step 7: From the right pane, select the Output folder. After that, click on the Process button.
Step 8: Wait for a few minutes to complete the process, and you will get all the same-size photos in no time.
Way 4: Make All Images the Same Size Using Microsoft Word
Yes, that’s right! You can align your photos to the same site using Microsoft Word. This software is not only good for editing text. There are several hidden features that you can use to edit photos in Microsoft Word.
Macros in Word can help you edit and resize your photos. This feature will automate certain tasks that otherwise would have required repeated actions. Here is how you can use Word to resize photos:
Step 1: Open the Word file where you want to align the photo size.
Step 2: Select a photo and click on the View tab from the top menu.
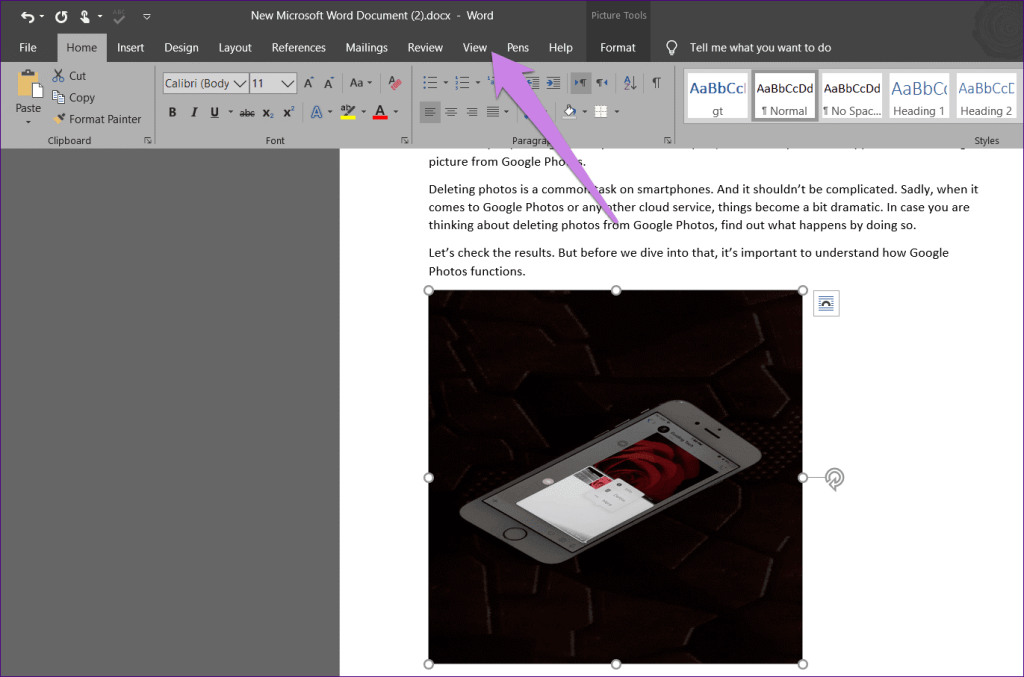
Step 3: Click on Macros.
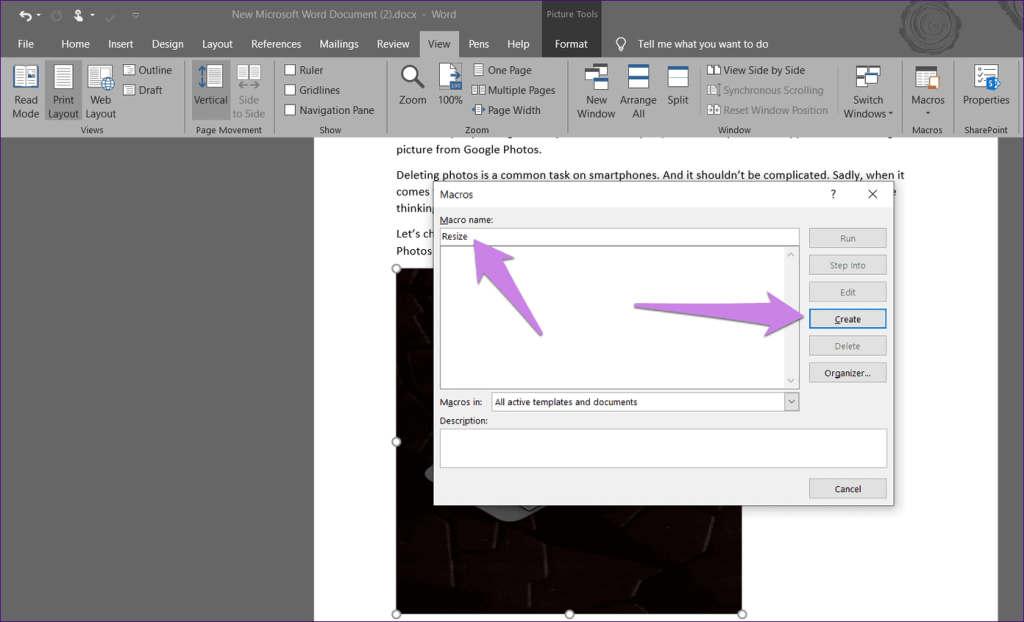
Step 4: A popup window will appear on your screen. Under the Macro name, type a name in the box. Then, click on Create.
Step 5: Now, the Microsoft Visual Basic for Applications window will open on your screen. Select and delete the existing code.
Step 6: If you want to change the height and width of your photos in pixels, you can copy and paste this code into the window:
Sub resize() Dim i As Long With ActiveDocument For i = 1 To .InlineShapes.Count With .InlineShapes(i) .Height = 500 .Width = 600 End With Next i End With End Sub
Use this code if you want to change the size by inches:
Sub resize() Dim i As Long With ActiveDocument For i = 1 To .InlineShapes.Count With .InlineShapes(i) .Height = InchesToPoints(2) .Width = InchesToPoints(2) End With Next i End With End Sub
If you want to scale your images, this code will help you:
Sub resize() Dim i As Long With ActiveDocument For i = 1 To .InlineShapes.Count With .InlineShapes(i) .ScaleHeight = 30 .ScaleWidth = 40 End With Next i End With End Sub
Step 7: Now, close the Microsoft Visual Basic window by clicking on the cross sign.
Step 8: While selecting the image, click on Macros under the View tab.
Step 9: Once the Macros window opens, click on the Run button while selecting the Macros. As soon as you press the button, you will see that all image sizes will change on your screen.
Apart from the Macros, you can also use the Magic Key in Word to change the image sizes. That key is the F4 on Windows and the Y on Mac. Here’s how you can use this method:
Step 1: Open the Word document containing your photos.
Step 2: Right-click on the image and select Size and Position.
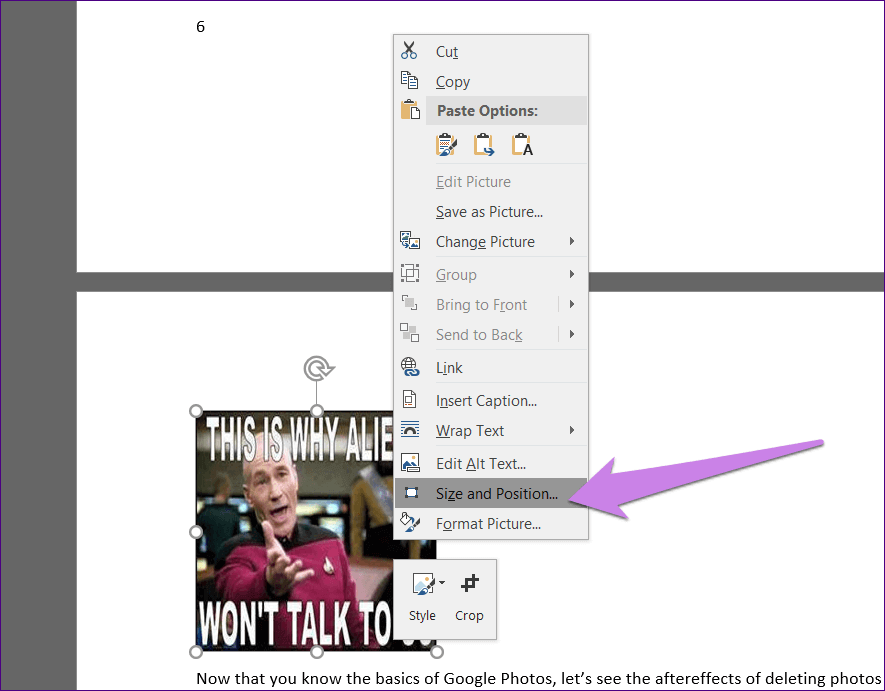
Step 3: The Layout box will pop up, and click on the Size tab. Uncheck the box next to the Lock aspect ratio. Enter the custom height and width dimensions. Click on OK.
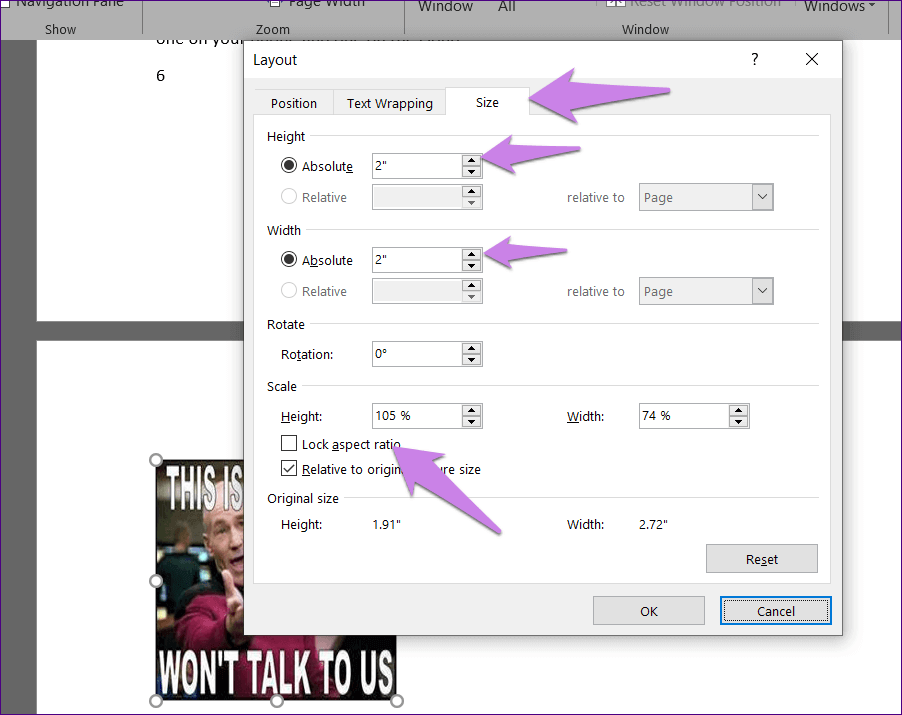
Step 4: You can now see the image size changed to your given dimensions. Click on the images one by one and press F4 or Y keys on them to make all images the same size.
Way 5: Make All Images the Same Size Using BeFunky
BeFunky is a stunning image resizing solution. It allows you to change the picture size you want without losing details or ratio aspects. Furthermore, it can control pixel by pixel. You can get professional quality results with this tool. Here’s how you can resize any image using BeFunky:
Step 1: Download and install the software on your computer.
Step 2: Click on the Open button to upload all the photos you want to change the size of the app.
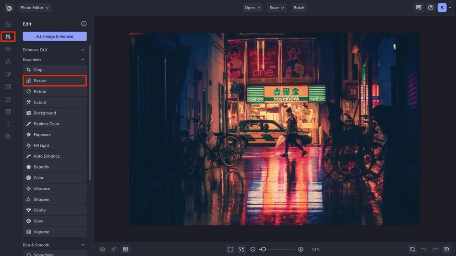
Step 3: Optionally, you can select the Lock Aspect Ratio feature. This feature keeps your photographs’ dimensions proportional to one another. When you increase the height, it will automatically increase the width to adjust the height. This feature will help you create creative images without losing the ratio aspects.
Step 4: Change the pixel dimensions as per your requirements. You can also crop your images before resizing. It can help you better change the pixel size to your desired resolution.
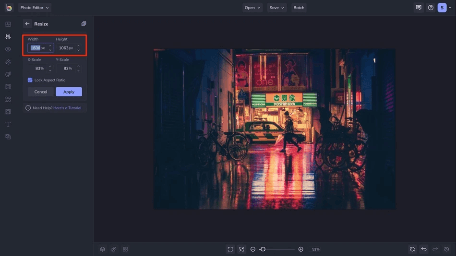
Step 5: Now, hit Enter, and quickly your images will have the same size.
Way 6: How do I make all photos the same size in Photoshop
Here comes another method to make all photos the same size using the Photoshop app. Follow these steps to batch-resize images in Photoshop:
Step 1: Launch Photoshop and make sure that all the images that you need to resize are stored in the same folder. To do so, you can use Photoshop’s Batch feature. Go to “File” > “Automate” > “Batch.” Select the Source folder where your images are located, and choose the Destination for the resized images.
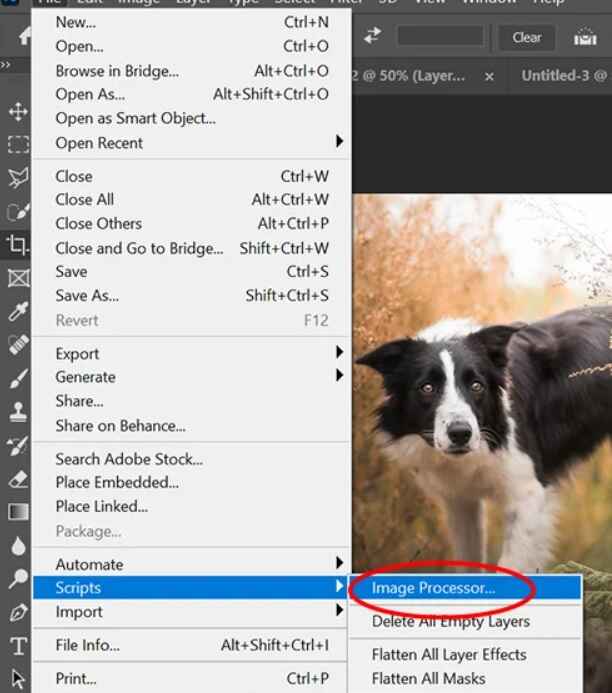
Step 2: Now, select File> Scripts> Image Processor.
Step 3: Select the folder where images are stored.
Step 4: When working with RAW files and planning to resize multiple images, consider editing a single image initially and then applying those edits to the rest. To do this, simply enable the option ‘Open first image to apply settings’ before starting the batch resizing process.
Step 5: Select the folder where the processed images will be stored after being resized.
Step 6: Pick a file type and set the size parameters for resizing. Enter the desired width and height in pixels for your images. You can choose the specific dimensions you want, or you can use a percentage to resize them relative to their original size.
Step 7: And finally, hit on the “Run” button.
The program will take care of the entire process for you, including opening and closing each file automatically.
Way 7: Make Multiple Pics Same Size In CSS
Sure, here’s how to make multiple pictures the same size using CSS:
Step 1: Creating a Class
To get started, we’ll create a special group for these images, which we’ll call `.same-size-img`. This class will help us apply the same size to all the pictures we want.
Step 2: Setting Width and Height
Now, we need to decide how big we want our images to be. Inside the `.same-size-img` class in our CSS file, we’ll set the width and height values.
For example, we can say `width: 300px;` and `height: 200px;` to make them all 300 pixels wide and 200 pixels tall. You can change these numbers to fit your preference.
Step 3: Applying the Class
Next, we’ll head over to our HTML file, where we’ve got our images. Look for the `<img>` tags of the images you want to resize. To make them follow our size rules, we simply add the `same-size-img` class to each `<img>` tag, like this: `<img src=”image.jpg” class=”same-size-img”>`.
That’s it! You can apply this class to as many images as you want to resize.
Step 4: And it’s done
Once you’ve completed these steps, the images with the `same-size-img` class will all conform to the dimensions you set in your CSS. They’ll look super organized and tidy!
Parting Remarks
Size matters! It is important to have all the same size on your document, website, or social media for a better user experience. It will look odd if your images have different dimensions and shapes,
Therefore, you can select the best method to make all the images the same size on your Windows or Mac devices.
That’s it for now! Don’t forget to check out other technical guides on the TC.
Popular Post
Recent Post
How To Adjust Display Appearance Settings Easily in Windows 11/10
Learn to adjust display appearance settings easily Windows offers. Simple guide covers brightness, scaling, resolution & multi-monitor setup for better screen experience.
Supercharge Your Productivity: A Solopreneur’s and SMB’s Guide to Mastering Google Workspace with Gemini’
Picture this. It’s Monday morning. You open your laptop. Email notifications flood your screen. Your to-do list has 47 items. Three clients need proposals by Friday. Your spreadsheet crashed yesterday. The presentation for tomorrow’s meeting is half-finished. Sound familiar? Most small business owners live this reality. They jump between apps. They lose files. They spend […]
9 Quick Tips: How To Optimize Computer Performance
Learn how to optimize computer performance with simple steps. Clean hard drives, remove unused programs, and boost speed. No technical skills needed. Start today!
How To Speed Up My Computer/Laptop Windows 11/10 [2025]
Want to make your computer faster? A slow computer can be really annoying. It takes up your time and makes work more difficult. But with a few easy steps, you can improve your laptop’s speed and make things run more smoothly. Your computer slows down over time. Old files pile up. Programs start with Windows. […]
How To Fix Low Disk Space Error Due To A Full Temp Folder
A low disk space error due to a full temp folder is a common problem. Many users face this issue daily. Your computer stores temporary files in special folders. These files ensure optimal program performance, but they can accumulate as time goes on. When temp folders get full, your system slows down. You might see […]
How to Use Disk Cleanup on This Computer: Step-by-Step Guide
Computers getting slow is just the worst, right? Well, yes! Files pile up on your hard drive. Luckily, the Disk Cleanup tool on your PC is here to save the day. It clears out unnecessary files, giving your system the boost it needs to run smoothly again. A lot of users aren’t aware of the […]
Top 25 Computer Maintenance Tips: Complete Guide [2025]
Computer maintenance tips are vital for every PC user. Without proper PC maintenance, your system will slow down. Files can get lost. Programs may crash often. These computer maintenance tips will help you avoid these problems. Good PC maintenance keeps your computer running fast. It makes your hardware last longer. Regular computer maintenance tips can […]
Reclaiming Disk Space On Windows Without Losing Files: A Complete Guide
Running low on storage can slow down programs and trigger that annoying “low disk space” warning. Files accumulate over time, cluttering the drive. The good news? It’s possible to reclaim space without deleting anything important. Reclaiming disk space on Windows without losing files is easier than you think. Your computer stores many temporary files, old […]
Fix Issues Downloading From the Microsoft Store on Windows 11, 10 PC
Do you get excited when you’re about to download a new app or game? You open the Microsoft Store, click the download button… but nothing happens. Or maybe it starts and then suddenly stops. Sometimes, strange messages pop up like “Something happened on our end” or “Try again later.” That can be really annoying. But […]
Fix Low Disk Space Errors Quickly On Windows 11, 10 PC [2025]
Low disk space errors can slow down your Windows PC. These errors appear when your hard drive runs out of room. Your computer needs space to work properly. When space runs low, programs crash and files won’t save. Windows shows warning messages about low disk space. Your PC may freeze or run slowly. You might […]


