An Informative Guide to Utilize the Built-in Password Manager in Android
Introduction
Most people use more than one profile on different platforms, websites, and apps. For each, they use specific IDs and passwords. For the best safety, it is better to have multiple passwords for various accounts, but that can get confusing to remember for many people.
In this context, you can access the in-built Android Password Manager that is available for free to all Android users. One can conveniently store all passwords of their accounts with strong encryption protection and sign in from any location.
Reasons to Use a Password Manager
A password manager is a vital tool for online-based users to ensure strong safety and privacy for their users across multiple platforms. They are valuable to use to protect passwords for different services and apps overall. There are specific benefits of this software type.
- You can access all passwords from different accounts on one secure platform.
- The software also generates new and unique passwords.
- Flexibility with the number of passwords one can save in the storage.
- It is accessible through one master password that the user sets with their preferred email ID.
- Encryption protection for all login information.
- It is useful for storing miscellaneous data like bank account details, notes, etc.
Ways to Use The Built-in Password Manager Android Free
One can use different sequences to utilize the pre-set password manager on Android devices. It has simple usability and is free for all users, allowing all to save multiple passwords with some taps. We tested out the Password manager Android free tool for specific uses and checked the ease of the process. Here are the processes you have to follow.
Solution 1: Enable the Google Password Manager function on an Android device.
Before getting any benefits related to usability through the Android password manager settings, you should activate the built-in password manager first. There are specific steps one can handle to switch their Google-based Password Manager on.
How to do this?
Step 1: Open the Android device you are using and access the Settings tab.
Step 2: Under this section, open the Privacy tab.
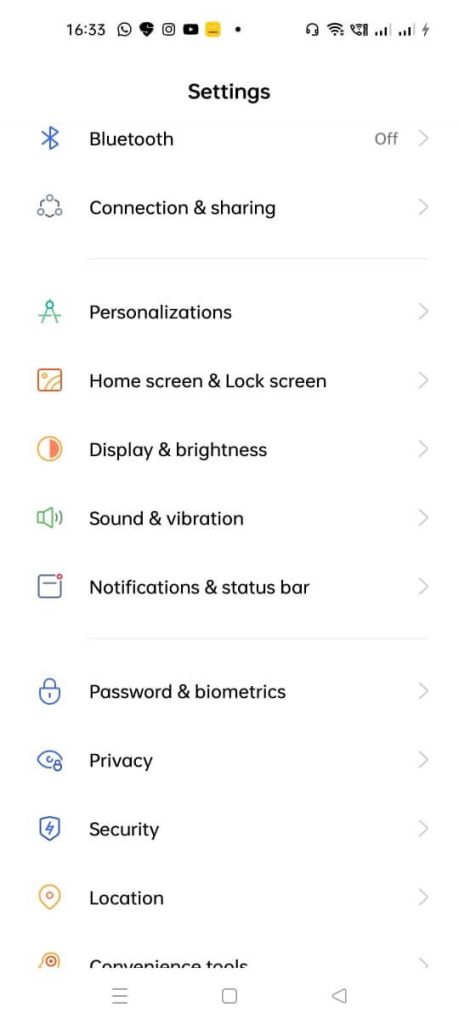
Then, click on the “Autofill services from Google” option. Alternatively, you can utilize the search bar through the menu to type the keyword Autofill and click on it.
To note, on some Android devices, the sequence of action would be Settings > Privacy > Advanced > Autofill services from Google.
So, consider your device model- the steps can differ for some users slightly.
Step 3: Switch the “Use Autofill with Google” setting on.
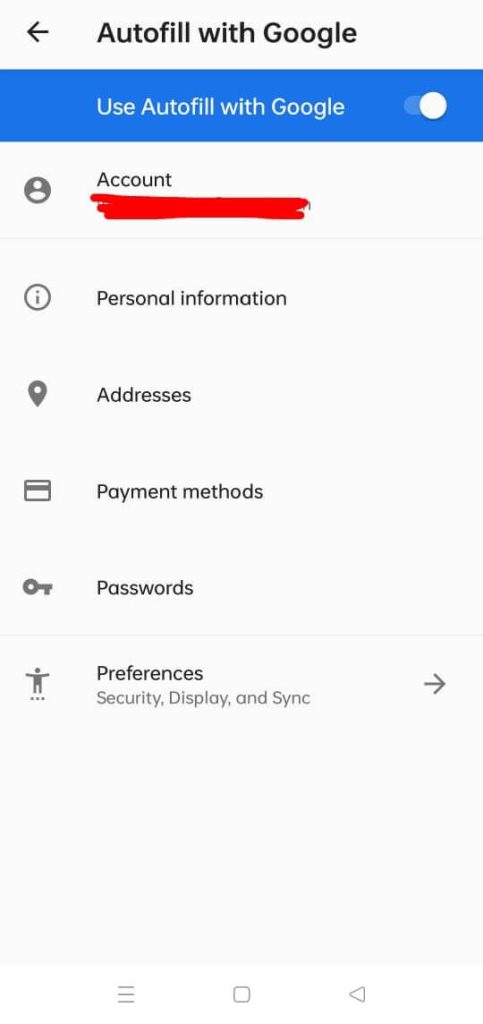
Step 4: Check that you are logged into the right account and open the Passwords section through this menu. Then, open Password Manager. On some devices, this section is available under the Privacy tab.
Step 5: Click on the Settings icon (gear-shaped button) at the upper-right side of the page.
Step 6: Then, toggle the settings for “Offer to save passwords” to the ON setting if you want the device to store all login details.
Keep in mind that this saved passwords listing is applicable when you visit sites and save the passwords through the Google Chrome browser, not other browsers. Typically, they have their own settings for Password manager Android free benefits.
Solution 2: Gain Access to Google Password Manager’s Saved Passwords
After activating the Google Password Manager account through Google, users can look for, edit, and view all saved passwords as necessary. There are steps available to access the Password Manager through the google website.
How to do this?
Step 1: Open the site link: passwords.google.com.
Step 2: Find all necessary login details for Google-based account(s) here.
Step 3: Launch the Google account. You have to add all the necessary information through your device.
Step 4: Open the Security section and click on the Password Manager button.
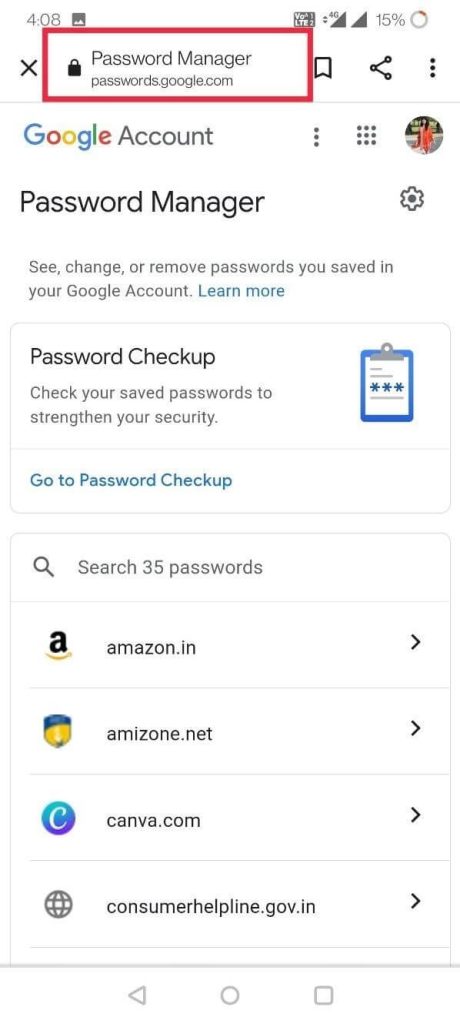
Step 5: The list of passwords will appear on the next page. Click on Password Checkup for password quality verification.
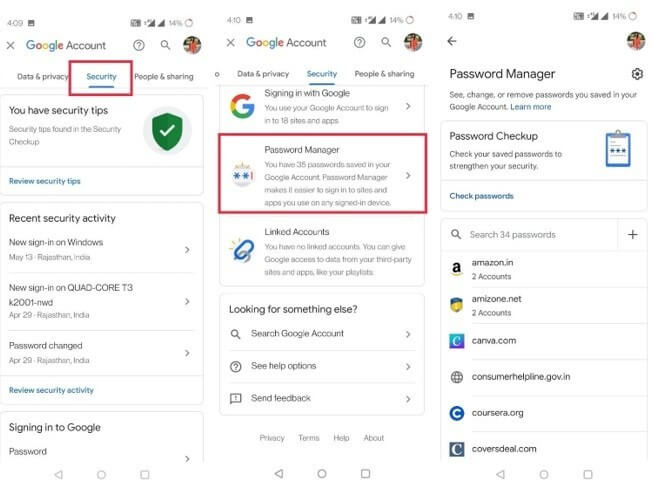
Solution 3: Manage the Auto Sign-in Settings via Google Password Manager
You access the Android password manager settings to set up automatic sign-in actions to apps and sites through the Google Password Manager. This improves the usability experience for Android users. To note, some steps of this use can differ as per the Settings navigations setup for different Android models. The sequence mentioned here is general for most Android OS devices.
How to do this?
Step 1: Get your Android device and go to Settings.
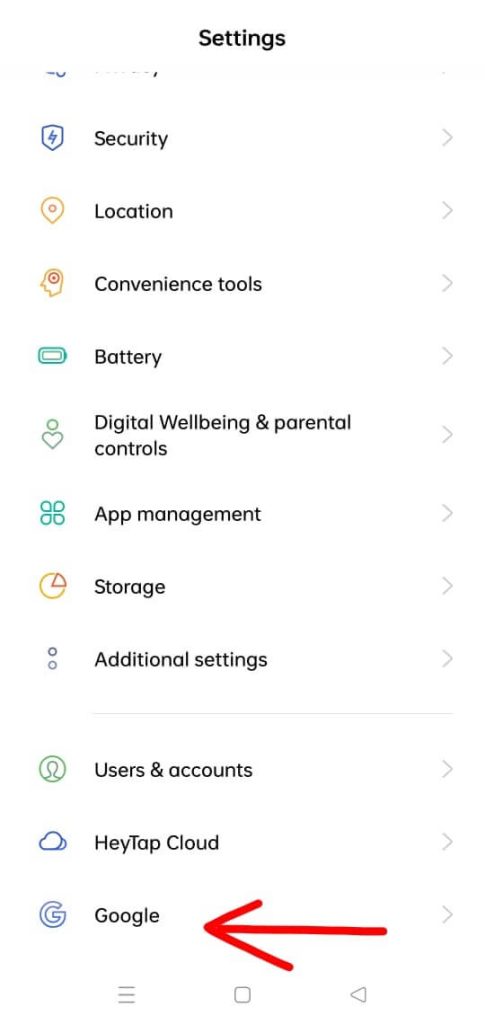
Step 2: Scroll down the menu and click on the Google tab.
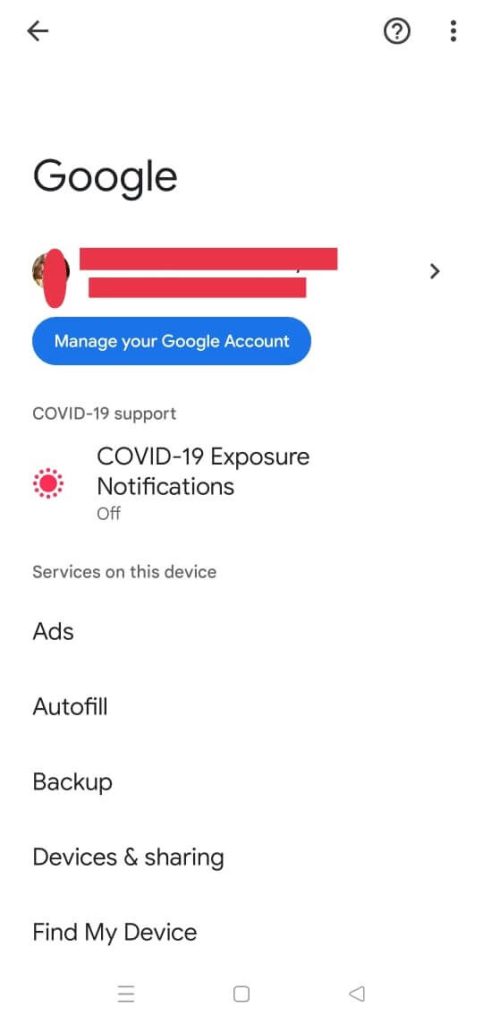
Step 3: When the next page opens, click on the “Manage your Google Account” option.
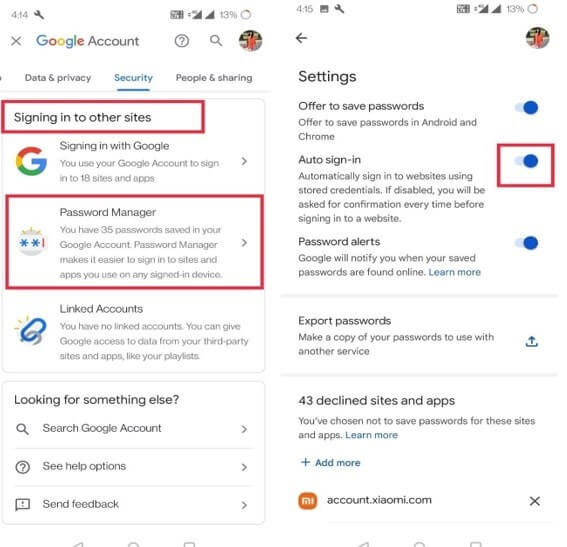
Step 4: In the next window, press on the Security tab.
Step 5: Find the “Signing into other sites” choice section. Find the Password Manager option and disable/enable the Auto sign-in settings.
Solution 4: Handle the Security Checkup for passwords
The Password Manager Android free allows users to evaluate the strength level of their passwords. For this, you should have your Google account active, like for the other processes.
How to do this?
Step 1: Open the Settings app on your Android device and click on the Privacy option.
Step 2: Then, open the Autofill Service from the Google tab. This would come up in the Advanced menu through the Privacy tab on some devices.
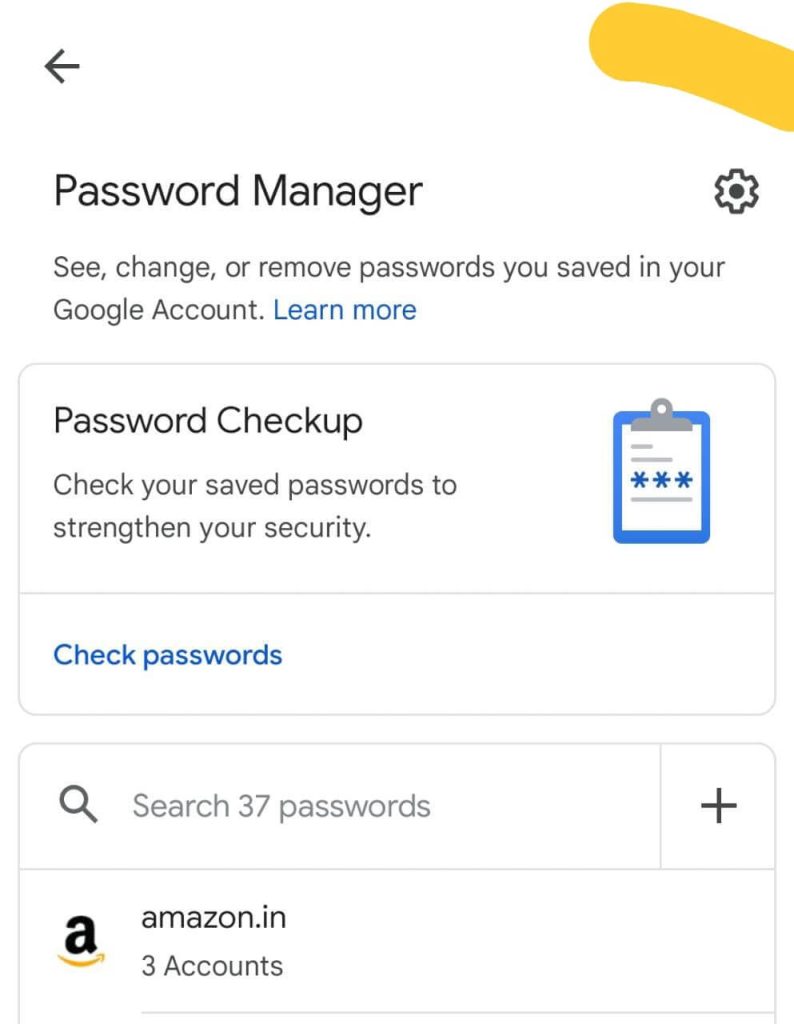
Step 3: Access the Passwords menu and choose the “Check Passwords” option under the Password Checkup section.
Solution 5: Export your password data via Google Password Manager
Users can access the Google Password manager Android free software through their device to export their data. The steps are useful for developing a specialized file for all password data that users can add to another app. Or, one can save it as an offline backup for password details.
How to do this?
Step 1: Open the Settings menu through your device and access the Privacy section.
Step 2: Click on the Autofill service from the Google option.
Step 3: Go to Passwords > Settings.
Step 4: Under the next menu, you will find the “Export passwords” button. Click on it.
Alternative: Use a Third-Party Password Manager like NordPass
While the Google Password Manager is useful for Android users, it is not the safest or most versatile option for password creation and management. Instead, you can use a high-quality, specialized password manager app like NordPass, developed under NordVPN for optimized usage. You can sync multiple devices and apps for comprehensive password storage and generate unique and secure passwords.
You can access the app or directly through the browser, regardless of device type. It includes one-click password protection in the Web Vault section. Users can also use this app offline and save more than their password information securely.
Conclusion
Overall, using, saving, and accessing multiple passwords is easier to handle using the in-built password manager in Android phones. You need to have an active Google account, save or find passwords, activate auto-signing on different websites, and even export all passwords. For additional benefits, download a more robust password manager software, like NordPass.
If you have other queries regarding this, read our other posts or leave a comment.
Popular Post
Recent Post
How To Adjust Display Appearance Settings Easily in Windows 11/10
Learn to adjust display appearance settings easily Windows offers. Simple guide covers brightness, scaling, resolution & multi-monitor setup for better screen experience.
Supercharge Your Productivity: A Solopreneur’s and SMB’s Guide to Mastering Google Workspace with Gemini’
Picture this. It’s Monday morning. You open your laptop. Email notifications flood your screen. Your to-do list has 47 items. Three clients need proposals by Friday. Your spreadsheet crashed yesterday. The presentation for tomorrow’s meeting is half-finished. Sound familiar? Most small business owners live this reality. They jump between apps. They lose files. They spend […]
9 Quick Tips: How To Optimize Computer Performance
Learn how to optimize computer performance with simple steps. Clean hard drives, remove unused programs, and boost speed. No technical skills needed. Start today!
How To Speed Up My Computer/Laptop Windows 11/10 [2025]
Want to make your computer faster? A slow computer can be really annoying. It takes up your time and makes work more difficult. But with a few easy steps, you can improve your laptop’s speed and make things run more smoothly. Your computer slows down over time. Old files pile up. Programs start with Windows. […]
How To Fix Low Disk Space Error Due To A Full Temp Folder
A low disk space error due to a full temp folder is a common problem. Many users face this issue daily. Your computer stores temporary files in special folders. These files ensure optimal program performance, but they can accumulate as time goes on. When temp folders get full, your system slows down. You might see […]
How to Use Disk Cleanup on This Computer: Step-by-Step Guide
Computers getting slow is just the worst, right? Well, yes! Files pile up on your hard drive. Luckily, the Disk Cleanup tool on your PC is here to save the day. It clears out unnecessary files, giving your system the boost it needs to run smoothly again. A lot of users aren’t aware of the […]
Top 25 Computer Maintenance Tips: Complete Guide [2025]
Computer maintenance tips are vital for every PC user. Without proper PC maintenance, your system will slow down. Files can get lost. Programs may crash often. These computer maintenance tips will help you avoid these problems. Good PC maintenance keeps your computer running fast. It makes your hardware last longer. Regular computer maintenance tips can […]
Reclaiming Disk Space On Windows Without Losing Files: A Complete Guide
Running low on storage can slow down programs and trigger that annoying “low disk space” warning. Files accumulate over time, cluttering the drive. The good news? It’s possible to reclaim space without deleting anything important. Reclaiming disk space on Windows without losing files is easier than you think. Your computer stores many temporary files, old […]
Fix Issues Downloading From the Microsoft Store on Windows 11, 10 PC
Do you get excited when you’re about to download a new app or game? You open the Microsoft Store, click the download button… but nothing happens. Or maybe it starts and then suddenly stops. Sometimes, strange messages pop up like “Something happened on our end” or “Try again later.” That can be really annoying. But […]
Fix Low Disk Space Errors Quickly On Windows 11, 10 PC [2025]
Low disk space errors can slow down your Windows PC. These errors appear when your hard drive runs out of room. Your computer needs space to work properly. When space runs low, programs crash and files won’t save. Windows shows warning messages about low disk space. Your PC may freeze or run slowly. You might […]


