Windows 11 Disk Management: Complete Guide [2025]
Windows 11 comes with many built-in tools. One key tool is Windows 11 Disk Management. This tool helps you control your hard drives and storage. It’s free and already installed on your computer.
Many users don’t know about this feature. But it can solve many storage problems. You can create new drives, resize them, and fix issues. The tool works with all types of storage devices. This includes hard drives, SSDs, and USB drives.
Get ready to master disk management from the ground up. This guide breaks down what it is, why it matters, and how to make the most of it. You’ll explore both essential tools and advanced capabilities. By the time we’re through, you’ll have the know-how to optimize your system and keep everything running smoothly.
Part 1: What is Windows 11 Disk Management?
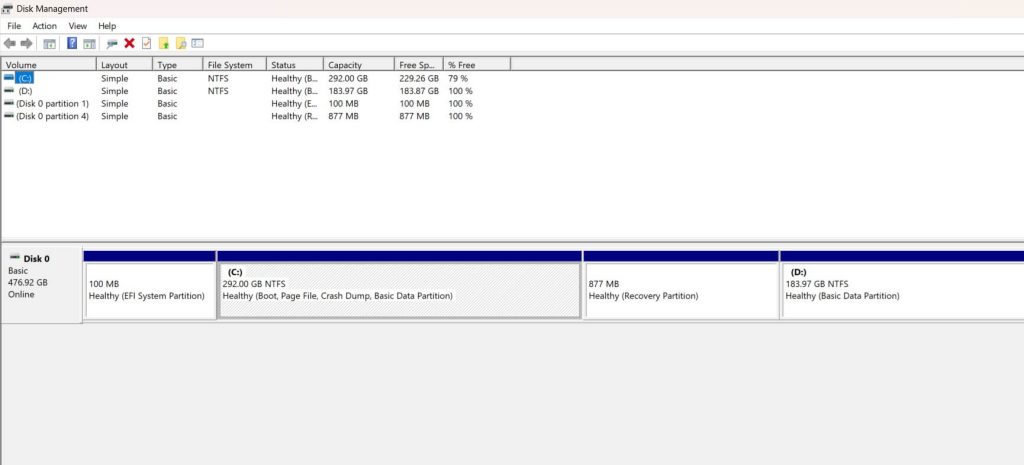
Windows 11 Disk Management is a built-in utility. It lets you manage your computer’s storage devices. You can view all your drives in one place.
The tool shows your hard drives, SSDs, and USB drives. You can see how much space each one has. It also shows which drives are active or inactive.
Key Features
Windows 11 Disk Management offers many useful features. These tools help you manage storage better:
- View all storage devices – See every drive connected to your computer in one window
- Create new partitions – Split large drives into smaller, manageable sections
- Delete old partitions – Remove partitions you no longer need to free up space
- Resize existing drives – Resize partitions safely without risking your data.
- Change drive letters – Assign custom letters like D:, E:, or F: to your drives
- Format drives – Prepare new drives for use or clean existing ones completely
- Check drive health – Monitor your drives for errors and potential problems
- Convert disk types – Change between different partition styles when needed
- Set active partitions – Choose which partition your computer boots from
- Assign mount points – Create folder-based access to drives instead of letters
Part 2: Why Use Disk Management on Windows 11
Disk management on Windows 11 offers many benefits. It gives you full control over your storage space. Here’s why you should use it:
- Organize your storage better – Split large drives into smaller ones for different purposes like games, work files, and personal documents
- Fix storage problems – Solve issues with drives that won’t show up, work properly, or are recognized by Windows
- Prepare new drives – Set up brand new hard drives or SSDs before using them by creating partitions and formatting
- Free up space – Remove old partitions you no longer need and combine space from different areas
- Change drive letters – Give your drives easy-to-remember names like D: for Data or G: for Games
- Create recovery partitions – Make backup areas to store important system files and recovery tools
- Convert file systems – Change between different storage formats like NTFS, FAT32, or exFAT when needed
- Monitor drive health – Check if your drives are working properly and catch problems before they cause data loss.
Part 3: How to Use Disk Management on Windows 11
Opening Disk Management
There are several ways to open Windows 11 Disk Management:
Method 1: Right-click Start Button
- Right-click the Start button. Select “Disk Management” from the menu.
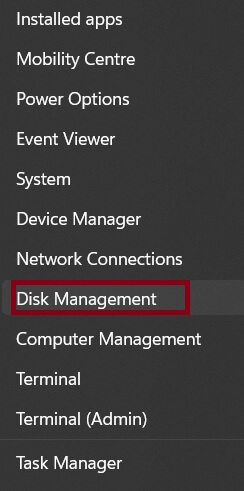
- Wait for the tool to load.
Method 2: Run Command
- Press Windows key + R. Type “diskmgmt.msc”.
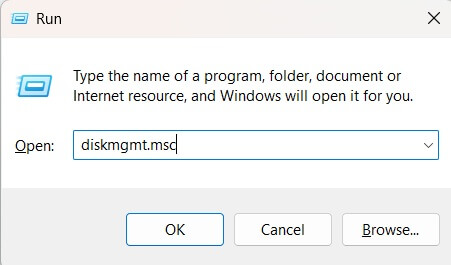
- Press Enter.
Creating a New Partition
Creating new partitions is one of the most useful features in Windows 11 Disk Management. A partition is like splitting one big drive into smaller sections. Each section acts like a separate drive with its own letter.
- Right-click on unallocated space. Select “New Simple Volume”. Follow the wizard steps.
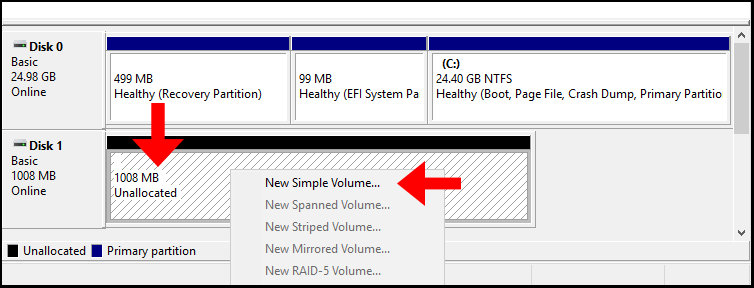
- Choose a partition size. Assign a drive letter. Format the partition. Click Finish.
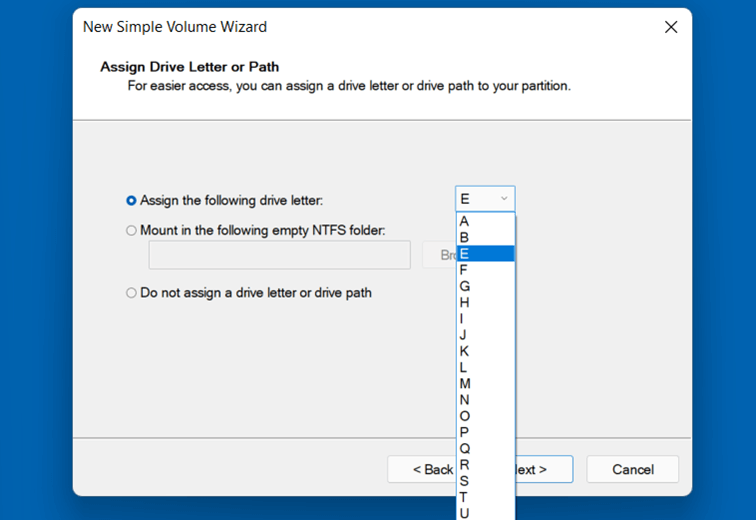
Resizing a Partition
Sometimes you need more space on one drive and less on another. Resizing partitions lets you move space around without losing data.
In Windows 11 Disk Management, you have two options for adjusting partition size: shrink a partition to reduce its size and free up space, or extend a partition by using existing unallocated space to make it larger.
- Right-click the partition you want to resize. Select “Shrink Volume”.
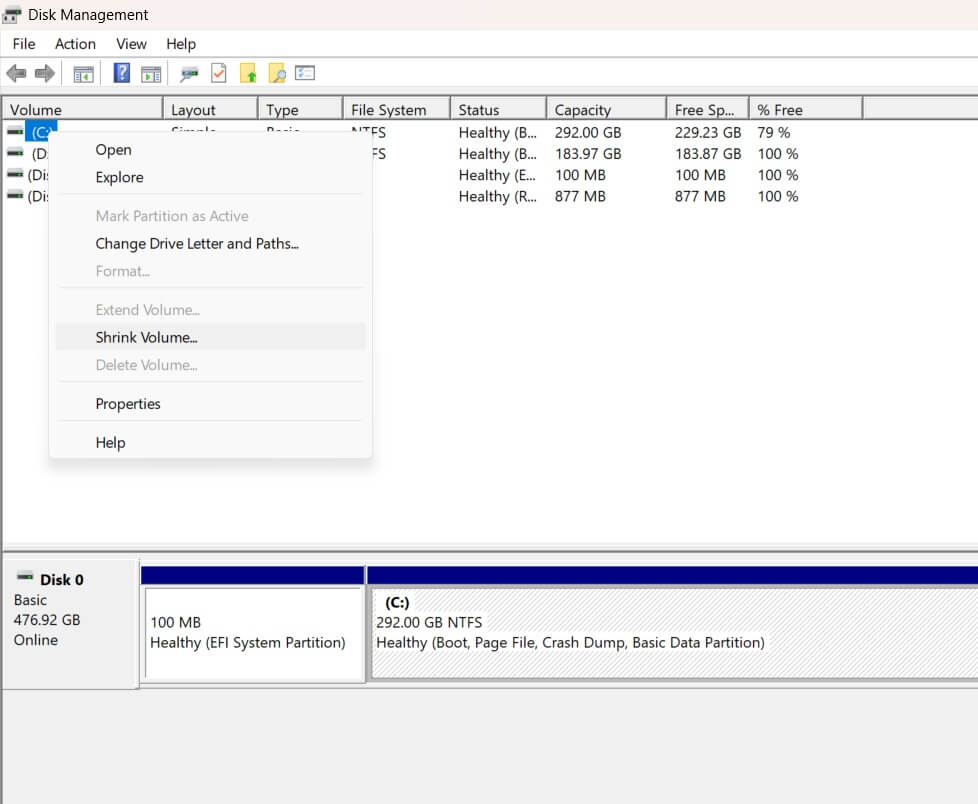
- Or select “Extend Volume” to make it bigger. Enter the amount of space to change. Click OK to apply changes.
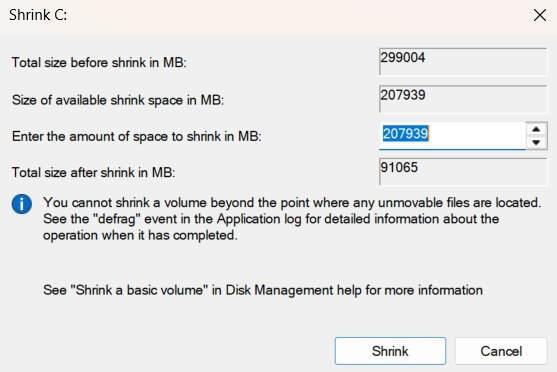
Deleting a Partition
Deleting partitions removes them completely from your drive. This creates unallocated space that you can use for new partitions. But be very careful with this feature.
When you delete a partition, all data on it is lost forever. Only delete partitions you’re sure you don’t need anymore.
- Back up any important data first. Right-click the partition. Select “Delete Volume”.
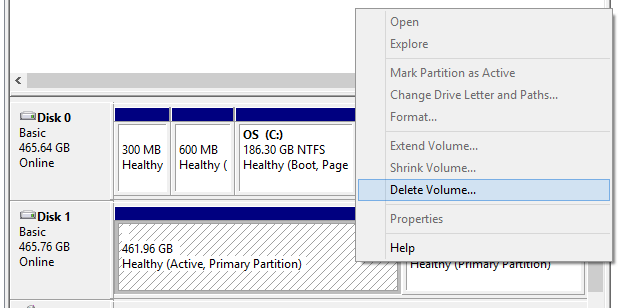
- Confirm the deletion. The space becomes unallocated.
Changing Drive Letters
Drive letters are the letters assigned to your partitions like C:, D:, or E:. Sometimes you want to change these letters for better organization. Maybe you want your games drive to be G: for “Games.”
Changing drive letters in Windows 11 Disk Management is straightforward—you can choose any available letter from A to Z. However, it’s best to leave the C: drive untouched, as altering it may lead to system issues.
- Right-click the drive.Select “Change Drive Letter and Paths“. Click “Change”.
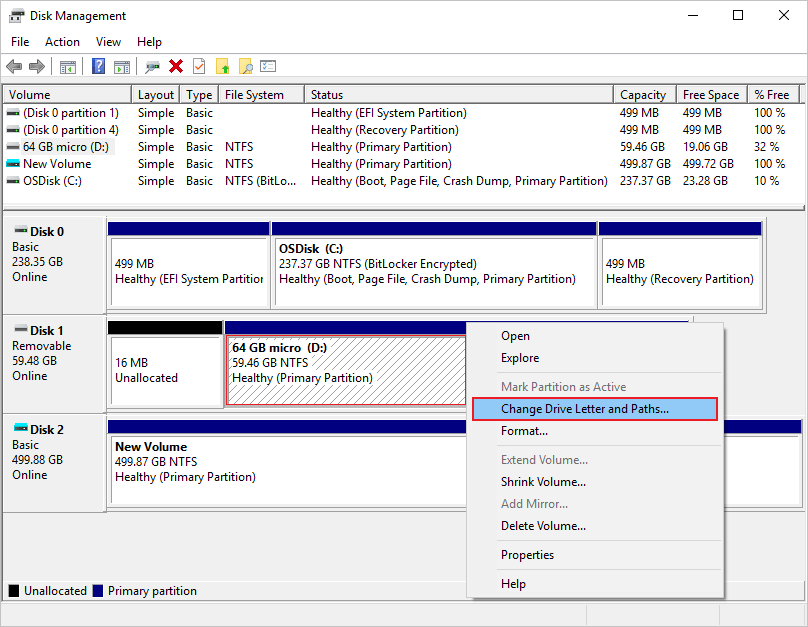
- Pick a new letter. Click OK
Part 4: Pro Tips to Make the Most of Disk Management on Windows 11
Windows 11 Disk Management has many advanced features. These tips will help you use it like a pro. Following these suggestions will keep your system running smoothly. You’ll avoid common mistakes that can cause problems.
- Always backup data first – Before making any changes, save your important files elsewhere to prevent data loss during operations
- Use NTFS for Windows drives – This file system works best with Windows and supports large files, better security, and advanced features
- Keep some unallocated space – Leave 10-15% of your drive empty for better performance, temporary files, and future expansion needs
- Name your partitions clearly – Use descriptive labels like “Games,” “Work Files,” or “Media” so you know what’s stored where
- Check drive health regularly – Look for error messages, warnings, or unusual behavior that might indicate hardware problems developing
- Don’t delete system partitions – Avoid removing partitions marked as “System,” “Boot,” or “Recovery” as these are needed for Windows to work
- Use quick format for speed – Choose quick format when formatting drives unless you suspect hardware problems or need secure erasure
- Convert to GPT for large drives – Use GPT partition style for drives over 2TB to access all available space and get better reliability
Advanced Troubleshooting Tips
Sometimes disk management operations don’t work as expected. Here are solutions for common problems:
- Partition won’t extend – Make sure unallocated space is directly adjacent to the partition you want to extend
- Can’t shrink partition – Defragment the drive first, then disable virtual memory and system restore temporarily
- Drive letter won’t change – Close all programs using that drive, then try again or restart your computer first
- New drive doesn’t appear – Check if the drive is initialized in Disk Management, initialize it if needed
- Format fails – Run the CHKDSK command first to fix any file system errors, then try formatting again
- Partition shows as RAW – The file system is corrupted, you may need data recovery software before reformatting
- Can’t delete partition – Make sure no programs are using files on that partition, close everything, and try again
- Disk shows as offline – Right-click the disk and select “Online” to activate it for use
Part 5: Understanding Disk Management Interface
The Windows 11 Disk Management interface shows lots of information. Understanding what you see helps you make better decisions. The main window has two sections. The top shows a list view. The bottom shows a graphical view.
Reading the Display
Each drive appears as a horizontal bar. Different colors mean different things. Blue sections are primary partitions. Green sections are logical drives. Black sections are unallocated space. Red sections indicate problems.
The list view shows detailed information. You can see drive letters, file systems, and status. The size column shows total capacity. The free space column shows available space. Status tells you if the drive is healthy.
Partition Types Explained
Primary partitions can boot operating systems. You can have up to four primary partitions on MBR disks. Extended partitions contain logical drives. Logical drives act like separate partitions. GPT disks don’t have these limitations.
System partitions contain boot files. Boot partitions contain Windows files. Recovery partitions store repair tools. EFI partitions manage modern boot processes. Don’t delete these special partitions.
Part 6: Safety and Best Practices
Working with disk management requires careful attention. One wrong click can delete important data. Following safety rules protects your files. Always think twice before making changes.
Before You Start
Create backups of important files. Make sure you have installation media ready. Write down current drive letters and sizes. Take screenshots of your current setup. This information helps if something goes wrong.
Check available space on other drives. Make sure Windows has enough space to work. Close all running programs. This prevents conflicts during operations. Restart your computer if it’s been running for days.
During Operations
Don’t interrupt disk operations once started. Stopping them can corrupt data. Don’t use the computer for other tasks. Focus on the disk management work. Watch for error messages or warnings.
Save your work in other programs first. Disk operations can sometimes require restarts. Make sure your computer has stable power. Use a UPS if possible. Avoid doing disk work during storms.
After Operations
Check that everything works correctly. Open each drive to test access. Verify that programs still run properly. Update any shortcuts that use old drive letters. Install programs may need reinstalling if paths changed.
Monitor drive health in the following days. Watch for unusual noises or slow performance. Run disk check utilities if you notice problems. Consider the operation successful only after several days of normal use.
Conclusion
Windows 11 Disk Management is a powerful tool. It gives you complete control over your storage. You can organize drives, fix problems, and optimize performance. The tool handles most storage tasks perfectly. Best of all, it’s completely free.
The tool is safe when used correctly. Take time to understand what you’re doing. Always backup important data first. Read warnings carefully before confirming actions. Practice on test drives when possible. Start with simple operations and work up to complex ones.
Start using disk management on Windows 11 today. Practice the basic operations first. Create test partitions to experiment safely. Soon you’ll handle all storage tasks with confidence. Your computer will run better and stay organized. You’ll solve storage problems without expensive software.
FAQs
Is Windows 11 Disk Management safe to use?
Yes, Windows 11 Disk Management is completely safe when used correctly. It’s Microsoft’s official tool for managing storage and has been tested extensively. The tool includes built-in safeguards to prevent accidental system damage. Just be careful not to delete important system partitions and always backup your data before making major changes. Follow the warning messages and you’ll avoid problems.
Can I undo changes made in Disk Management?
Most changes in disk management on Windows 11 cannot be undone easily. Formatting and deleting partitions permanently remove data and partition structures. However, you can recreate partitions and restore data from backups if you prepared properly. Some operations like changing drive letters can be reversed immediately. Always double-check before confirming any destructive changes and maintain good backups.
What’s the difference between Disk Management and third-party tools?
Windows 11 Disk Management covers all basic storage tasks for free and integrates perfectly with the operating system. Third-party tools often offer more advanced features like partition recovery, disk cloning, better resizing algorithms, and data rescue capabilities. Some can resize partitions without data loss in situations where Disk Management cannot. For most users, the built-in tool is sufficient for everyday needs and maintenance tasks.
Popular Post
Recent Post
Supercharge Your Productivity: A Solopreneur’s and SMB’s Guide to Mastering Google Workspace with Gemini’
Picture this. It’s Monday morning. You open your laptop. Email notifications flood your screen. Your to-do list has 47 items. Three clients need proposals by Friday. Your spreadsheet crashed yesterday. The presentation for tomorrow’s meeting is half-finished. Sound familiar? Most small business owners live this reality. They jump between apps. They lose files. They spend […]
9 Quick Tips: How To Optimize Computer Performance
Learn how to optimize computer performance with simple steps. Clean hard drives, remove unused programs, and boost speed. No technical skills needed. Start today!
How To Speed Up My Computer/Laptop Windows 11/10 [2025]
Want to make your computer faster? A slow computer can be really annoying. It takes up your time and makes work more difficult. But with a few easy steps, you can improve your laptop’s speed and make things run more smoothly. Your computer slows down over time. Old files pile up. Programs start with Windows. […]
How To Fix Low Disk Space Error Due To A Full Temp Folder
A low disk space error due to a full temp folder is a common problem. Many users face this issue daily. Your computer stores temporary files in special folders. These files ensure optimal program performance, but they can accumulate as time goes on. When temp folders get full, your system slows down. You might see […]
How to Use Disk Cleanup on This Computer: Step-by-Step Guide
Computers getting slow is just the worst, right? Well, yes! Files pile up on your hard drive. Luckily, the Disk Cleanup tool on your PC is here to save the day. It clears out unnecessary files, giving your system the boost it needs to run smoothly again. A lot of users aren’t aware of the […]
Top 25 Computer Maintenance Tips: Complete Guide [2025]
Computer maintenance tips are vital for every PC user. Without proper PC maintenance, your system will slow down. Files can get lost. Programs may crash often. These computer maintenance tips will help you avoid these problems. Good PC maintenance keeps your computer running fast. It makes your hardware last longer. Regular computer maintenance tips can […]
Reclaiming Disk Space On Windows Without Losing Files: A Complete Guide
Running low on storage can slow down programs and trigger that annoying “low disk space” warning. Files accumulate over time, cluttering the drive. The good news? It’s possible to reclaim space without deleting anything important. Reclaiming disk space on Windows without losing files is easier than you think. Your computer stores many temporary files, old […]
Fix Issues Downloading From the Microsoft Store on Windows 11, 10 PC
Do you get excited when you’re about to download a new app or game? You open the Microsoft Store, click the download button… but nothing happens. Or maybe it starts and then suddenly stops. Sometimes, strange messages pop up like “Something happened on our end” or “Try again later.” That can be really annoying. But […]
Fix Low Disk Space Errors Quickly On Windows 11, 10 PC [2025]
Low disk space errors can slow down your Windows PC. These errors appear when your hard drive runs out of room. Your computer needs space to work properly. When space runs low, programs crash and files won’t save. Windows shows warning messages about low disk space. Your PC may freeze or run slowly. You might […]
How To Uninstall Software From My Computer: Complete Guide [2025]
Learning how to uninstall software from my computer is a key skill. Every PC user needs to know this. Old programs take up space. They slow down your system. Unused software creates clutter. When you remove a program from computer, you free up storage. Your PC runs faster. You also fix issues caused by bad […]


